Manual rules#
Introduction#
Manager 1.3.0 adds Manual Rules for FlowSpec filtering and blackholing. Use them when you want to configure a rule yourself, independently of automatic attack thresholds.
Automatic detection remains configured under Detection and filtering, and automatic blackholing under Blackholing.
Prerequisites and permissions#
Use Manager 1.3.0 with Analyser 1.3.1 or newer. Configure BGP sessions for the address family and rule type you intend to announce: FlowSpec for filtering, or unicast for blackholing. For selective blackholing, configure Upstreams as well.
Administrator and SuperOperator can create, edit, enable, disable, and delete manual rules across all prefixes.
Operator can view and edit manual rules within assigned prefixes, including their Enabled state. Creation and deletion require additional permissions.
Viewer has read-only access within assigned prefixes by default. An Administrator can grant additional Create or Delete permissions.
The Manual rules permissions are configured under Preferences > Users > Edit user. They apply to both manual Filtering and Blackholing rules. See Additional permissions.
For scoped accounts, a filtering rule’s Destination or a blackholing rule’s Prefix must fall entirely within an assigned prefix. Rules outside that scope are hidden. The scope field is locked when a scoped user edits a rule. A SuperOperator must provide a Destination when creating a filtering rule; only an Administrator can create one without a Destination.
Important
Saving a rule queues a configuration change. An Administrator must click Apply in the sidebar under Configuration changes pending to send it to Analyser. SuperOperators and Operators do not have this Apply control. This also applies to disabling or deleting a rule.
Manual filtering#
Open Manual Rules > Filtering, then click “+” to create a FlowSpec rule.
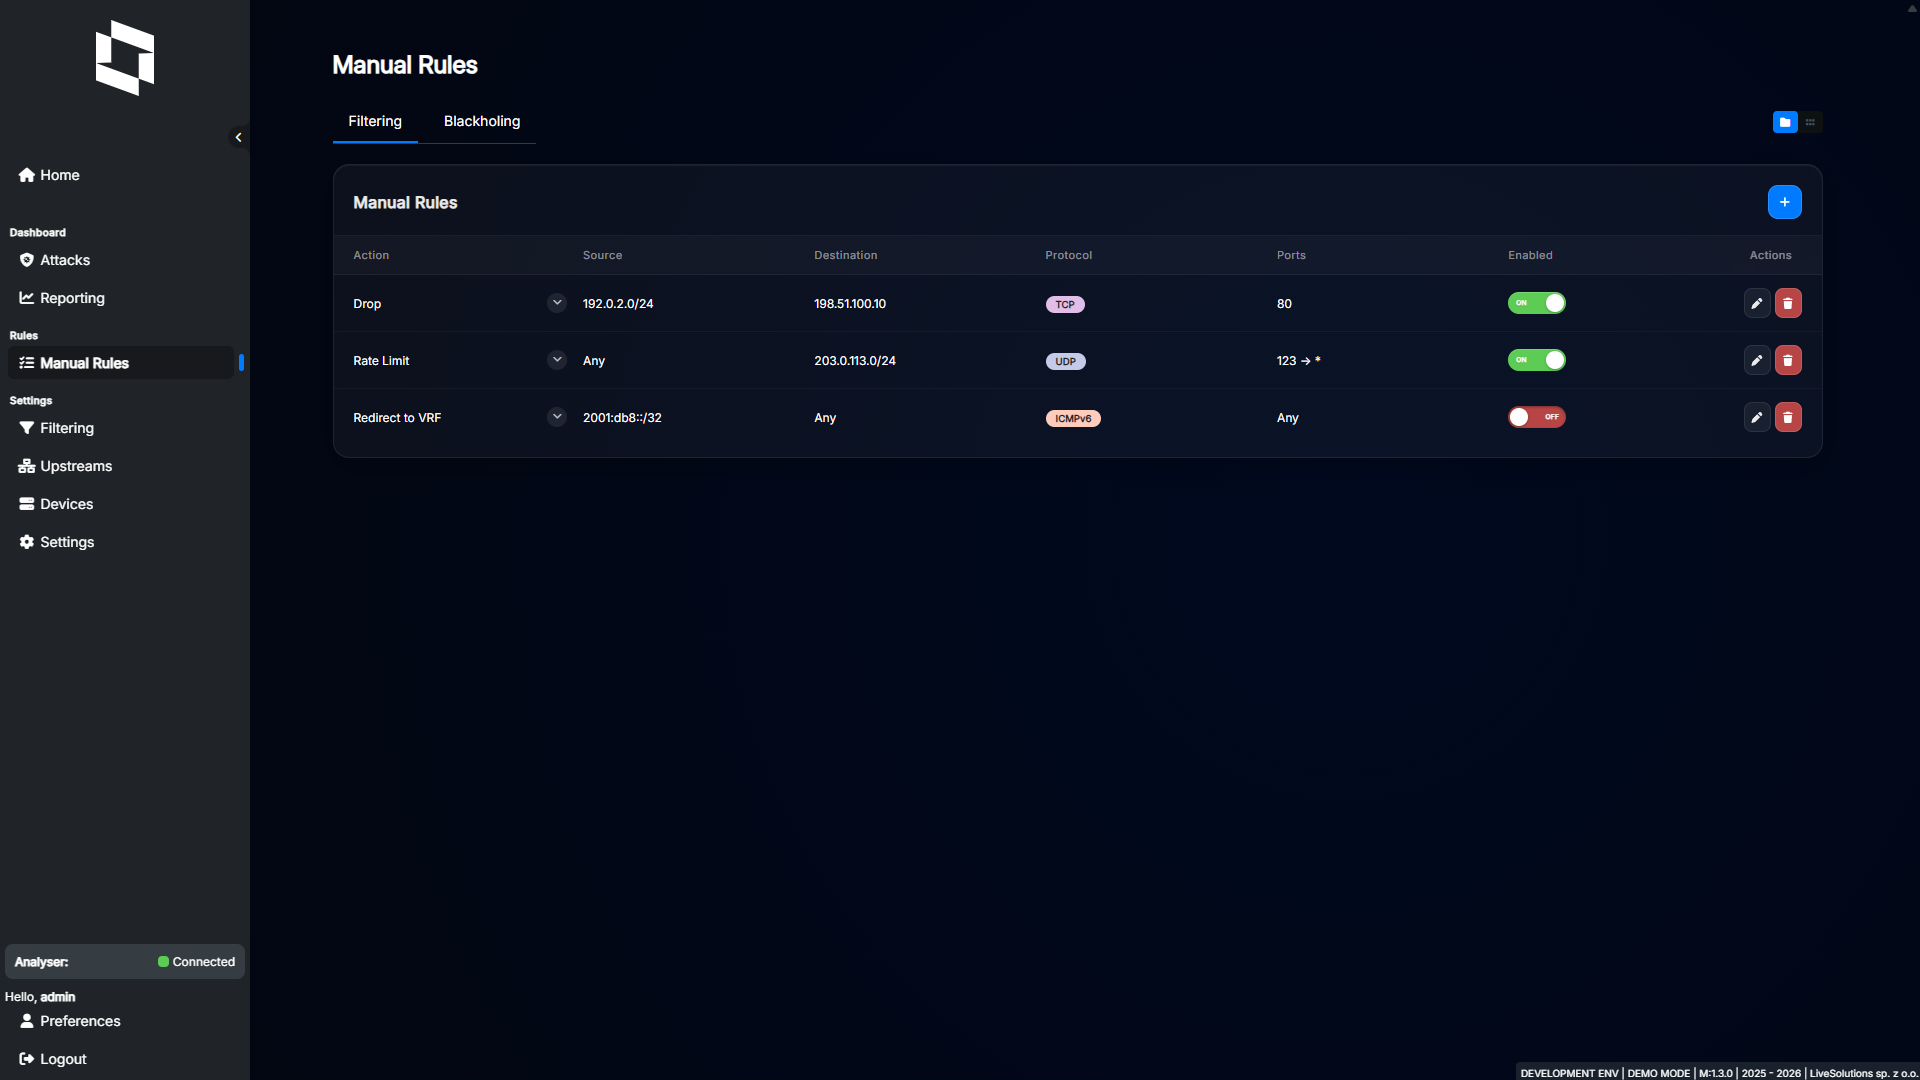
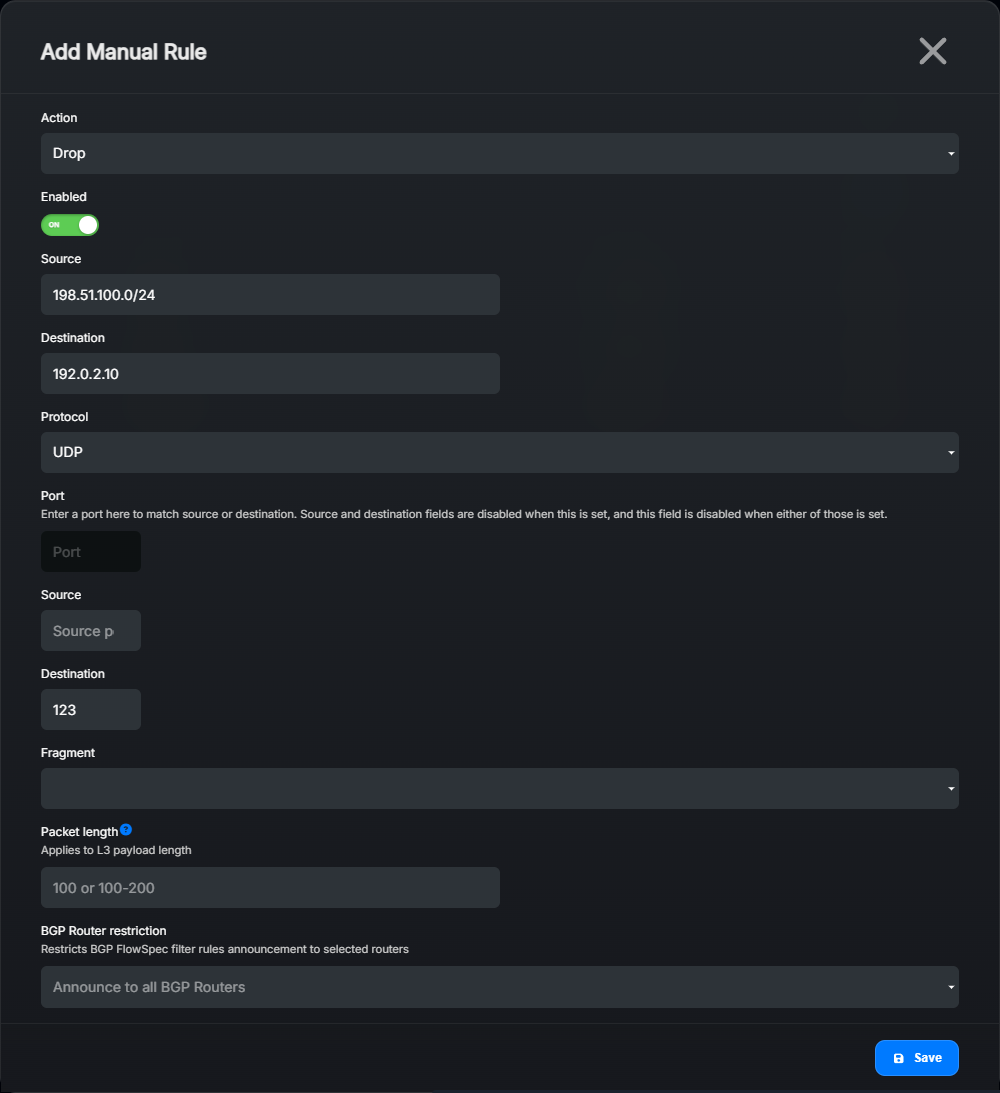
Settings explained:
Action: Defaults to Drop. Choose Drop, Rate Limit, Accept, Redirect to VRF, or Redirect to IP.
Enabled: Enabled by default. Turn it off to save a rule without enabling its announcement.
Source: (Optional) Match a source IPv4/IPv6 address or CIDR. Empty means any source.
Destination: Match a destination IPv4/IPv6 address or CIDR. Required for non-administrators. If both Source and Destination are set, they must use the same address family.
Protocol: Defaults to Any. Choose ICMP, TCP, UDP, GRE, ESP, ICMPv6, or Custom. Custom requires a Protocol number between 0 and 255.
TCP flags: (Optional) Available for TCP. Select the flags to match, such as SYN or ACK. Changing to another protocol clears this selection. SYN and ACK protocols are matched strictly (just SYN or just ACK flag) when selected alone.
Port: (Optional) Match either the source or destination port. Use a single number between 0 and 65535.
Source port and Destination port: (Optional) Match the corresponding ports individually. Use these fields instead of Port; they cannot be combined with it.
Fragment: Defaults to None. Available matches are DF (Don’t Fragment), IsF (Is Fragment), FF (First Fragment), and LF (Last Fragment).
Packet length: (Optional) Match L3 payload length. Enter a single value such as
100or an inclusive range such as100-200, between 0 and 65535.BGP Router restriction: (Optional) Restrict announcement to selected routers. Empty means Announce to all BGP Routers; the routers still need suitable BGP sessions.
Action-specific settings#
Drop: Drops matching traffic.
Accept: Uses the FlowSpec accept action for matching traffic. Check how your router handles this action alongside other FlowSpec rules before relying on it as an exception.
Rate Limit: Set Rate limit type to Bits/s and enter a non-negative whole number in Rate limit value. For example,
10000000means 10 Mbit/s. The 1.3.0 form offers Bits/s only.Redirect to VRF: Enter Traffic Diversion as an IPv4 route target with a 16-bit suffix, for example
192.0.2.1:65000.Redirect to IP: Enter Traffic Diversion as a host address, for example
192.0.2.10or2001:db8::10. Do not include a subnet mask. The target must match the Source/Destination address family.
Changing the action clears settings that do not apply to the new action. Redirect support also depends on the receiving router’s configuration.
Example: drop a selected UDP flow#
In our example, we want to drop UDP packets from 198.51.100.0/24 to 192.0.2.10 on destination port 123.
Select Drop and leave Enabled on.
Set Source to
198.51.100.0/24and Destination to192.0.2.10.Select UDP, then enter
123in Destination port. Leave Port empty.Select the appropriate BGP routers, or leave the restriction empty to use all eligible routers.
Click Save. The rule appears in the list.
Have an Administrator click Apply, then verify the announced rule on the receiving router.
Manager rejects a second manual filtering rule with the same Source, Destination, Protocol, Fragment, Port, Source port, and Destination port combination. Changing only the action, TCP flags, packet length, or router restriction does not make that combination unique. Edit the existing rule instead.
Manual blackholing#
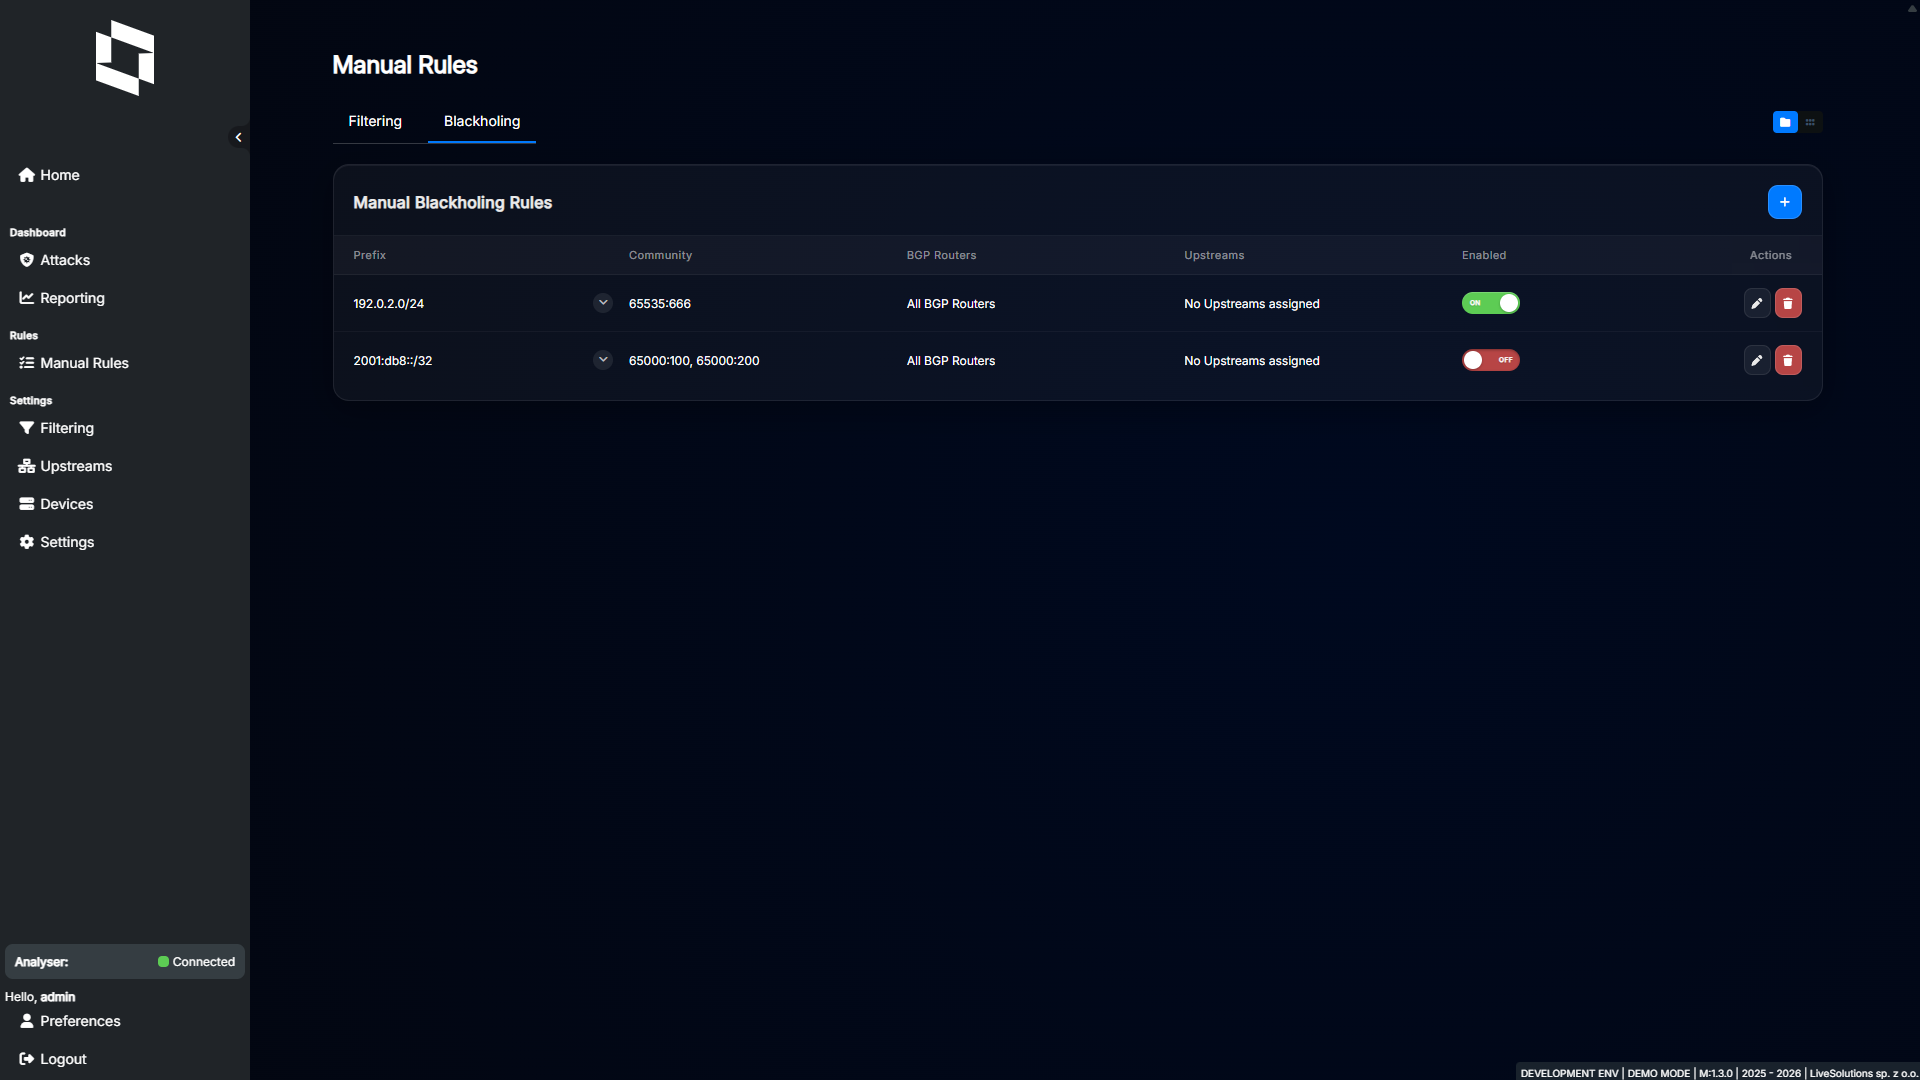
Open Manual Rules > Blackholing, then click “+”.
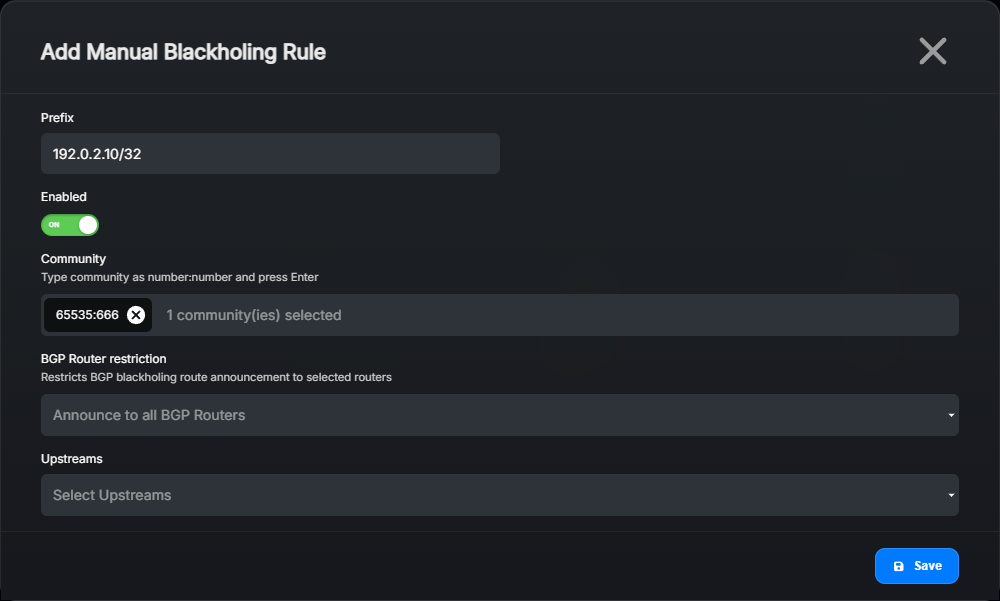
Settings explained:
Prefix: An IPv4 or IPv6 CIDR. For a single host, use
192.0.2.10/32or2001:db8::10/128.Enabled: Enabled by default.
Community: (Optional) Enter each BGP community as
number:numberand press Enter. Use values agreed with your upstream provider or configured on your router.BGP Router restriction: (Optional) Announce only to selected routers. An empty selection means all BGP routers with suitable sessions.
Upstreams: (Optional) Associate upstreams with the rule for selective blackholing. Empty means no upstreams are assigned. See Selective blackholing for the required upstream and session configuration.
For example, enter 192.0.2.10/32, add the community required by your provider, and select the intended router and upstreams. Click Save, then have an Administrator Apply the pending configuration. Verify the route and its communities on the receiving router.
Only one manual blackholing rule can exist for a given prefix. Edit that rule to change its communities, router restrictions, or upstreams.
Warning
Blackholing drops legitimate traffic as well as attack traffic. Confirm the destination and announcement scope before applying a manual rule.
Editing, disabling, and deleting#
Expand a list entry to inspect its details. Use the edit action to change the rule and click Save. If your account is scoped, you cannot change the filtering Destination or blackholing Prefix in this dialog.
Use the Enabled toggle in the list to disable a rule while keeping its configuration for later reuse. Turn it on again when needed. To remove a rule permanently, use its delete action and confirm the removal.
After each change, have an Administrator click Apply. A saved change or disabled toggle in Manager does not by itself confirm that a router has withdrawn or changed the rule. Check the receiving router after applying configuration.
If Apply fails, check the Analyser connection and version compatibility. Manager 1.3.0 requires Analyser 1.3.1 or newer, and configuration cannot be propagated if Analyser has rejected the Manager version.