Architecture#
Introduction#
LiveShield consists of four specialized modules:
Helper (C++): Manages updates, runs services, and provides essential toolsets for system maintenance and operation.
Manager (Node.js/React): A web-based graphical user interface for managing and monitoring the entire anti-DDoS system.
Analyser (C++): The core of LiveShield, responsible for analyzing network traffic, detecting attacks, triggering events, generating filtering rules, and managing BGP connections.
Worker (C/DPDK): An ultra-fast packet processing application that communicates directly with network interface cards (NICs) using the DPDK framework, bypassing the kernel and utilizing poll-mode for maximum performance.
When planning your LiveShield deployment, consider the following installation strategies for the Worker, Manager, and Analyser modules:
Distributed Installation: Each module (Worker, Manager, Analyser) can be installed on separate machines to maximize performance and reliability.
Worker Deployment: For optimal packet processing, Workers should always be installed on bare metal servers. Avoid using virtual machines for Workers to ensure direct access to network hardware and maximum throughput.
Single Location, Cost-Effective: If your deployment is limited to a single location, you may install all modules on one machine. This approach is cost-effective and simplifies management for smaller environments.
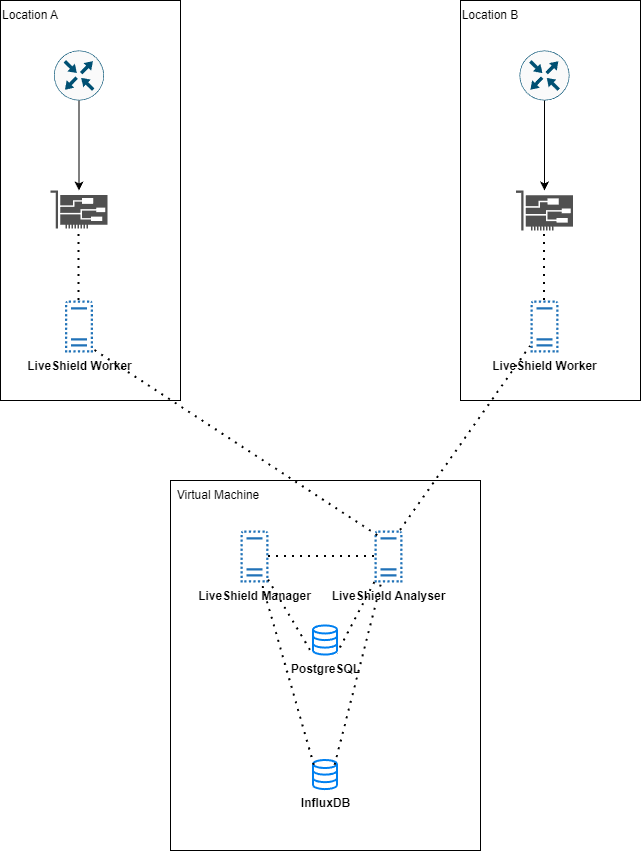
Multiple Sniffing Locations: For organizations with multiple network entry points, install Workers on bare metal hardware at each location. Manager and Analyser modules can be co-located on a virtual machine to centralize management and analysis.
High Traffic Environments (>100Gbps): If your network traffic regularly exceeds 100Gbps, install Manager and Analyser on separate virtual machines to distribute load and improve scalability. Workers should remain on dedicated bare metal servers for best performance.
Choose the architecture that best fits your operational needs, budget, and expected traffic volume to ensure robust and efficient anti-DDoS protection.
Modularity#
Because we use a modular architecture, there is a need for communication between the modules. We wanted to ensure maximum performance, that’s why we developed a custom protocol based on TCP.
We don’t rely on existing protocols or database engines, because they would introduce unnecessary overhead.
Here’s an overview of the communication between modules:
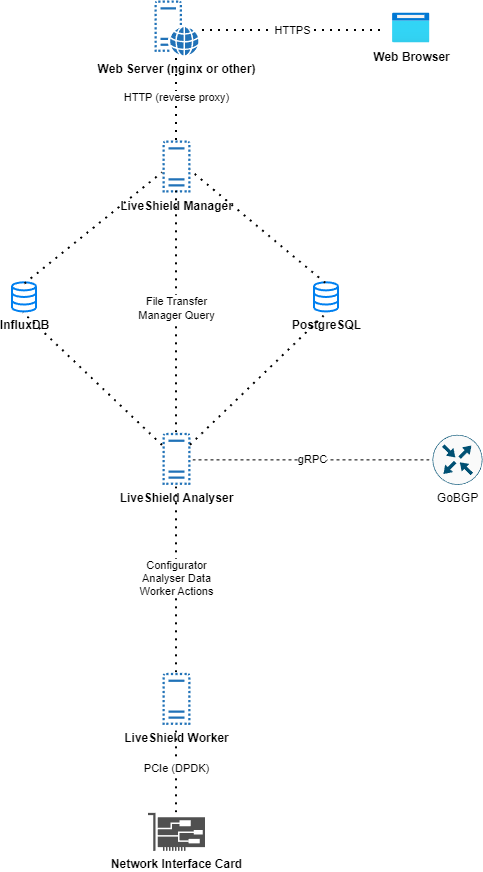
File Transfer: Connection used for transferring packet dump files from Analyser to Manager. Port configurable in Settings > Analyser section. More details here.
Manager Query: Connection used for communication between Manager and Analyser. It is used for live statistics data, configuration changes, alerts etc. Everything which requires immediate action. Port configurable in Settings > Analyser section. More details here.
gRPC: Connection used for communication between Analyser and GoBGP daemon. It is used for BGP daemon configuration, monitoring BGP sessions status and injecting FlowSpec and blackholing routes. Address and port configurable in Settings > Analyser section. More details here.
Configurator: Port used by Worker module to ask Analyser for configuration data during startup. It is also used to signal configuration changes by Analyser. Port configurable in Settings > Analyser section. More details here. Please be aware, that this port has to be configured in worker too. Refer to Installation for more details.
Analyser data: Connection used by Worker module to send aggregated data statistics to Analyser module. Port configurable in Settings > Analyser section. More details here. This is the most important connection.
Worker Actions: Connection used by Analyser module to send commands to Worker module. For example, after attack is detected it will send “please give me sampled packet for XXX ip and protocol” or “please give me detailed traffic info per vlan (upstream)”. Port configurable in Settings > Analyser section. More details here.
Note
You can connect multiple Workers to a single Analyser module. Each component can run on a separate machine.
Choose hardware#
Analyser and Manager modules are quite lightweight and not so hardware dependent. You can run them on virtual machines, bare metal, whatever fits your needs. Here you can check for minimum hardware requirements for these modules: installation-hardware-requirements.
Worker module is the most hardware dependent part of LiveShield. Because it’s responsible for high speed packet processing, you need to choose hardware carefully. It needs to be installed on a bare metal server equipped with a decent CPU and a supported network interface card (NIC).
Warning
Worker module must be installed on bare metal server. Although it may be possible to run it on virtual machine with PCI passthrough, and IOMMU interrupt remapping, this may introduce performance issues and is not officially supported.
CPU#
We recommend Intel Xeon series.
You should divide your expected traffic in Gbps by 10 and then add 4. This is your expected number of CPU cores (physical, non-HT). We recommend at least 8 cores.
Higher CPU frequency is better than more cores with lower frequency.
Look for CPUs with a large L3 cache size. This is extremely important for performance. If you’ll have a large L3 cache, most traffic will be processed in CPU cache, without the need to access RAM.
Look for PCIe version support. If you’re planning to have over 40Gbps of traffic, make sure you have PCIe 4.0 support.
Check for memory channels support. More memory channels are better for performance.
We recommend using single-CPU systems. Dual-CPU systems are supported but this may introduce implementation complexity and performance issues if incorrectly configured.
For traffic above 40G, we recommend at least Intel Xeon Gold 63xx series. For lower traffic, you can use even older generations like Intel Xeon E5 v4 series.
Motherboard#
Choose a motherboard that supports the chosen CPU and has enough PCIe slots for your network interface cards. Make sure that the supported PCIe version and length are sufficient for your expected traffic. For traffic above 40G, PCIe 4.0 x16 is a must have.
Memory#
At least 8GB is required for Worker module. If you’re building new system, please go for at least 32GB.
Faster memory, lower latency is better. If you can, go with DDR5.
More memory stick is better than single stick with larger capacity. This is because of memory channels. More channels means better performance.
Refer to your motherboard documentation for best memory slots configuration.
Disks#
We don’t have any special requirements for disks. Worker module doesn’t use disk much. You can go with small SSD disk (20GB is enough). This is more important for Analyser, Manager modules and InfluxDB, PostgreSQL servers, because they store logs, packet dumps, traffic data etc. We recommend using NVMe disks there. At least 20GB per module. If you have big network, you may need more space for logs and packet dumps.
Network Interface Cards (NICs)#
This is the most important part of your hardware selection. Worker module relies heavily on NIC performance and capabilities.
Basically, you can run LiveShield on any NIC supported by DPDK framework. Here you can find list of supported NICs: https://core.dpdk.org/supported/nics/ (by driver name).
However, we recommend using Intel or Mellanox/NVIDIA ConnectX series NICs for best performance and stability. Mellanox/NVIDIA NICs may require additional configuration and installation of specific drivers, so if you don’t want to deal with that, stick with Intel NIC.
Tested and recommended Intel NICs:
Intel X5xx series (10GbE)
Intel X7xx series (40GbE or lower)
Intel E8xx series (100GbE or lower)
Warning
Dual port NICs may require “PCIe bifurcation” support in BIOS. Otherwise, only one port may be functional.
For example, Intel E810‑2CQDA2 does have two 100GbE and PCIe 4.0 x16 interface. However it’s divided into two x8 interfaces internally. So, in order to use both ports, you need bifurcation support. Also if you want to use only one port at full 100Gbps speed, you need to have PCIe 4.0 support. If you have only PCIe 3.0, it will work as the PCIe 3.0 x8 interface, which in reality gives you around 50Gbps.
Note
Please note that PCIe version and length is extremely important. If you have 100GbE PCIe 4.0 x8 NIC but your system supports only PCIe 3.0, you will be limited to PCIe 3.0 x8 speeds which is around 50Gbps of real network traffic (because of overheads). We don’t recommend this scenario with traffic levels above 40Gbps. This may lead to missed packets.
Complete hardware#
If you want to buy complete hardware, without the need of building custom system, buying NICs etc. we can recommend following servers:
Supermicro SYS-112D-20C-FN3P https://www.supermicro.com/en/products/system/iot/1u/sys-112d-20c-fn3p
This bare metal system is well suitable for LiveShield Worker.
Network design#
In this section, we will explain recommended network design for LiveShield deployment.
Locations#
If you have your edge infrastructure in a single location, you can install all LiveShield modules on a single bare metal server which will reduce costs and simplify configuration.

If you have multiple edge network locations, we recommend placing bare metal servers in each location with Worker module installed. Manager and Analyser modules can be installed on single virtual machine in one location, along with InfluxDB and PostgreSQL databases.
Traffic mirror#
Because LiveShield doesn’t rely on NetFlow for attack detection, you need to provide an upstream traffic mirror to the Worker module.
There are multiple ways how to achieve this:
SPAN port: If your edge router/switch supports a SPAN/mirror port, you can configure it to mirror all incoming traffic to the LiveShield Worker port. This is the simplest way, but unfortunately it wastes the device’s resources.
Link TAP: If you’re using optical fiber connections (especially single-mode), you can TAP the wire and connect the TAP output to the LiveShield Worker port. This is the most reliable way, because it’s not affecting your production network device at all.
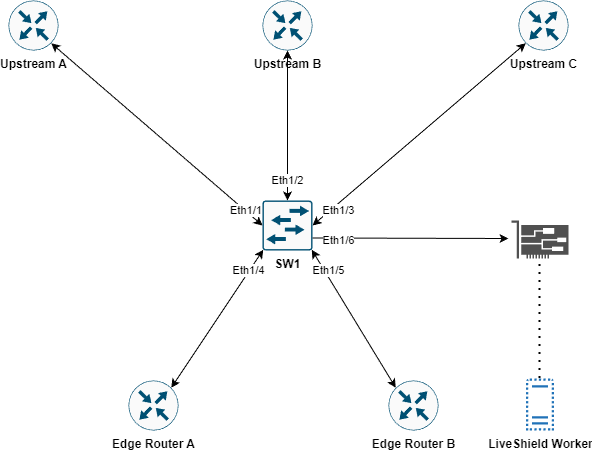
Port SPAN example:
Configuration example:
interface Ethernet1/6
   description LiveShield_Worker_1
   switchport monitor
   no shutdown
!
monitor session 1
   description LiveShield_SPAN
   source interface Ethernet1/1 rx
   source interface Ethernet1/2 rx
   source interface Ethernet1/3 rx
   destination interface Ethernet1/5
   no shutdown
!
Note
SPAN functionalities may be limited in specific switch/router model. Some functions may be unavailable. Please refer to your device vendor documentation.
You may need to change your mirroring architecture, e.g. mirror TX towards the router, or use the second method (TAP).
Hint
If you have multiple switches and want to aggregate traffic to single NIC port, please look for TAP aggregation feature on your devices.
Note
You can probably do SPAN directly from your Router if you want so.
Link TAP example:
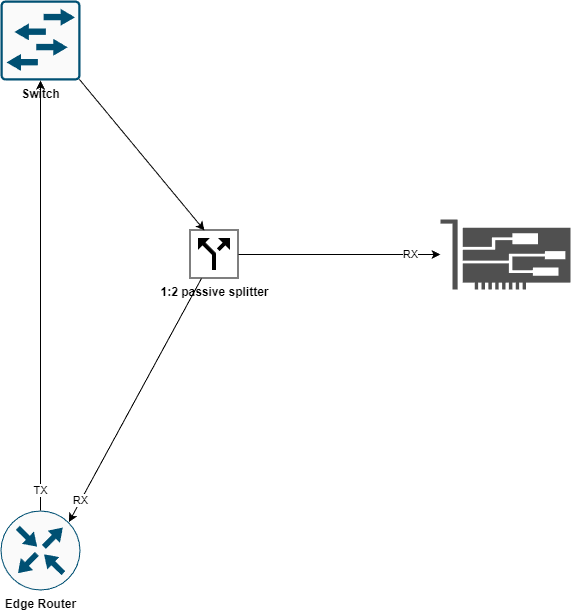
As you see, we tapped on the fiber link between the Switch and Edge Router. We used a 1:2 splitter and connected it to the RX port of a transceiver which we then inserted into the NIC.
Because we don’t need traffic outgoing from the router, we placed the TAP only on the router RX fiber.
Note
You have to use the same types of transceivers in all network devices connected with the same TAP.
You have to use duplex fibers (separate TX and RX) in order to properly TAP the link.