BGP configuration#
Prerequisites#
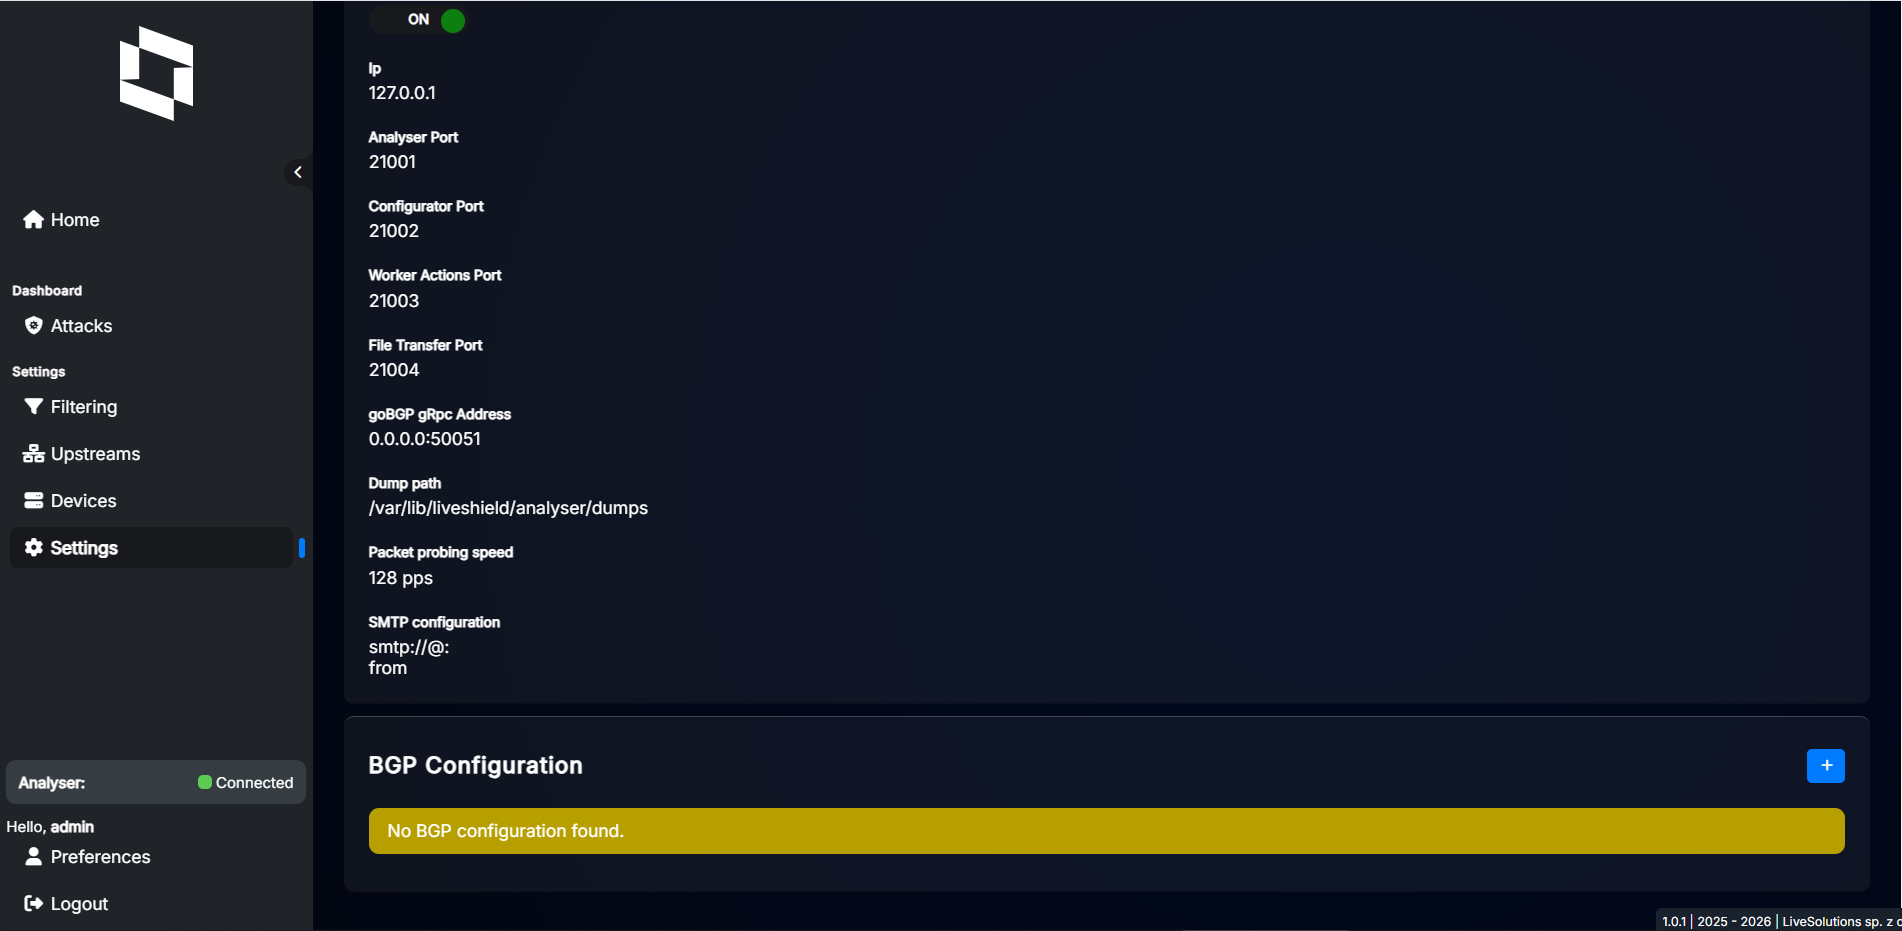
BGP is an essential protocol that LiveShield uses to exchange filtering decisions with routers. LiveShield uses the BGP FlowSpec address family to distribute filtering rules and redirect traffic, and standard BGP unicast routes for BGP Blackholing. By default, the analyser starts its own GoBGP daemon instance and uses it to establish BGP sessions with your edge routers. All configuration is performed via the LiveShield web interface, so you don’t need to manually configure GoBGP or any other BGP daemon. It uses the gRPC API to communicate with GoBGP. For details about gRPC address configuration, see Base configuration.
First, you have to decide which IP version(s) you want to use. LiveShield supports both IPv4 and IPv6 BGP sessions. If you’re using IPv6 in your network, we recommend setting up BGP sessions for both IPv4 and IPv6 to ensure comprehensive coverage.
Next, check which BGP features your routers support. Do they support BGP FlowSpec, or just standard unicast routes? Are they capable of applying FlowSpec rules in hardware? If not, we don’t recommend using FlowSpec on this router; instead, you should use a unicast session for blackholing or change your edge device.
Known routers that are suitable for FlowSpec use with LiveShield:
Juniper MX series
Juniper PTX series
Cisco ASR9k series, ASR 9900 series
Cisco ASR1k series
Cisco NCS 5500 series (selected models, see important note above)
Cisco 8000 series
Please refer to your router documentation for more details about BGP FlowSpec support and configuration, because on some models it may not be supported or may require a specific hardware version, licenses, etc. Of course, many more routers are supported; this is just a list of proven devices. You can use any router of your choice as long as it supports FlowSpec and is capable of handling the expected traffic load.
Important
Some routers may advertise BGP FlowSpec support, but may not be able to program rules in the forwarding data path. They can accept FlowSpec routes and redistribute them, but cannot apply filtering.
As stated before, the Cisco NCS 5500 series supports FlowSpec, but this is true only for selected models from that range. Because FlowSpec rules take significant space in TCAM, only models with eTCAM (external TCAM) are suitable. You should look for models with -SE in the name. However, even in that case, for example, the NCS 5501-SE does have eTCAM, but in an older version that is not capable of handling FlowSpec rules.
Newer versions such as NCS-55A1-36H-SE-S are suitable for FlowSpec use (NCS-55A1-36H-S is not).
There is a workaround script that can convert FlowSpec rules to standard ACLs (so they can be loaded even into internal TCAM), but not all FlowSpec features are supported, and in general we don’t recommend using it with LiveShield.
You can read more here: https://xrdocs.io/ncs5500/tutorials/bgp-flowspec-to-acl-script
The conclusion is: please check with your vendor whether your specific model is suitable for FlowSpec use. If you’re still unsure, you can contact us; we may have experience with your specific model.
If you want to use the blackholing feature, in most cases you need to establish a standard BGP unicast session between LiveShield and your edge routers, and then configure your routers to accept blackholing routes from LiveShield and redistribute them to your upstream providers. However, some providers may require an additional BGP session for blackholing purposes, so you’ll need to add them as a BGP neighbor in LiveShield and ensure that connectivity is in place.
ASN, router ID, BH community#
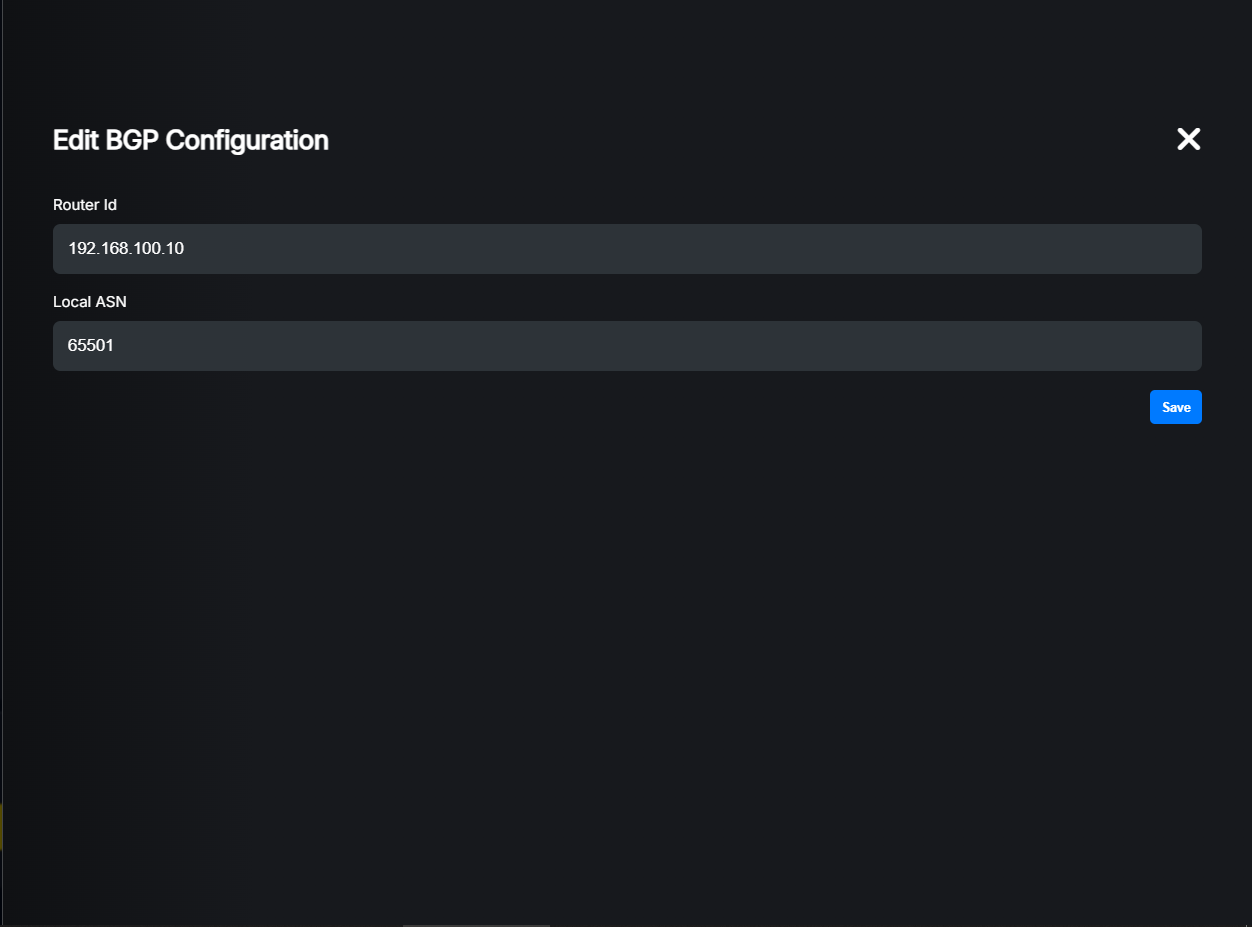
There are three parameters required for the BGP daemon to start: Autonomous System Number (ASN), Router ID, and Blackholing community. If you already have your own ASN assigned by an RIR, you can use it. Otherwise, you can use a private ASN range (64512-65534).
Router ID is a unique identifier for your BGP router. It is represented as an IPv4 address. You can use any valid IPv4 address; it won’t be used for any routing purposes.
Blackholing community is a BGP community that will be attached to blackholing routes. Default value is set to 65536:666. More about blackholing in Blackholing section.
Go to “Devices”, then switch to the “BGP Routers” tab. On the top of the page, you’ll find the “BGP Configuration” section where you can set the ASN, Router ID, and Blackholing community.
Click the “+” button to add a new BGP configuration. A dialog will appear where you can set the ASN, Router ID, and Blackholing community.
Once this is done, you can start adding BGP peers.
BGP peers#
Go to the “Devices” menu option, then switch to the “BGP Routers” tab.
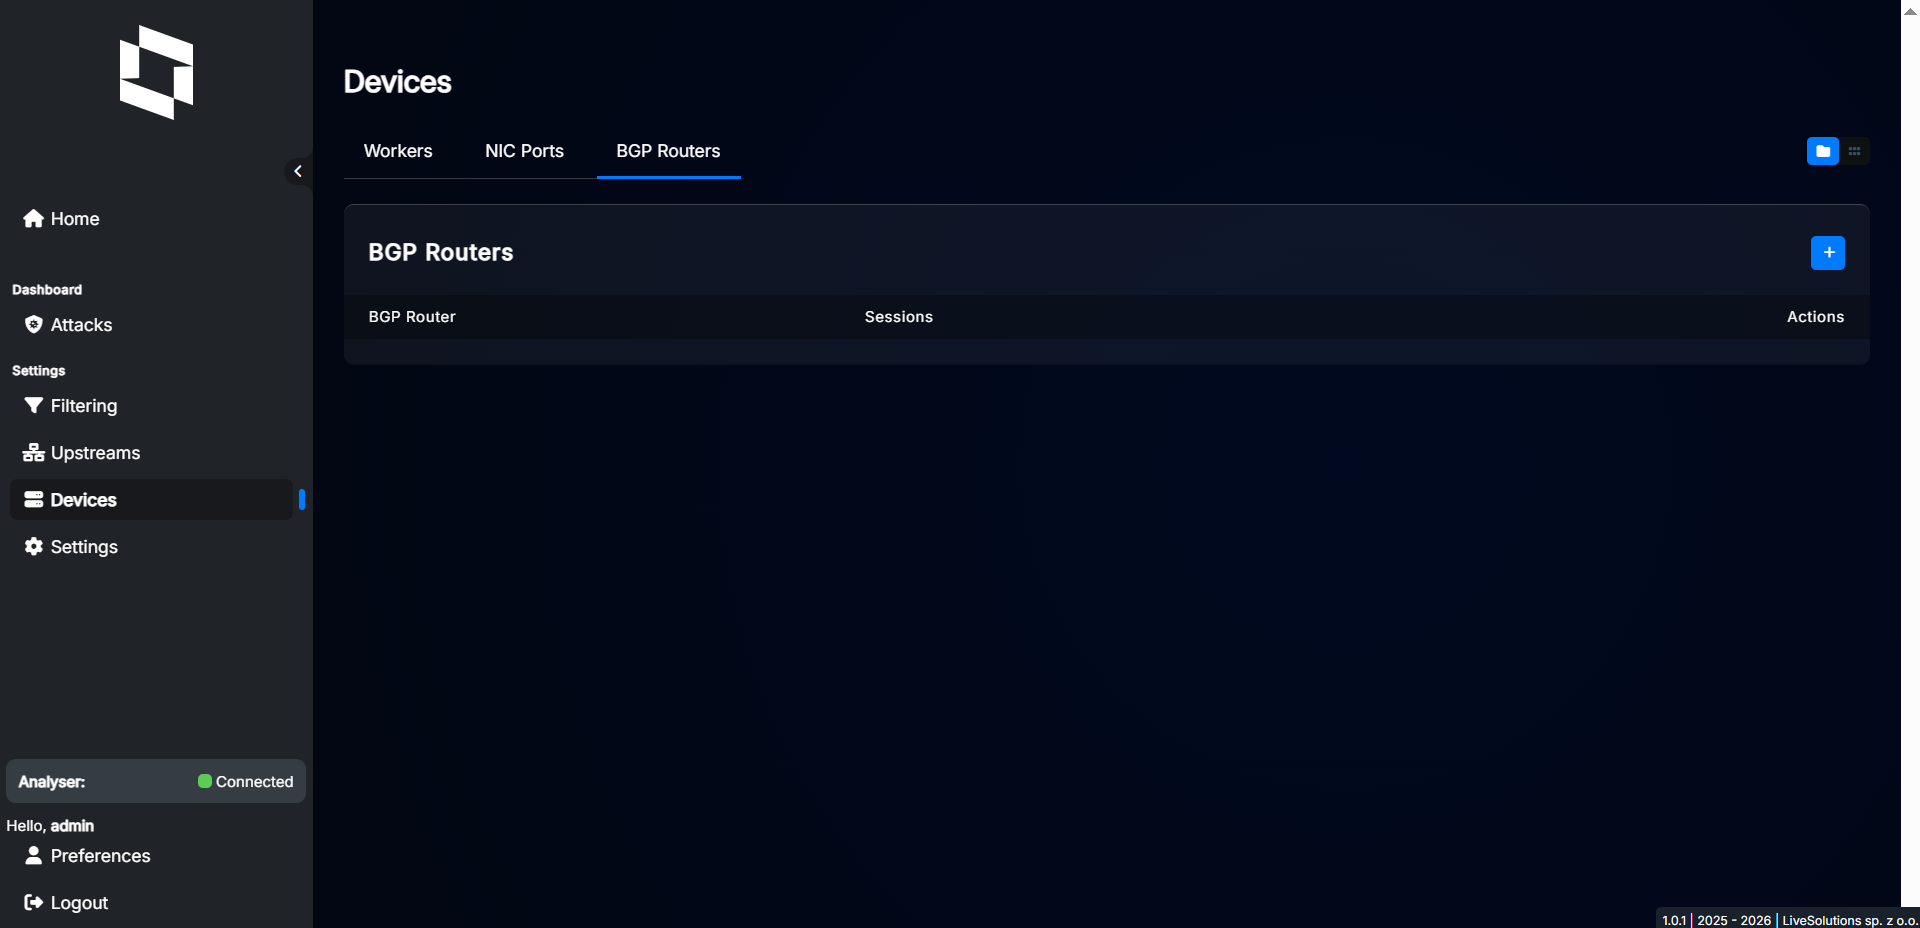
Click the “+” button to add a new BGP peer. A dialog will appear where you can set BGP peer parameters.
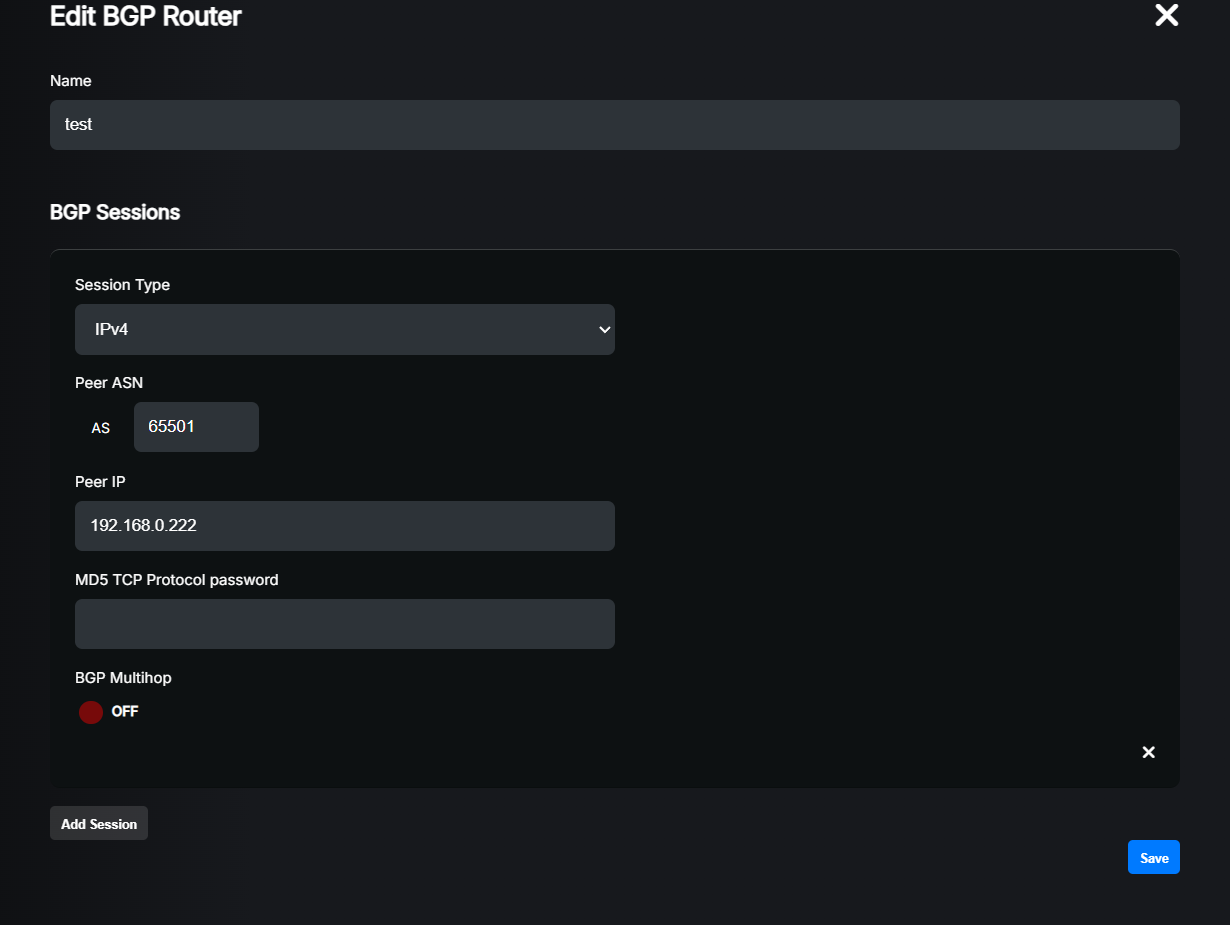
Here you can add one or more BGP sessions. Please remember that the ASN of this peer must match across each session address family. The IP address must match the address family. For example, when you configure an IPv4 session and IPv4 FlowSpec, you must use the same IPv4 address for both. If you want to use a different address, please create a separate BGP peer for that.
Settings explained:
Name: A friendly name for your BGP peer. Just for your reference.
Session Type: Select the type of BGP session you want to establish with this peer. You can choose between “IPv4”, “IPv4 FlowSpec”, “IPv6” and “IPv6 FlowSpec”. You can add multiple sessions for each peer.
Peer IP: The IP address of the BGP peer. Must match with the selected session type.
MD5 TCP Protocol password: (Optional) If your BGP peer requires MD5 authentication, you can set the password here.
BGP Multihop: (Optional) If your BGP peer is not reachable directly from the analyser (GoBGP) machine, you’ll have to enable this option. This is useful when you’re establishing a BGP session directly with your upstream provider, as mentioned here.
Once you’re done, click the “Save” button. The new BGP peer will be added to the list. Remember that you must apply the changes by clicking “Apply” on the bottom left side of the page.
Example FlowSpec config#
Hint
For BGP Blackholing configuration examples, please refer to the Blackholing>Example router config documentation.
In order to make it work, you have to configure your router to establish the session and correctly apply FlowSpec rules.
set protocols bgp group LIVESHIELD type internal
set protocols bgp group LIVESHIELD peer-as 65501
set protocols bgp group LIVESHIELD neighbor 192.168.100.10 family inet flow
We also recommend configuring the router to exclude FlowSpec rules from all interfaces except upstream links. This is not necessary but recommended.
set routing-options flow interface-group 10
set routing-options flow interface-group exclude
Now assign interface-group 10 to all non-upstream interfaces so that FlowSpec rules won’t be applied there (in our example, ge-0/0/1 and ge-0/0/2 will be excluded):
set interfaces ge-0/0/1 unit 0 family inet filter group 10
set interfaces ge-0/0/1 unit 0 family inet6 filter group 10
In that case, FlowSpec rules will be applied only on interfaces that are not in interface-group 10 (i.e. upstream links).
flowspec
   address-family ipv4
      local-install interface-all
   address-family ipv6
      local-install interface-all
!

router bgp 65501
   neighbor 192.168.100.10 remote-as 65501
   neighbor 192.168.100.10 description LIVESHIELD
   !
   address-family ipv4 flowspec
      neighbor 192.168.100.10 activate
   exit-address-family
   !
!
Hint
If you won’t be able to enter address-family ipv4 flowspec, please check your router capabilities and the required license. It may be necessary to set the license boot level.
We also recommend configuring the router to exclude FlowSpec rules from all interfaces except upstream links. This is not necessary but recommended.
interface GigabitEthernet2
   ip flowspec disable
   ipv6 flowspec disable
!
interface GigabitEthernet3
   ip flowspec disable
   ipv6 flowspec disable
!
In the above example, FlowSpec rules won’t be applied on GigabitEthernet2 and GigabitEthernet3 interfaces.
flowspec
   address-family ipv4
      local-install interface-all
   address-family ipv6
      local-install interface-all
!

router bgp 65501
   address-family ipv4 flowspec
   !
   neighbor 192.168.100.10
      remote-as 65501
      description LIVESHIELD
      address-family ipv4 flowspec
      !
   !
!
Important
Please remember to configure bgp router-id <ip> under router bgp <asn> configuration block. This is required for session establishment.
We assume this is already configured on your router, so we didn’t include it in the example.
We also recommend configuring the router to exclude FlowSpec rules from all interfaces except upstream links. This is not necessary but recommended.
interface GigabitEthernet0/0/0/1
   ipv4 flowspec disable
   ipv6 flowspec disable
!
interface GigabitEthernet0/0/0/2
   ipv4 flowspec disable
   ipv6 flowspec disable
!
In the above example, FlowSpec rules won’t be applied on GigabitEthernet0/0/0/1 and GigabitEthernet0/0/0/2 interfaces.
Note
The above configurations are just examples. Please adapt them to your network!
Here is what the full config looks like:
ge-0/0/1 {
   unit 0 {
      family inet {
         filter {
            group 10;
         }
      }
   }
}
ge-0/0/2 {
   unit 0 {
      family inet6 {
         filter {
            group 10;
         }
      }
   }
}
routing-options {
   flow {
      interface-group 10 exclude;
   }
}
protocols {
   bgp {
      group LIVESHIELD {
         type internal;
         peer-as 65501;
         neighbor 192.168.100.10 {
            family inet {
               flow;
            }
         }
      }
   }
}
flowspec
   address-family ipv4
      local-install interface-all
   address-family ipv6
      local-install interface-all
!
interface GigabitEthernet1
   ip address 192.168.100.222 255.255.255.0
   negotiation auto
!
interface GigabitEthernet2
   no ip address
   ip flowspec disable
   negotiation auto
   ipv6 flowspec disable
!
interface GigabitEthernet3
   no ip address
   ip flowspec disable
   negotiation auto
   ipv6 flowspec disable
!
router bgp 65501
   neighbor 192.168.100.10 remote-as 65501
   neighbor 192.168.100.10 description LIVESHIELD
   !
   address-family ipv4 flowspec
      neighbor 192.168.100.10 activate
   exit-address-family
   !
!
flowspec
   address-family ipv4
      local-install interface-all
   address-family ipv6
      local-install interface-all
!
interface GigabitEthernet0/0/0/0
   ipv4 address 192.168.100.222 255.255.255.0
!
interface GigabitEthernet0/0/0/1
   ipv4 flowspec disable
   ipv6 flowspec disable
!
interface GigabitEthernet0/0/0/2
   ipv4 flowspec disable
   ipv6 flowspec disable
!
router bgp 65501
   bgp router-id 192.168.100.222
   address-family ipv4 flowspec
   !
   neighbor 192.168.100.10
      remote-as 65501
      description LIVESHIELD
      address-family ipv4 flowspec
      !
   !
!
Verification#
To verify the session status, you can use the following commands:
/usr/share/liveshield/analyser/gobgp/gobgp neighbor
It should give you the following output:
Peer               AS  Up/Down State       |#Received  Accepted
192.168.100.222 65501 00:04:00 Establ      |        0         0
During an attack, you can check announced rules with:
/usr/share/liveshield/analyser/gobgp/gobgp global rib -a flowvpn4
This should give you output similar to the following:
   Network                                                                   Next Hop             AS_PATH              Age        Attrs
*> [rd: 192.168.100.10:0][destination: 192.168.100.222/32][protocol: ==icmp] fictitious                                00:08:32   [{Origin: ?} {Extcomms: [discard], [192.168.100.10:0]}]
show bgp summary
This should give you output like this (look for your LiveShield IP, the “inetflow.0” family and the “Establ” state):
Peer                     AS      InPkt     OutPkt    OutQ   Flaps Last Up/Dwn State|#Active/Received/Accepted/Damped...
192.168.100.10        65501          2          2       0       0           8 Establ
   inetflow.0: 0/0/0/0
If you want to check whether rules are applied during an attack, you can use:
show route table inetflow.0
And to check whether the filter is installed:
show firewall filter __flowspec_default_inet__
Example output:
inetflow.0: 1 destinations, 1 routes (1 active, 0 holddown, 0 hidden)
+ = Active Route, - = Last Active, * = Both

192.168.100.222,*,proto=1/term:2
                  *[BGP/170] 00:01:31, localpref 100, from 192.168.100.10
                     AS path: ?, validation-state: unverified
                     Fictitious

Filter: __flowspec_default_inet__
Counters:
Name                                                                            Bytes              Packets
192.168.100.222,*,proto=1                                                         252                    3
You can clearly see that the FlowSpec rule is retrieved and then installed correctly. It filtered 3 packets with a total size of 252 bytes.
show bgp ipv4 flowspec summary
It should give you output like this:
Neighbor        V           AS MsgRcvd MsgSent   TblVer  InQ OutQ Up/Down  State/PfxRcd
192.168.100.10  4        65501     573     627        3    0    0 04:44:34        0
If you want to check whether rules are applied during an attack, you can use:
show bgp ipv4 flowspec
Example output:
     Network          Next Hop            Metric LocPrf Weight Path
*>i  Dest:192.168.100.222/32,Proto:=1
                      0.0.0.0                       100      0 ?
And to check whether the filter is installed:
show flowspec afi-all detail
Example output:
AFI: IPv4
   Flow           :Dest:192.168.100.222/32,Proto:=1
      Actions      :Traffic-rate: 0 bps  (bgp.1)
      Statistics                        (packets/bytes)
         Matched             :                   3/294
         Dropped             :                   3/294
You can clearly see that the FlowSpec rule is retrieved and then installed correctly. It filtered 3 packets with a total size of 294 bytes.
show bgp ipv4 flowspec summary
It should give you output like this:
Neighbor        Spk    AS MsgRcvd MsgSent       TblVer  InQ OutQ  Up/Down  St/PfxRcd
192.168.100.10    0 65501     575     757            3    0    0 00:06:29          1
If you want to check whether rules are applied during an attack, you can use:
show bgp ipv4 flowspec
Example output:
Network            Next Hop            Metric LocPrf Weight Path
*>iDest:192.168.100.222/32,Proto:=1/72
                   0.0.0.0                       100      0 ?
And to check whether the filter is installed:
show flowspec afi-all detail
Example output:
AFI: IPv4
   Flow           :Dest:192.168.100.222/32,Proto:=1
      Actions      :Traffic-rate: 0 bps  (bgp.1)
      Statistics                        (packets/bytes)
         Matched             :                   3/294
         Transmitted         :                   0/0
         Dropped             :                   3/294
You can clearly see that the FlowSpec rule is retrieved and then installed correctly. It filtered 3 packets with a total size of 294 bytes.
Note
The provided examples are valid for the IPv4 address family only. For the IPv6 address family, please change the commands accordingly.