Blackholing#
Introduction#
Filtering with FlowSpec is a very efficient and flexible way to mitigate DDoS attacks. However, if attack volume exceeds uplink capacity, no local filtering will help. In such cases, RTBH (Remotely Triggered Black Hole) routing is used to drop traffic in the upstream network, before it reaches your infrastructure.
Note
RTBH is usually possible only with IP transit providers. In most cases it’s not supported or not effective on private peerings or IXPs.
Blackholing can also be used if your routers don’t support FlowSpec or are not capable of applying FlowSpec rules in hardware. However, using blackholing as the only mitigation method is not recommended, because it results in collateral damage by dropping all traffic to the targeted IP address, including legitimate traffic.
The best way is to stick with RTBH for large volumetric attacks which can’t be handled locally, and use FlowSpec for the rest.
Hint
If you want to use blackholing along with FlowSpec, it’s recommended to send blackholing routes to the upstreams and not apply them locally, so local, private peering and IXP traffic will still be exchanged.
This is covered in the provided example configurations.
Warning
Unfortunately, blackholing techniques are always a trade-off between mitigation efficiency and collateral damage. Therefore it’s recommended to use blackholing only as a last resort method.
Example use case:
You have two IP transit providers A and B, each with a 100G link. Both are half saturated with legitimate traffic (50G each). Also, you have some PNIs (private peerings) and you are present on some IXPs C and D (both 100G each).
An attacker starts a 10G DDoS attack against some of your IP addresses. If you have FlowSpec filtering in place and properly configured thresholds, all attack traffic will be filtered locally on your edge routers. Now the attacker increases attack volume to 120G. Most of the traffic comes from IP transit providers A and B, so your edge routers are not able to receive it without saturating links to A and B. If you have properly configured blackholing thresholds, the attacked IP will be announced to your edge routers and then redistributed to your upstream providers A and B who will drop all traffic to the attacked IP addresses. Because your local router will not apply this route in its forwarding table, traffic from your PNIs and IXPs C and D will still reach your infrastructure, so legitimate traffic from these sources will not be affected, because the rest of the traffic is filtered more accurately by FlowSpec rules.
This way you can reduce the impact of blackholing. The customer behind the attacked IP is still able to reach important routes via private peerings and IXPs. Only the traffic from IP transit providers is dropped.
Hint
If you have high-capacity IP transit links, you may consider selective blackholing to further reduce the impact of blackholing.
Note
Some IP transit providers allow or require an additional BGP session just for blackholing routes. In that case, you’ll need to configure a new BGP peer in LiveShield and ensure connectivity between LiveShield and your provider’s blackholing BGP router.
Important
You need at least one IPv4/IPv6 unicast BGP session configured in LiveShield to be able to use the blackholing feature.
Please refer to BGP peer.
Create profile#
To use the blackholing feature, you need to create a blackholing profile first. Go to the “Filtering” section in the main menu.
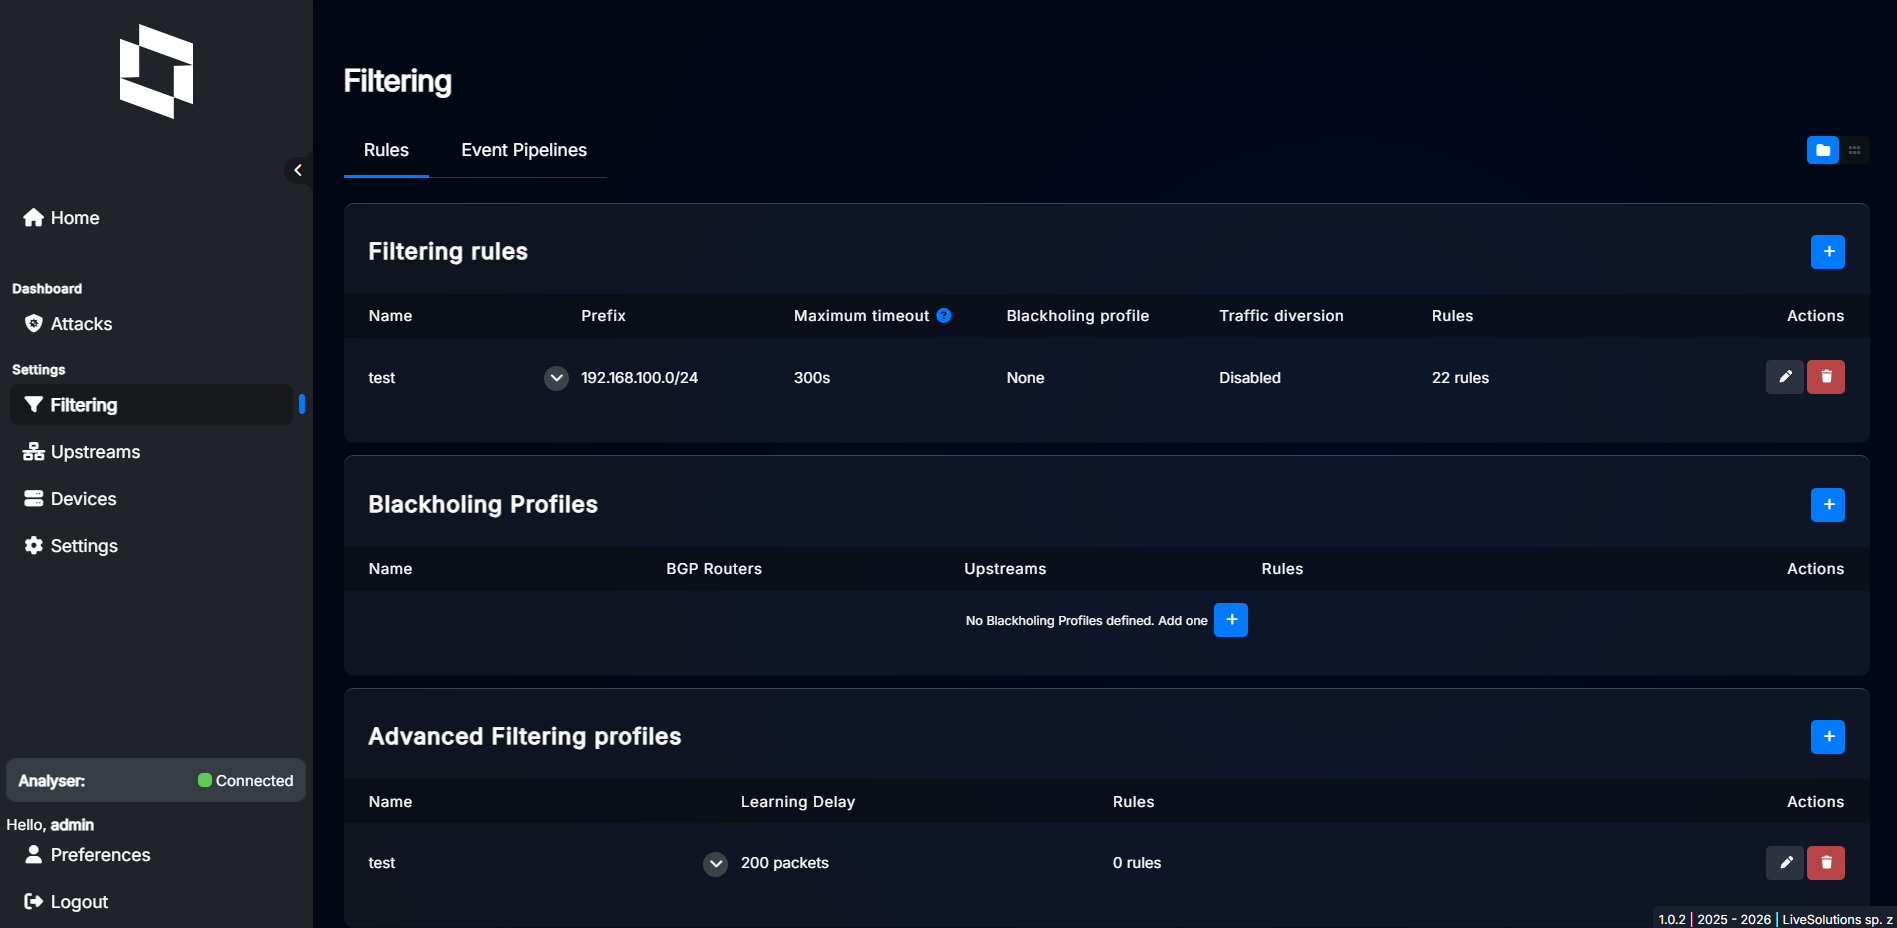
Then click “+” to add a new profile. A dialog will appear.
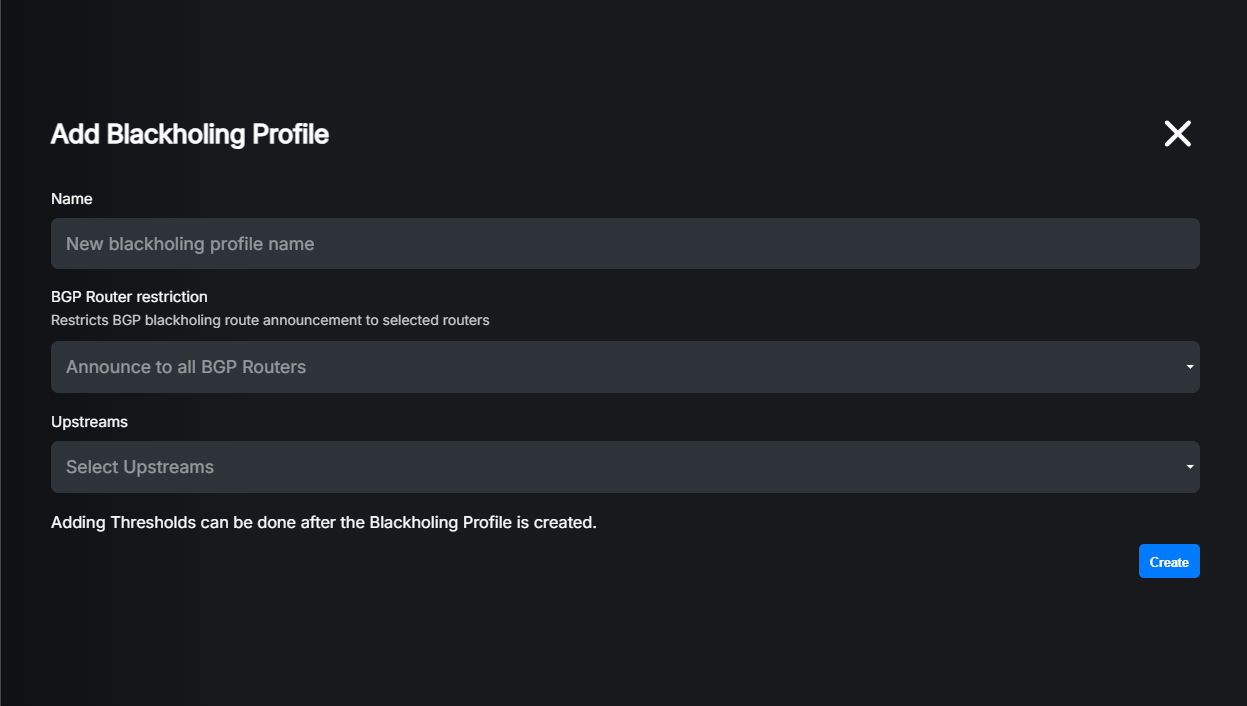
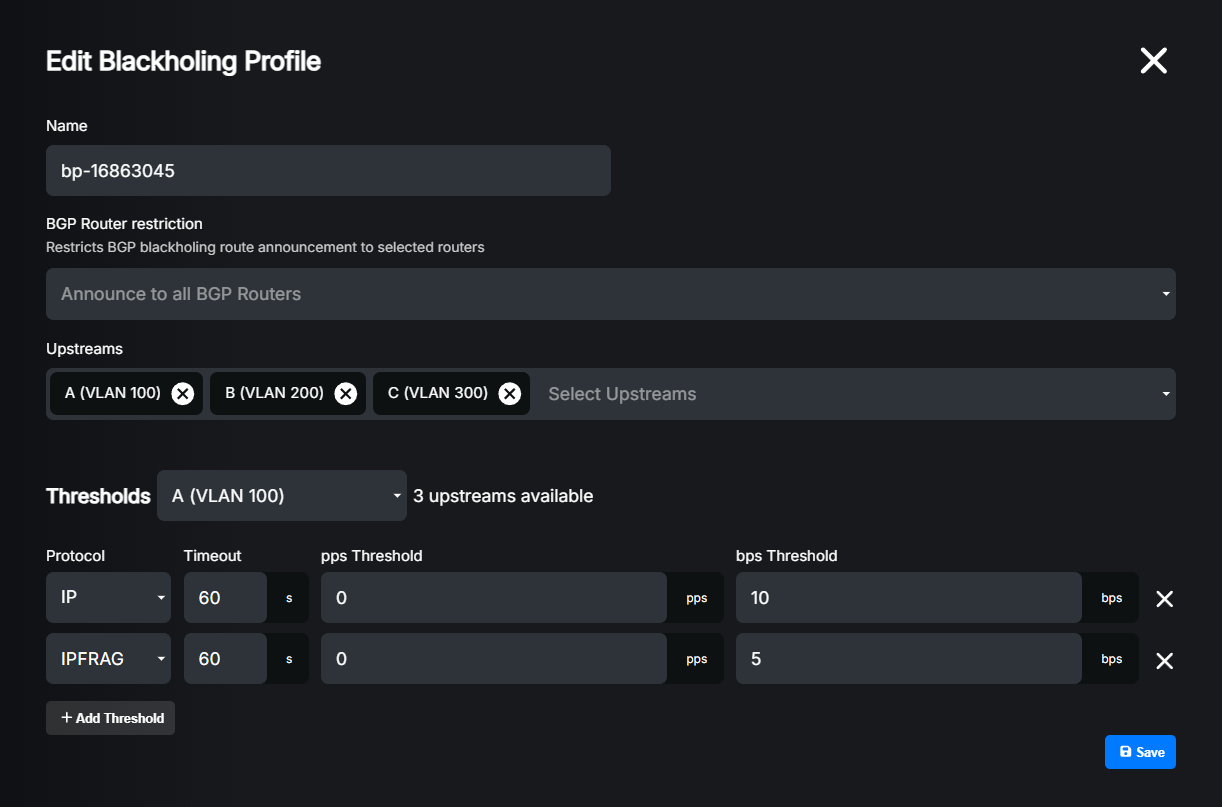
Settings explained:
Name: Profile name, used to identify the profile in the web interface. If you leave it empty, a random name will be generated.
BGP Router Restriction: (Optional) If you want routes generated by this profile to be sent only to specific BGP peers, you can select them here. If you leave it empty, routes will be sent to all configured BGP peers.
Upstreams: (Optional) If you want to use the selective blackholing feature, you have to select all upstream providers which should receive blackholing routes from this profile.
The newly created profile will appear in the profiles list:

In order to make the profile work, you need to define thresholds for it.
Click the “Add Threshold” button to add a new threshold:
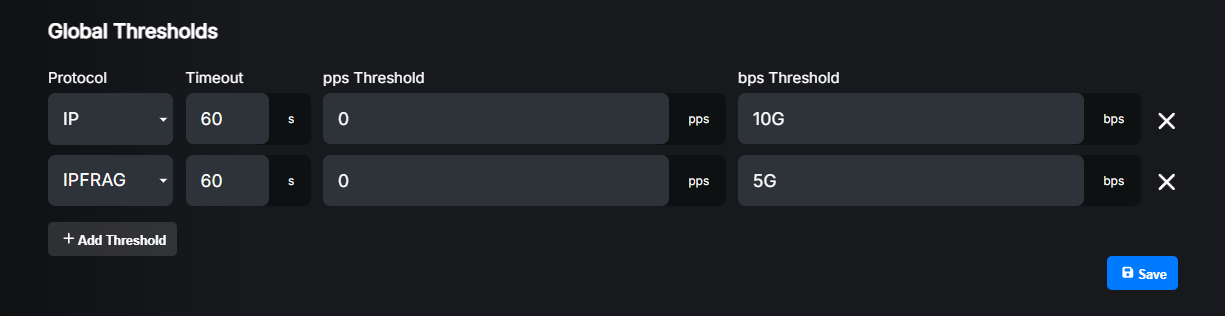
Settings explained:
Protocol: Select the protocol for which you want to define a threshold.
Timeout: How long (in seconds) the blackholing route generated by this threshold should be kept active after it’s no longer exceeding the defined thresholds. If the profile is attached to a prefix which has a shorter Maximum timeout value, that value will be used instead. Please refer to the Detection and Filtering (Thresholds).
pps Threshold: Packets per second threshold. If the traffic for the selected protocol exceeds this value, a blackholing route will be announced. Set to 0 to disable pps-based detection.
bps Threshold: Bits per second threshold. If the traffic for the selected protocol exceeds this value, a blackholing route will be announced. Set to 0 to disable bps-based detection.
Note
It is possible to configure different thresholds for per-IP and per-subnet attacks. If an attack is triggered by per-IP thresholds, only per-IP blackholing thresholds will be checked.
Similarly, if an attack is triggered by per-subnet thresholds, only per-subnet blackholing thresholds will be checked.
For more information about protocols and thresholds, please refer to Detection and Filtering (Thresholds).
Hint
We recommend setting the bps Threshold value for the IP protocol or the most common protocols for volumetric attacks such as IPFRAG and UDP. However, you can also set thresholds for other protocols if you want to be more specific or adjust them to your needs.
Attach profile#
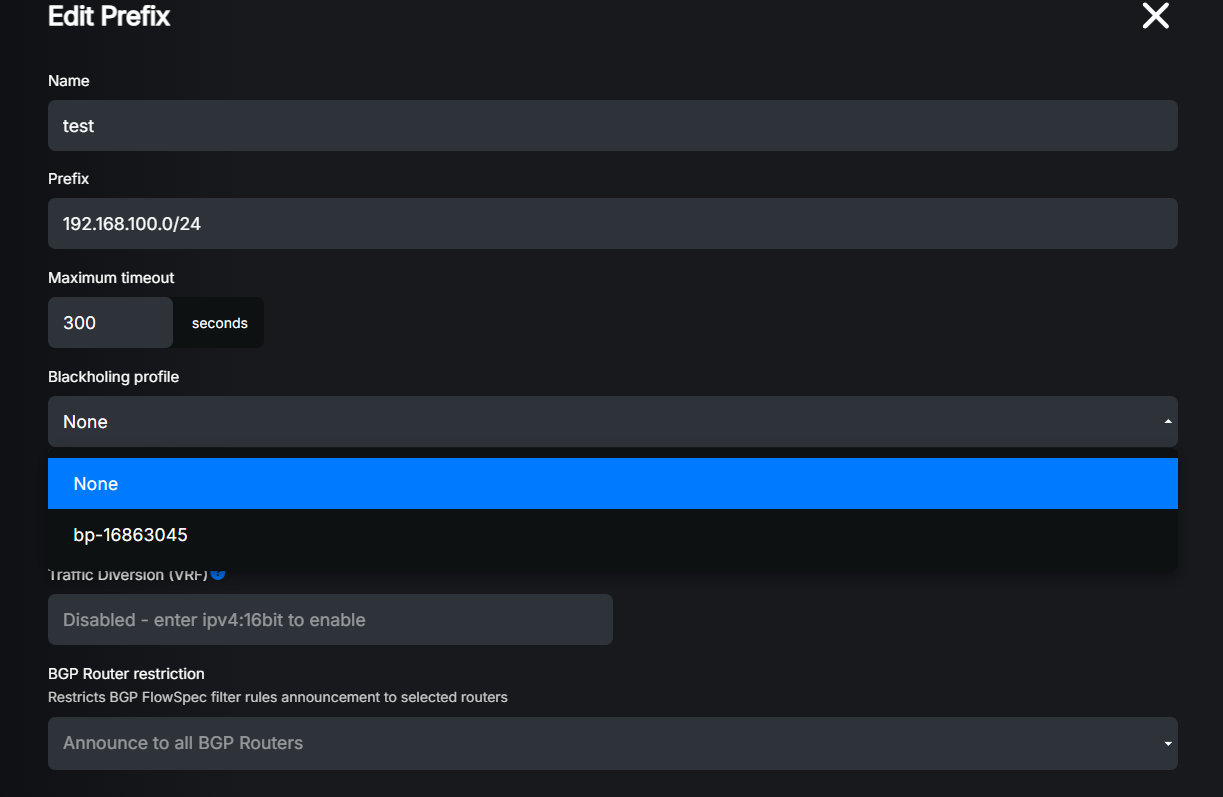
In order to make it work, you have to attach the blackholing profile to prefixes you want to protect.
Go to the Filtering section in the main menu, then edit the desired prefix and change Blackholing Profile to the one you created before.
For more information about prefix configuration, please refer to Detection and Filtering.
Operation logic#
Now, when everything is configured inside LiveShield, we can explain how blackholing thresholds work in practice.
Input traffic is continuously monitored and analysed. When traffic for a specific prefix and protocol exceeds defined thresholds in the prefix settings, a new attack is detected and some filtering rules are applied (if prefiltering or advanced filtering is enabled). At the same time, blackholing thresholds start to be evaluated. If traffic exceeds any of the defined blackholing thresholds, a blackholing route is generated and announced to the configured BGP routers (peers). No blackholing profile thresholds are checked if an attack is not detected on a particular IP. If the attack is detected by exceeding per-IP thresholds, only per-IP blackholing thresholds will be evaluated. If the attack is detected by exceeding per-subnet thresholds, only per-subnet blackholing thresholds will be evaluated.
Note
If you set blackholing profile thresholds to lower values than thresholds in the prefix settings, a blackholing route won’t be announced until prefix thresholds are exceeded (and an attack is detected). Blackholing profile thresholds are evaluated only after an attack is detected on a particular IP.
Note
You can have different protocols set in thresholds in prefix settings than in the blackholing profile. Only one prefix protocol threshold needs to be exceeded to start evaluating all of the blackholing profile thresholds.
For example: In prefix settings you set thresholds for DNS and NTP only, but in the blackholing profile you have configured thresholds for UDP and TCP. Only if DNS or NTP thresholds are exceeded blackholing profile thresholds for UDP and TCP will be evaluated. So if a DNS attack is detected and the UDP blackholing threshold is exceeded, a blackholing route will be announced. Also, if a DNS attack is detected and the TCP blackholing threshold is exceeded, a blackholing route will be announced too.
Note
Only one blackholing route is announced for a specific IP. If multiple blackholing thresholds are exceeded, it will be displayed in the web interface, but only one route will be announced for the whole period.
Example router config#
Blackholing configuration is much more complex than FlowSpec. The main concept is to receive blackholing routes from LiveShield containing blackholing communities and then rewrite it to the one required by the upstream provider.
We will use local blackholing community set to default 65535:666 and two example providers PROVIDER_A (RTBH community 1000:666) and PROVIDER_B (RTBH community 2000:666).
Warning
Do not copy-and-paste these lines without adjusting them to your existing configuration!
First, create all necessary communities (local and for each provider, according to their requirements):
set policy-options community PROVIDER_A.RTBH members 1000:666
set policy-options community PROVIDER_B.RTBH members 2000:666
set policy-options community RTBH members 65535:666
Then create a policy to match routes with the RTBH community. This policy also contains a rule to allow FlowSpec routes to be accepted. This is necessary if you have FlowSpec and blackholing sessions on the same BGP peer with the same import policy. We will also reject any export towards LiveShield, because there’s no need to send any routes back.
set policy-options policy-statement LIVESHIELD.IN term CHECK-COMMUNITY from community RTBH
set policy-options policy-statement LIVESHIELD.IN term CHECK-COMMUNITY then accept
set policy-options policy-statement LIVESHIELD.IN term ACCEPT-FLOWSPEC from rib inetflow.0
set policy-options policy-statement LIVESHIELD.IN term ACCEPT-FLOWSPEC then accept
set policy-options policy-statement LIVESHIELD.IN term ACCEPT-FLOWSPEC-V6 from rib inet6flow.0
set policy-options policy-statement LIVESHIELD.IN term ACCEPT-FLOWSPEC-V6 then accept
set policy-options policy-statement LIVESHIELD.IN then default-action reject
set policy-options policy-statement LIVESHIELD.OUT then default-action reject
Create a BGP peer with LiveShield:
set protocols bgp group LIVESHIELD type internal
set protocols bgp group LIVESHIELD import LIVESHIELD.IN
set protocols bgp group LIVESHIELD export LIVESHIELD.OUT
set protocols bgp group LIVESHIELD peer-as 65501
set protocols bgp group LIVESHIELD neighbor 192.168.100.10 family inet unicast
Modify the existing export policy for PROVIDER_A and PROVIDER_B to match the local community and rewrite it to the provider-specific community:
set policy-options policy-statement PROVIDER_A.OUT term REWRITE-RTBH-COMMUNITY from community RTBH
set policy-options policy-statement PROVIDER_A.OUT term REWRITE-RTBH-COMMUNITY then community set PROVIDER_A.RTBH

set policy-options policy-statement PROVIDER_B.OUT term REWRITE-RTBH-COMMUNITY from community RTBH
set policy-options policy-statement PROVIDER_B.OUT term REWRITE-RTBH-COMMUNITY then community set PROVIDER_B.RTBH
Modify your existing BGP peer configuration to announce BGP routes even if they’re not preferred:
set protocols bgp group PROVIDER_A advertise-inactive
set protocols bgp group PROVIDER_B advertise-inactive
As stated in Introduction, if you want to use FlowSpec along with blackholing, it’s recommended to not apply blackholing routes in the forwarding table, so the blackhole route will be redistributed to the upstream, but not applied locally.
set policy-options policy-statement FIB-FILTER.IN term REJECT-RTBH from community RTBH
set policy-options policy-statement FIB-FILTER.IN term REJECT-RTBH then reject
set policy-options policy-statement FIB-FILTER.IN then default-action accept

set routing-options forwarding-table export FIB-FILTER.IN
First, create all necessary communities (on IOS XE we create only a local RTBH community for matching purposes):
ip community-list standard RTBH permit 65535:666
Then create a policy to match routes with the RTBH community. We will also reject any export towards LiveShield, because there’s no need to send any routes back.
route-map LIVESHIELD_IN_V4 permit 10
   match community RTBH
!
route-map LIVESHIELD_IN_V4 deny 1000
!
route-map LIVESHIELD_IN_V6 permit 10
   match community RTBH
!
route-map LIVESHIELD_IN_V6 deny 1000
!
route-map LIVESHIELD_OUT deny 1000
!
Create a BGP peer with LiveShield:
router bgp 65501
   neighbor 192.168.100.10 remote-as 65501
   neighbor 192.168.100.10 description LIVESHIELD
   !
   address-family ipv4
      neighbor 192.168.100.10 activate
      neighbor 192.168.100.10 route-map LIVESHIELD_IN_V4 in
      neighbor 192.168.100.10 route-map LIVESHIELD_OUT out
   exit-address-family
   !
!
Modify the existing export route-maps for PROVIDER_A and PROVIDER_B to match the local community and rewrite it to the provider-specific community:
route-map PROVIDER_A_OUT_V4 permit 10
   match community RTBH
   set community 1000:666
!
route-map PROVIDER_B_OUT_V4 permit 10
   match community RTBH
   set community 2000:666
!
route-map PROVIDER_A_OUT_V6 permit 10
   match community RTBH
   set community 1000:666
!
Make sure to announce BGP routes even if they’re not preferred (this is the default behaviour):
router bgp 65501
   no bgp suppress-inactive
!
Make sure to send communities to your upstream providers:
router bgp 65501
   address-family ipv4
      neighbor 192.168.200.0 send-community
      neighbor 192.168.200.2 send-community
   exit-address-family
   !
   address-family ipv6
      neighbor FC00::200:0 send-community
   exit-address-family
   !
!
As stated in Introduction, if you want to use FlowSpec along with blackholing, it’s recommended to not apply blackholing routes in the forwarding table, so the blackhole route will be redistributed to the upstream, but not applied locally.
This is possible by configuring table-map, which can prevent blackhole routes from being installed in the RIB and therefore FIB (CEF), while still allowing redistribution to upstream providers.
route-map RIB_FILTER deny 10
   match community RTBH
!
route-map RIB_FILTER permit 1000
!
router bgp 65501
   address-family ipv4
      table-map RIB_FILTER filter
   exit-address-family
   !
   address-family ipv6
      table-map RIB_FILTER filter
   exit-address-family
   !
!
First, create all necessary communities (local and for each provider, according to their requirements):
community-set RTBH
   65535:666
end-set
!
community-set PROVIDER_A.RTBH
   1000:666
end-set
!
community-set PROVIDER_B.RTBH
   2000:666
end-set
!
Then create a route-policy to match routes with the RTBH community.. We will also reject any export towards LiveShield, because there’s no need to send any routes back.
route-policy LIVESHIELD_IN_V4
   if community matches-any RTBH then
      pass
   else
      drop
   endif
end-policy
!
route-policy LIVESHIELD_IN_V6
   if community matches-any RTBH then
      pass
   else
      drop
   endif
end-policy
!
route-policy LIVESHIELD_OUT
   drop
end-policy
!
Create a BGP peer with LiveShield:
router bgp 65501
   address-family ipv4 unicast
   !
   address-family ipv6 unicast
   !
   session-group LIVESHIELD
      remote-as 65501
   !
   neighbor-group LIVESHIELD
      use session-group LIVESHIELD
      address-family ipv4 unicast
         route-policy LIVESHIELD_IN_V4 in
         route-policy LIVESHIELD_OUT out
      !
      address-family ipv6 unicast
         route-policy LIVESHIELD_IN_V6 in
         route-policy LIVESHIELD_OUT out
      !
   !
   neighbor 192.168.100.10
      use neighbor-group LIVESHIELD
      description LIVESHIELD
   !
!
Modify the existing export route-policies for PROVIDER_A and PROVIDER_B to match the local community and rewrite it to the provider-specific community:
route-policy PROVIDER_A_OUT_V4
   if community matches-any RTBH then
      set community PROVIDER_A.RTBH
   elseif destination in ANNOUNCE-PREFIXES then
      pass
   else
      drop
   endif
end-policy
!
route-policy PROVIDER_A_OUT_V6
   if community matches-any RTBH then
      set community PROVIDER_A.RTBH
   elseif destination in ANNOUNCE-PREFIXES-V6 then
      pass
   else
      drop
   endif
end-policy
!
route-policy PROVIDER_B_OUT_V4
   if community matches-any RTBH then
      set community PROVIDER_B.RTBH
   elseif destination in ANNOUNCE-PREFIXES then
      pass
   else
      drop
   endif
end-policy
!
Make sure to send communities to your upstream providers:
router bgp 65501
   neighbor fc00::200:0
      send-community-ebgp
   !
   neighbor 192.168.200.0
      send-community-ebgp
   !
   neighbor 192.168.200.2
      send-community-ebgp
   !
!
As stated in Introduction, if you want to use FlowSpec along with blackholing, it’s recommended to not apply blackholing routes in the forwarding table, so the blackhole route will be redistributed to the upstream, but not applied locally.
This is possible by configuring table-map, which can prevent blackhole routes from being installed in the RIB and therefore FIB (CEF), while still allowing redistribution to upstream providers.
route-policy RIB_FILTER
   if community matches-any RTBH then
      drop
   else
      pass
   endif
end-policy
!

router bgp 65501
   address-family ipv4 unicast
      table-policy RIB_FILTER
   !
   address-family ipv6 unicast
      table-policy RIB_FILTER
   !
!
Full config example:
interfaces {
   ge-0/0/0 {
      unit 0 {
         description TO_LIVESHIELD;
         family inet {
            address 192.168.100.222/24;
         }
      }
   }
   ge-0/0/1 {
      description PROVIDER_A;
      unit 0 {
         family inet {
            address 192.168.200.1/31;
         }
         family inet6 {
            address fc00::200:1/127;
         }
      }
   }
   ge-0/0/2 {
      description PROVIDER_B;
      unit 0 {
         family inet {
            address 192.168.200.3/31;
         }
      }
   }
}
policy-options {
   prefix-list ANNOUNCE-PREFIXES {
      192.168.66.0/24;
   }
   prefix-list ANNOUNCE-PREFIXES-V6 {
      fc00::66:0/112;
   }
   policy-statement PROVIDER_A.IN {
      then default-action accept;
   }
   policy-statement PROVIDER_A.OUT {
      term REWRITE-RTBH-COMMUNITY {
         from community RTBH;
         then {
            community set PROVIDER_A.RTBH;
            accept;
         }
      }
      term ANNOUNCE-PREFIXES {
         from {
            prefix-list ANNOUNCE-PREFIXES;
         }
         then accept;
      }
      term ANNOUNCE-PREFIXES-V6 {
         from {
            prefix-list ANNOUNCE-PREFIXES-V6;
         }
         then accept;
      }
      then default-action reject;
   }
   policy-statement FIB-FILTER.IN {
      term REJECT-RTBH {
         from community RTBH;
         then reject;
      }
      then default-action accept;
   }
   policy-statement PROVIDER_B.IN {
      then default-action accept;
   }
   policy-statement PROVIDER_B.OUT {
      term REWRITE-RTBH-COMMUNITY {
         from community RTBH;
         then {
            community set PROVIDER_B.RTBH;
            accept;
         }
      }
      term ANNOUNCE-PREFIXES {
         from {
            prefix-list ANNOUNCE-PREFIXES;
         }
         then accept;
      }
      then default-action reject;
   }
   policy-statement LIVESHIELD.IN {
      term CHECK-COMMUNITY {
         from community RTBH;
         then accept;
      }
      term ACCEPT-FLOWSPEC {
         from rib inetflow.0;
         then accept;
      }
      term ACCEPT-FLOWSPEC-V6 {
         from rib inet6flow.0;
         then accept;
      }
      then default-action reject;
   }
   policy-statement LIVESHIELD.OUT {
      then default-action reject;
   }
   community PROVIDER_A.RTBH members 1000:666;
   community PROVIDER_B.RTBH members 2000:666;
   community RTBH members 65535:666;
}
routing-options {
   router-id 192.168.100.222;
   forwarding-table {
      export FIB-FILTER.IN;
   }
}
protocols {
   bgp {
      group LIVESHIELD {
         type internal;
         import LIVESHIELD.IN;
         export LIVESHIELD.OUT;
         peer-as 65501;
         neighbor 192.168.100.10 {
            family inet {
               unicast;
               flow;
            }
         }
      }
      group PROVIDER_A {
         type external;
         description PROVIDER_A;
         advertise-inactive;
         import PROVIDER_A.IN;
         export PROVIDER_A.OUT;
         peer-as 1000;
         neighbor 192.168.200.0 {
            family inet {
               unicast;
            }
         }
         neighbor fc00::200:0 {
            family inet6 {
               unicast;
            }
         }
      }
      group PROVIDER_B {
         type external;
         description PROVIDER_B;
         advertise-inactive;
         import PROVIDER_B.IN;
         export PROVIDER_B.OUT;
         peer-as 2000;
         neighbor 192.168.200.2 {
            family inet {
               unicast;
            }
         }
      }
      local-as 65501;
   }
}
interface GigabitEthernet1
   description TO_LIVESHIELD
   ip address 192.168.100.222 255.255.255.0
   negotiation auto
!
interface GigabitEthernet2
   description PROVIDER_A
   ip address 192.168.200.1 255.255.255.254
   negotiation auto
   ipv6 address FC00::200:1/127
!
interface GigabitEthernet3
   description PROVIDER_B
   ip address 192.168.200.3 255.255.255.254
   negotiation auto
!
router bgp 65501
   bgp router-id 192.168.100.222
   bgp log-neighbor-changes
   neighbor 192.168.100.10 remote-as 65501
   neighbor 192.168.100.10 description LIVESHIELD
   neighbor 192.168.200.0 remote-as 1000
   neighbor 192.168.200.0 description PROVIDER_A
   neighbor 192.168.200.2 remote-as 2000
   neighbor 192.168.200.2 description PROVIDER_B
   neighbor FC00::200:0 remote-as 1000
   neighbor FC00::200:0 description PROVIDER_A
   !
   address-family ipv4
      table-map RIB_FILTER filter
      network 192.168.66.0
      neighbor 192.168.100.10 activate
      neighbor 192.168.100.10 route-map LIVESHIELD_IN_V4 in
      neighbor 192.168.100.10 route-map LIVESHIELD_OUT out
      neighbor 192.168.200.0 activate
      neighbor 192.168.200.0 send-community standard
      neighbor 192.168.200.0 route-map PROVIDER_A_IN_V4 in
      neighbor 192.168.200.0 route-map PROVIDER_A_OUT_V4 out
      neighbor 192.168.200.2 activate
      neighbor 192.168.200.2 send-community standard
      neighbor 192.168.200.2 route-map PROVIDER_B_IN_V4 in
      neighbor 192.168.200.2 route-map PROVIDER_B_OUT_V4 out
      no neighbor FC00::100:10 activate
      no neighbor FC00::200:0 activate
   exit-address-family
   !
   address-family ipv6
      table-map RIB_FILTER filter
      network FC00::66:0/112
      neighbor FC00::200:0 activate
      neighbor FC00::200:0 send-community standard
      neighbor FC00::200:0 route-map PROVIDER_A_IN_V6 in
      neighbor FC00::200:0 route-map PROVIDER_A_OUT_V6 out
   exit-address-family
   !
!
ip bgp-community new-format
ip community-list standard RTBH permit 65535:666
!
ip prefix-list ANNOUNCE-PREFIXES seq 10 permit 192.168.66.0/24
!
!
ipv6 prefix-list ANNOUNCE-PREFIXES-V6 seq 10 permit FC00::66:0/112
!
route-map LIVESHIELD_IN_V4 permit 10
   match community RTBH
!
route-map LIVESHIELD_IN_V4 deny 1000
!
route-map LIVESHIELD_IN_V6 permit 10
   match community RTBH
!
route-map LIVESHIELD_IN_V6 deny 1000
!
route-map PROVIDER_A_OUT_V4 permit 10
   match community RTBH
   set community 1000:666
!
route-map PROVIDER_A_OUT_V4 permit 20
   match ip address prefix-list ANNOUNCE-PREFIXES
!
route-map PROVIDER_A_OUT_V4 deny 1000
!
route-map PROVIDER_A_OUT_V6 permit 10
   match community RTBH
   set community 1000:666
!
route-map PROVIDER_A_OUT_V6 permit 20
   match ip address prefix-list ANNOUNCE-PREFIXES-V6
!
route-map PROVIDER_A_OUT_V6 deny 1000
!
route-map PROVIDER_B_OUT_V4 permit 10
   match community RTBH
   set community 2000:666
!
route-map PROVIDER_B_OUT_V4 permit 20
   match ip address prefix-list ANNOUNCE-PREFIXES
!
route-map PROVIDER_B_OUT_V4 deny 1000
!
route-map PROVIDER_B_IN_V4 permit 1000
!
route-map RIB_FILTER deny 10
   match community RTBH
!
route-map RIB_FILTER permit 1000
!
route-map LIVESHIELD_OUT deny 1000
!
route-map PROVIDER_A_IN_V4 permit 1000
!
route-map PROVIDER_A_IN_V6 permit 1000
!
interface GigabitEthernet0/0/0/0
   description TO_LIVESHIELD
   ipv4 address 192.168.100.222 255.255.255.0
!
interface GigabitEthernet0/0/0/1
   description PROVIDER_A
   ipv4 address 192.168.200.1 255.255.255.254
   ipv6 address fc00::200:1/127
!
interface GigabitEthernet0/0/0/2
   description PROVIDER_B
   ipv4 address 192.168.200.3 255.255.255.254
!
prefix-set ANNOUNCE-PREFIXES
   192.168.66.0/24
end-set
!
prefix-set ANNOUNCE-PREFIXES-V6
   fc00::66:0/112
end-set
!
community-set RTBH
   65535:666
end-set
!
community-set PROVIDER_A.RTBH
   1000:666
end-set
!
community-set PROVIDER_B.RTBH
   2000:666
end-set
!
route-policy RIB_FILTER
   if community matches-any RTBH then
      drop
   else
      pass
   endif
end-policy
!
route-policy LIVESHIELD_OUT
   drop
end-policy
!
route-policy LIVESHIELD_IN_V4
   if community matches-any RTBH then
      pass
   else
      drop
   endif
end-policy
!
route-policy LIVESHIELD_IN_V6
   if community matches-any RTBH then
      pass
   else
      drop
   endif
end-policy
!
route-policy PROVIDER_A_IN_V4
   pass
end-policy
!
route-policy PROVIDER_A_IN_V6
   pass
end-policy
!
route-policy PROVIDER_B_IN_V4
   pass
end-policy
!
route-policy PROVIDER_A_OUT_V4
   if community matches-any RTBH then
      set community PROVIDER_A.RTBH
   elseif destination in ANNOUNCE-PREFIXES then
      pass
   else
      drop
   endif
end-policy
!
route-policy PROVIDER_A_OUT_V6
   if community matches-any RTBH then
      set community PROVIDER_A.RTBH
   elseif destination in ANNOUNCE-PREFIXES-V6 then
      pass
   else
      drop
   endif
end-policy
!
route-policy PROVIDER_B_OUT_V4
   if community matches-any RTBH then
      set community PROVIDER_B.RTBH
   elseif destination in ANNOUNCE-PREFIXES then
      pass
   else
      drop
   endif
end-policy
!
router bgp 65501
   bgp router-id 192.168.100.222
   address-family ipv4 unicast
      table-policy RIB_FILTER
      network 192.168.66.0/24
   !
   address-family ipv6 unicast
      table-policy RIB_FILTER
      network fc00::66:0/112
   !
   session-group LIVESHIELD
      remote-as 65501
   !
   neighbor-group LIVESHIELD
      use session-group LIVESHIELD
      address-family ipv4 unicast
         route-policy LIVESHIELD_IN_V4 in
         route-policy LIVESHIELD_OUT out
      !
      address-family ipv6 unicast
         route-policy LIVESHIELD_IN_V6 in
         route-policy LIVESHIELD_OUT out
      !
   !
   neighbor fc00::200:0
      remote-as 1000
      description PROVIDER_A
      send-community-ebgp
      address-family ipv6 unicast
         route-policy PROVIDER_A_IN_V6 in
         route-policy PROVIDER_A_OUT_V6 out
      !
   !
   neighbor 192.168.200.0
      remote-as 1000
      description PROVIDER_A
      send-community-ebgp
      address-family ipv4 unicast
         route-policy PROVIDER_A_IN_V4 in
         route-policy PROVIDER_A_OUT_V4 out
      !
   !
   neighbor 192.168.200.2
      remote-as 2000
      description PROVIDER_B
      send-community-ebgp
      address-family ipv4 unicast
         route-policy PROVIDER_B_IN_V4 in
         route-policy PROVIDER_B_OUT_V4 out
      !
   !
   neighbor 192.168.100.10
      use neighbor-group LIVESHIELD
      description LIVESHIELD
   !
!
Verification#
First, check if the BGP session with LiveShield is established:
/usr/share/liveshield/analyser/gobgp/gobgp neighbor
It should give you the following output:
Peer               AS  Up/Down State       |#Received  Accepted
192.168.100.222 65501 03:17:33 Establ      |        0         0
In order to check if the unicast address family is established, use:
/usr/share/liveshield/analyser/gobgp/gobgp neighbor 192.168.100.222
It should give you the following output:
[...]
  Neighbor capabilities:
   multiprotocol:
      ipv4-unicast:   advertised and received
You should see advertised and received near the unicast address family.
During an attack, you can check announced routes with:
/usr/share/liveshield/analyser/gobgp/gobgp global rib -a vpnv4
This should give you output similar to the following:
   Network                            Labels     Next Hop             AS_PATH              Age        Attrs
*> 192.168.100.10:0:192.168.66.101/32 [0]        0.0.0.0                                   01:36:02   [{Origin: ?} {Communities: blackhole} {Extcomms: [192.168.100.10:0]}]
First, check if the BGP session with LiveShield is established:
show bgp summary
This should give you output like this (look for your LiveShield IP, the “inet.0” family and the “Establ” state):
Peer                     AS      InPkt     OutPkt    OutQ   Flaps Last Up/Dwn State|#Active/Received/Accepted/Damped...
192.168.100.10        65501        412        447       0       0     3:21:38 Establ
   inet.0: 0/1/1/0
If you want to check whether blackhole routes are received during an attack, you can use:
show route 192.168.66.101/32 detail
This should give you output similar to the following:
192.168.66.101/32 (1 entry, 1 announced)
      *BGP     Preference: 170/-101
               Next hop type: Indirect, Next hop index: 0
               Address: 0x8249b14
               Next-hop reference count: 1
               Kernel Table Id: 0
               Source: 192.168.100.10
               Protocol next hop: 192.168.100.10
               Indirect next hop: 0x2 no-forward INH Session ID: 0
               Indirect next hop: INH non-key opaque: 0x0 INH key opaque: 0x0
               State: <Active Int Ext>
               Peer AS: 65501
               Age: 1:38:00    Metric2: 0
               Validation State: unverified
               Task: BGP_65501_65501.192.168.100.10
               Announcement bits (2): 1-BGP_RT_Background 2-Resolve tree 1
               AS path: ?
               Communities: 65535:666
               Accepted
               Localpref: 100
               Router ID: 192.168.100.10
               Thread: junos-main
Look for Communities: 65535:666. If it matches the previously defined local blackhole community, then the blackhole route is properly received.
Check if the route is correctly redistributed to upstream providers:
show route advertising-protocol bgp 192.168.200.0 192.168.66.101/32 detail
show route advertising-protocol bgp 192.168.200.2 192.168.66.101/32 detail
This should give you output similar to the following:
* 192.168.66.101/32 (1 entry, 1 announced)
   BGP group PROVIDER_A type External
      Nexthop: Self
      AS path: [65501] ?
      Communities: 1000:666

* 192.168.66.101/32 (1 entry, 1 announced)
   BGP group PROVIDER_B type External
      Nexthop: Self
      AS path: [65501] ?
      Communities: 2000:666
As you can see, the community has been rewritten to the one required by each upstream provider and both routes are properly advertised.
If you applied a restriction to avoid dropping traffic locally, you can verify if the route is not in the forwarding table:
show route forwarding-table matching 192.168.66.101/32
This should give you an empty response or an entry pointing to the correct next-hop (if you have such a /32 route normally).
In our example, we don’t have a 192.168.66.101/32 route normally, so the output is empty:
Routing table: default.inet
Internet:

Routing table: __juniper_services__.inet
Internet:

Routing table: __pfe_private__.inet
Internet:

Routing table: __master.anon__.inet
Internet:
First, check if the BGP session with LiveShield is established:
show bgp ipv4 unicast summary
This should give you output like this (look for your LiveShield IP and the “Established” state):
Neighbor        V           AS MsgRcvd MsgSent   TblVer  InQ OutQ Up/Down  State/PfxRcd
192.168.100.10  4        65501      74      80        5    0    0 00:35:42        1
If you want to check whether blackhole routes are received during an attack, you can use:
show bgp ipv4 unicast 192.168.66.101/32
This should give you output similar to the following:
BGP routing table entry for 192.168.66.101/32, version 5
Paths: (1 available, best #1, table default)
Advertised to update-groups:
   28         29
Refresh Epoch 1
Local
   192.168.100.10 from 192.168.100.10 (192.168.100.10)
      Origin incomplete, localpref 100, valid, internal, best
      Community: 65535:666
      rx pathid: 0, tx pathid: 0x0
      Updated on Jan 20 2026 18:32:32 UTC
Look for Community: 65535:666. If it matches the previously defined local blackhole community, then the blackhole route is properly received.
Note
If you see the community in a different format (number), please make sure that you have enabled ip bgp-community new-format in the global configuration.
Check if the route is correctly redistributed to upstream providers:
show bgp ipv4 unicast neighbors 192.168.200.0 advertised-routes 192.168.66.101/32
show bgp ipv4 unicast neighbors 192.168.200.2 advertised-routes 192.168.66.101/32
This should give you output similar to the following:
BGP routing table entry for 192.168.66.101/32, version 5
Paths: (1 available, best #1, table default)
Advertised Attributes
   Local Preference: 0
   Metric: 0
   Origin: incomplete
   AS-Path:  65501
   Community: 1000:666
   Nexthop: 192.168.200.1

BGP routing table entry for 192.168.66.101/32, version 5
Paths: (1 available, best #1, table default)
Advertised Attributes
   Local Preference: 0
   Metric: 0
   Origin: incomplete
   AS-Path:  65501
   Community: 2000:666
   Nexthop: 192.168.200.3
As you can see, the community has been rewritten to the one required by each upstream provider and both routes are properly advertised.
If you applied a restriction to avoid dropping traffic locally, you can verify if the route is not in the RIB and therefore in the forwarding table (CEF):
show ip route 192.168.66.101 255.255.255.255
show ip cef 192.168.66.101/32
This should give you an empty response or an entry pointing to the correct next-hop (if you have such a /32 route normally).
In our example, we don’t have a 192.168.66.101/32 route normally, so the output is empty:
% Subnet not in table

%Prefix not found
First, check if the BGP session with LiveShield is established:
show bgp ipv4 unicast summary
This should give you output like this (look for your LiveShield IP and the “Established” state):
Neighbor        Spk    AS MsgRcvd MsgSent       TblVer  InQ OutQ  Up/Down  St/PfxRcd
192.168.100.10    0 65501     168     156           21    0    0 01:16:52          1
If you want to check whether blackhole routes are received during an attack, you can use:
show bgp ipv4 unicast 192.168.66.101/32
This should give you output similar to the following:
BGP routing table entry for 192.168.66.101/32
Versions:
   Process           bRIB/RIB   SendTblVer
   Speaker                 21           21
Last Modified: Jan 21 14:05:50.231 for 00:31:02
Paths: (1 available, best #1)
   Advertised IPv4 Unicast paths to peers (in unique update groups):
      192.168.200.0   192.168.200.2
   Path #1: Received by speaker 0
   Advertised IPv4 Unicast paths to peers (in unique update groups):
      192.168.200.0   192.168.200.2
   Local
      192.168.100.10 from 192.168.100.10 (192.168.100.10)
         Origin incomplete, localpref 100, valid, internal, best, group-best
         Received Path ID 0, Local Path ID 1, version 21
         Community: 65535:666
Look for Community: 65535:666. If it matches the previously defined local blackhole community, then the blackhole route is properly received.
Check if the route is correctly redistributed to upstream providers:
show bgp ipv4 unicast advertised neighbor 192.168.200.0 | begin 192.168.66.101/32
show bgp ipv4 unicast advertised neighbor 192.168.200.2 | begin 192.168.66.101/32
This should give you output similar to the following:
192.168.66.101/32 is advertised to 192.168.200.0
   Path info:
      neighbor: 192.168.100.10  neighbor router id: 192.168.100.10
      valid  internal  best
Received Path ID 0, Local Path ID 1, version 21
   Attributes after inbound policy was applied:
      next hop: 192.168.100.10
      ORG AS LOCAL COMM
      origin: incomplete  local pref: 100
      aspath:
      community: 65535:666
   Attributes after outbound policy was applied:
      next hop: 192.168.200.1
      ORG AS LOCAL COMM
      origin: incomplete  local pref: 100
      aspath: 65501
      community: 1000:666

192.168.66.101/32 is advertised to 192.168.200.2
   Path info:
      neighbor: 192.168.100.10  neighbor router id: 192.168.100.10
      valid  internal  best
Received Path ID 0, Local Path ID 1, version 21
   Attributes after inbound policy was applied:
      next hop: 192.168.100.10
      ORG AS LOCAL COMM
      origin: incomplete  local pref: 100
      aspath:
      community: 65535:666
   Attributes after outbound policy was applied:
      next hop: 192.168.200.3
      ORG AS LOCAL COMM
      origin: incomplete  local pref: 100
      aspath: 65501
      community: 2000:666
As you can see in the Attributes after outbound policy was applied section, the community has been rewritten to the one required by each upstream provider and both routes are properly advertised.
If you applied a restriction to avoid dropping traffic locally, you can verify if the route is not in the RIB and therefore in the forwarding table (CEF):
show route ipv4 192.168.66.101/32
show cef ipv4 192.168.66.101/32
This should give you an empty response or an entry pointing to the correct next-hop (if you have such a /32 route normally).
In our example, we don’t have a 192.168.66.101/32 route normally, so the output is empty:
% Network not in table

%Prefix not found or IP is not running. VRF default.
Selective blackholing#
If you have high-capacity upstream links to your IP transit providers, you may consider using the selective blackholing feature to further reduce the impact of blackholing on legitimate traffic.
With this feature, you can configure different thresholds for each upstream provider and announce blackholing routes only to those upstreams which are actually affected by the attack.
Note
Selective blackholing requires that you have properly configured upstream providers in the BGP settings.
This requires your traffic to have 802.1Q VLAN tags for distinguishing different upstream providers. Otherwise, LiveShield Worker won’t be able to differentiate traffic.
Warning
Selective blackholing is a little bit slower than regular blackholing, because LiveShield has to keep track of traffic for each upstream separately.
There are two ways to achieve selective blackholing (it depends on your upstream providers’ agreements):
You can configure LiveShield to announce blackhole routes to your routers, but with additional communities for each upstream provider which is exceeding the defined thresholds. You can configure these communities in the Upstreams menu.
If you have a direct separate BGP session with your upstream provider just for blackholing routes (established directly from LiveShield), you should also configure BGP Router Restriction in the Upstreams menu (for each upstream). Please be sure to allow blackhole route announcements only on the BGP session which is matching the upstream provider.
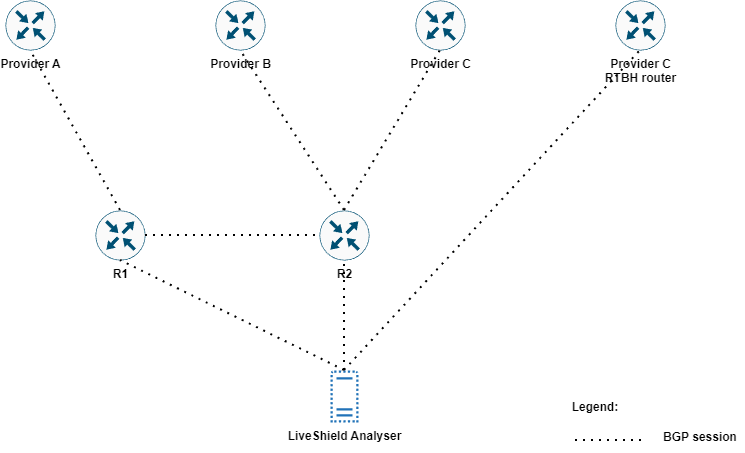
Example:
We have three upstream providers A, B and C. They are all terminated on two edge routers R1 and R2.
Provider A accepts /32 blackhole routes with community 1000:666 on the BGP session from router R1.
Provider B accepts /32 blackhole routes with community 2000:666 on the BGP session from router R2.
Provider C accepts /32 blackhole routes without any special community but requires a separate BGP session, which can be established directly from LiveShield.
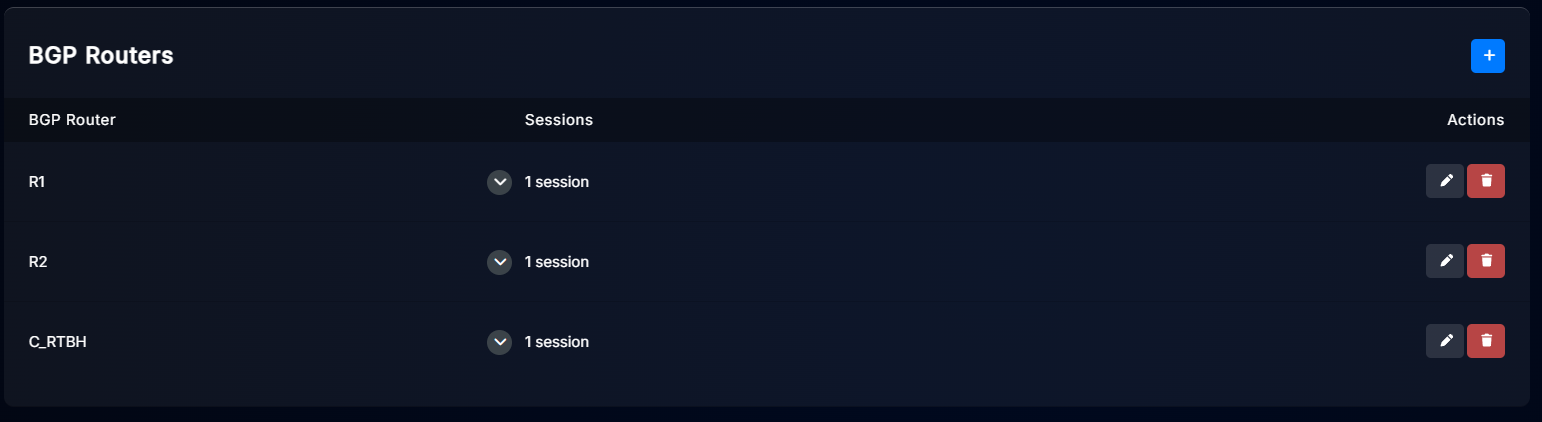
Example of configured BGP Routers (Peers) in Devices, BGP Routers tab:
In the Upstreams menu, we have configured three upstreams as follows:
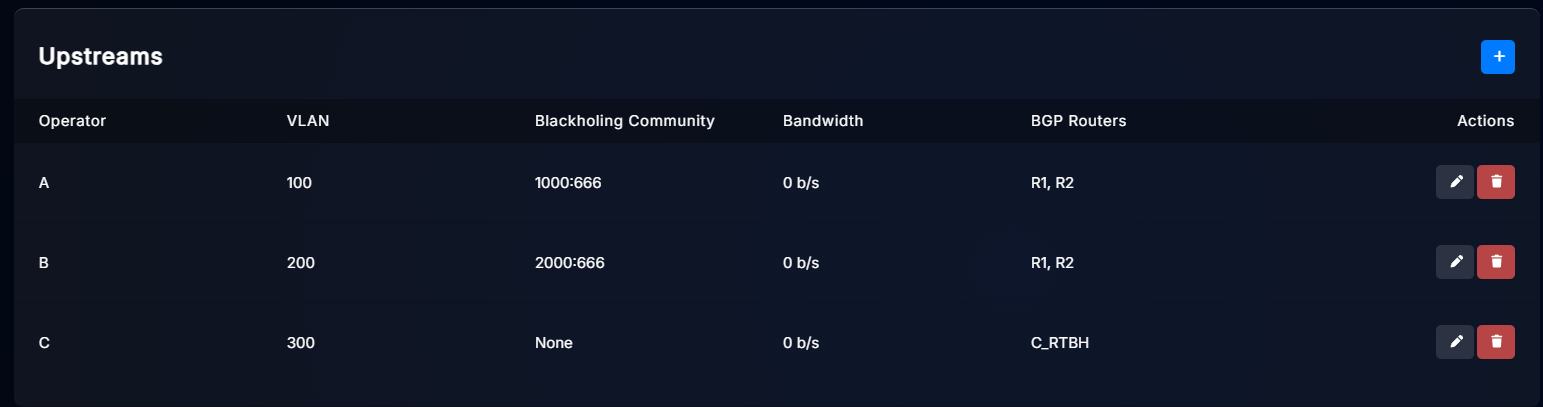
As you can see, each upstream has a different VLAN tag to allow LiveShield to distinguish traffic. Also, each upstream has a different blackholing community, except upstream C which uses a separate BGP session for blackholing routes.
The most important part is the BGP Router Restriction setting. Upstream A and B are restricted to router R1 and R2, because we have a BGP session only from these routers. The decision where to send the blackhole route will be performed by our R1 and R2 routers, based on communities. Upstream C is restricted to the C_RTBH peer, because blackhole routes for this upstream will be announced directly from LiveShield, only on this session.
Thresholds#
In order to use selective blackholing, you need to configure thresholds for each upstream in the blackholing profile.
Go to Filtering, then Blackholing Profiles and edit the desired profile or add a new one. More details about profile creation can be found in the Create profile section.
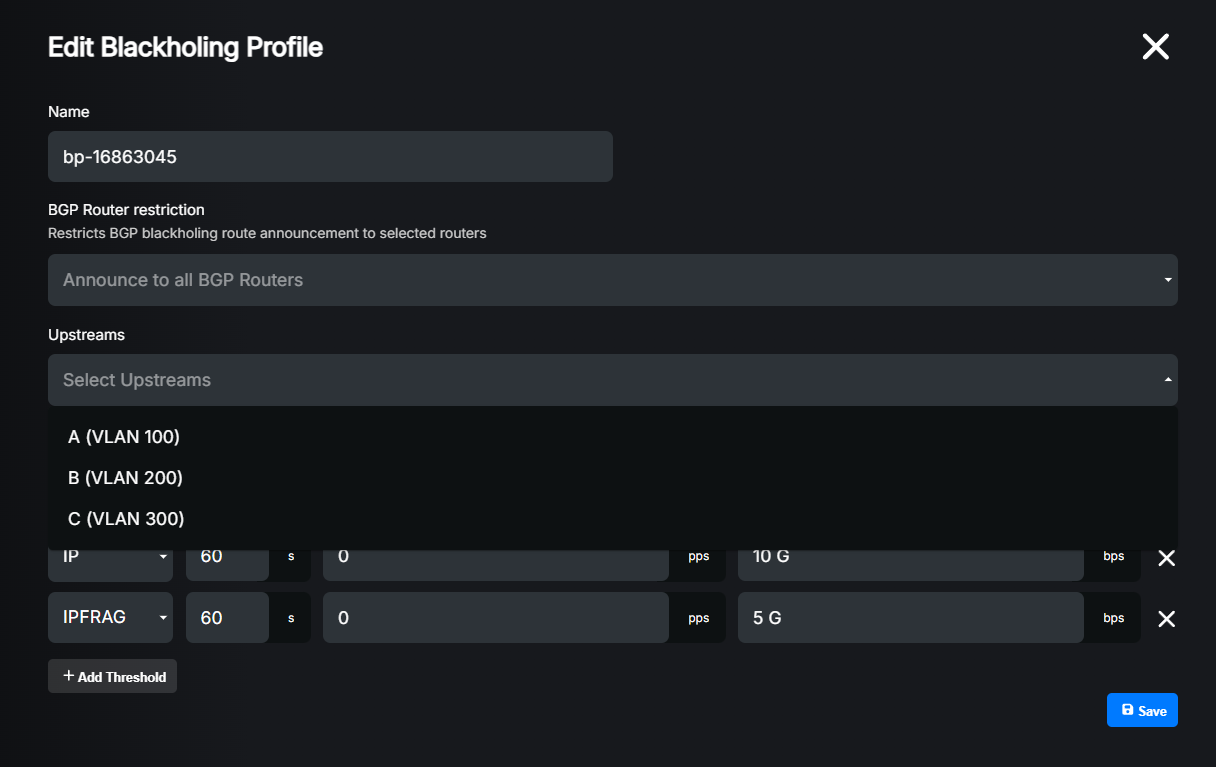
In order to convert it to a selective blackholing profile, you need to add Upstreams from the list and configure thresholds for each of them.
You can have different thresholds for each upstream, but please remember to add all upstreams which you want to use for selective blackholing and configure thresholds for each. Please remember to configure per-subnet thresholds if you want any blackholing actions on subnet attacks.
Warning
If you don’t add an upstream to the blackholing profile or you don’t configure thresholds for it, no blackholing will be applied on that upstream.
Note
If you configure BGP Router Restriction in the blackholing profile, only those BGP peers will receive blackholing routes. If your upstream is restricted to a BGP peer which is not in the profile restriction list, no blackholing route will be sent to that upstream.
Hint
You can have different profiles for different prefixes (even more specific). You can use selective blackholing only for some prefixes and regular blackholing for others.
If you want to check which upstreams are used for blackholing during an attack, you can check the Blackholing details in the Attacks menu (you have to click on a specific attack).

Example router config#
Before you start, please read the blackholing example configuration section, because this is the basic configuration required for blackholing to work (regular non-selective blackholing). In this section we will show you only the differences required for selective blackholing.
Warning
Do not copy-and-paste these lines without adjusting them to your existing configuration!
First, start with adding additional combined communities (combining local RTBH community 65535:666 with specific upstream RTBH community 1000:666 or 2000:666 respectively):
set policy-options community PROVIDER_A_W_LOCAL.RTBH members 65535:666
set policy-options community PROVIDER_A_W_LOCAL.RTBH members 1000:666

set policy-options community PROVIDER_B_W_LOCAL.RTBH members 65535:666
set policy-options community PROVIDER_B_W_LOCAL.RTBH members 2000:666
Then, all we have to do is to change our export policy for each upstream provider to announce the route only if the local RTBH community is present and/or a specific RTBH community for that provider is present. Then rewrite communities to leave only the specific provider RTBH community (PROVIDER_A.RTBH or PROVIDER_B.RTBH respectively).
Note
This example covers a scenario with regular (full) blackholing and selective blackholing together. If just the local RTBH community is present, the route will be announced to all upstreams. If local RTBH is present along with an additional community, the specific provider RTBH community is checked to achieve selective blackholing.
Note
If you already have configuration from the regular blackholing example, you’ll need to remove existing terms and insert new ones in the correct order (at the beginning of the statement).
We don’t recommend pure copy-and-paste, but here are the commands for deleting old terms:
delete policy-options policy-statement PROVIDER_A.OUT term REWRITE-RTBH-COMMUNITY
delete policy-options policy-statement PROVIDER_B.OUT term REWRITE-RTBH-COMMUNITY
After setting new terms, you can reposition them with:
insert policy-options policy-statement PROVIDER_A.OUT term REWRITE-RTBH-COMMUNITY before term ANNOUNCE-PREFIXES
insert policy-options policy-statement PROVIDER_A.OUT term REWRITE-RTBH-SELECTIVE-COMMUNITY after term REWRITE-RTBH-COMMUNITY

insert policy-options policy-statement PROVIDER_B.OUT term REWRITE-RTBH-COMMUNITY before term ANNOUNCE-PREFIXES
insert policy-options policy-statement PROVIDER_B.OUT term REWRITE-RTBH-SELECTIVE-COMMUNITY after term REWRITE-RTBH-COMMUNITY
set policy-options policy-statement PROVIDER_A.OUT term REWRITE-RTBH-COMMUNITY from community RTBH
set policy-options policy-statement PROVIDER_A.OUT term REWRITE-RTBH-COMMUNITY from community-count 1 equal
set policy-options policy-statement PROVIDER_A.OUT term REWRITE-RTBH-COMMUNITY then community set PROVIDER_A.RTBH
set policy-options policy-statement PROVIDER_A.OUT term REWRITE-RTBH-COMMUNITY then accept
set policy-options policy-statement PROVIDER_A.OUT term REWRITE-RTBH-SELECTIVE-COMMUNITY from community PROVIDER_A_W_LOCAL.RTBH
set policy-options policy-statement PROVIDER_A.OUT term REWRITE-RTBH-SELECTIVE-COMMUNITY then community set PROVIDER_A.RTBH
set policy-options policy-statement PROVIDER_A.OUT term REWRITE-RTBH-SELECTIVE-COMMUNITY then accept

set policy-options policy-statement PROVIDER_B.OUT term REWRITE-RTBH-COMMUNITY from community RTBH
set policy-options policy-statement PROVIDER_B.OUT term REWRITE-RTBH-COMMUNITY from community-count 1 equal
set policy-options policy-statement PROVIDER_B.OUT term REWRITE-RTBH-COMMUNITY then community set PROVIDER_B.RTBH
set policy-options policy-statement PROVIDER_B.OUT term REWRITE-RTBH-COMMUNITY then accept
set policy-options policy-statement PROVIDER_B.OUT term REWRITE-RTBH-SELECTIVE-COMMUNITY from community PROVIDER_B_W_LOCAL.RTBH
set policy-options policy-statement PROVIDER_B.OUT term REWRITE-RTBH-SELECTIVE-COMMUNITY then community set PROVIDER_B.RTBH
set policy-options policy-statement PROVIDER_B.OUT term REWRITE-RTBH-SELECTIVE-COMMUNITY then accept
First, start with adding additional community-lists (combining local RTBH community 65535:666 with specific upstream RTBH community 1000:666 or 2000:666 respectively):
ip community-list standard PROVIDER_A_W_LOCAL.RTBH permit 65535:666 1000:666
ip community-list standard PROVIDER_B_W_LOCAL.RTBH permit 65535:666 2000:666
Then, all we have to do is to change our export route-map for each upstream provider to announce the route only if the local RTBH community is present and/or a specific RTBH community for that provider is present. Then rewrite communities to leave only the specific provider RTBH community (1000:666 or 2000:666 respectively).
Note
This example covers a scenario with regular (full) blackholing and selective blackholing together. If just the local RTBH community is present, the route will be announced to all upstreams. If local RTBH is present along with an additional community, the specific provider RTBH community is checked to achieve selective blackholing.
Note
If you already have configuration from the regular blackholing example, you’ll need to remove existing route-map entries and insert new ones.
We don’t recommend pure copy-and-paste, but here are the commands for deleting old terms:
no route-map PROVIDER_A_OUT_V4 permit 10
no route-map PROVIDER_A_OUT_V6 permit 10
no route-map PROVIDER_B_OUT_V4 permit 10
route-map PROVIDER_A_OUT_V4 permit 10
   match community RTBH exact-match
   set community 1000:666
!
route-map PROVIDER_A_OUT_V4 permit 11
   match community PROVIDER_A_W_LOCAL.RTBH
   set community 1000:666
!
route-map PROVIDER_A_OUT_V6 permit 10
   match community RTBH exact-match
   set community 1000:666
!
route-map PROVIDER_A_OUT_V6 permit 11
   match community PROVIDER_A_W_LOCAL.RTBH
   set community 1000:666
!
route-map PROVIDER_B_OUT_V4 permit 10
   match community RTBH exact-match
   set community 2000:666
!
route-map PROVIDER_B_OUT_V4 permit 11
   match community PROVIDER_B_W_LOCAL.RTBH
   set community 2000:666
!
All we have to do is to change our export route-policy for each upstream provider to announce the route only if the local RTBH community is present and/or a specific RTBH community for that provider is present. Then rewrite communities to leave only the specific provider RTBH community (PROVIDER_A.RTBH or PROVIDER_B.RTBH respectively).
Note
This example covers a scenario with regular (full) blackholing and selective blackholing together. If just the local RTBH community is present, the route will be announced to all upstreams. If local RTBH is present along with an additional community, the specific provider RTBH community is checked to achieve selective blackholing.
route-policy PROVIDER_A_OUT_V4
   if community matches-within RTBH then
      set community PROVIDER_A.RTBH
   elseif community matches-any RTBH and community matches-any PROVIDER_A.RTBH then
      set community PROVIDER_A.RTBH
   elseif destination in ANNOUNCE-PREFIXES then
      pass
   else
      drop
   endif
end-policy
!

route-policy PROVIDER_A_OUT_V6
   if community matches-within RTBH then
      set community PROVIDER_A.RTBH
   elseif community matches-any RTBH and community matches-any PROVIDER_A.RTBH then
      set community PROVIDER_A.RTBH
   elseif destination in ANNOUNCE-PREFIXES-V6 then
      pass
   else
      drop
   endif
end-policy
!

route-policy PROVIDER_B_OUT_V4
   if community matches-within RTBH then
      set community PROVIDER_B.RTBH
   elseif community matches-any RTBH and community matches-any PROVIDER_B.RTBH then
      set community PROVIDER_B.RTBH
   elseif destination in ANNOUNCE-PREFIXES then
      pass
   else
      drop
   endif
end-policy
!
Full config example:
interfaces {
   ge-0/0/0 {
      unit 0 {
         description TO_LIVESHIELD;
         family inet {
            address 192.168.100.222/24;
         }
      }
   }
   ge-0/0/1 {
      description PROVIDER_A;
      unit 0 {
         family inet {
            address 192.168.200.1/31;
         }
         family inet6 {
            address fc00::200:1/127;
         }
      }
   }
   ge-0/0/2 {
      description PROVIDER_B;
      unit 0 {
         family inet {
            address 192.168.200.3/31;
         }
      }
   }
}
policy-options {
   prefix-list ANNOUNCE-PREFIXES {
      192.168.66.0/24;
   }
   prefix-list ANNOUNCE-PREFIXES-V6 {
      fc00::66:0/112;
   }
   policy-statement PROVIDER_A.IN {
      then default-action accept;
   }
   policy-statement PROVIDER_A.OUT {
      term REWRITE-RTBH-COMMUNITY {
            from {
               community RTBH;
               community-count 1 equal;
            }
            then {
               community set PROVIDER_A.RTBH;
               accept;
            }
      }
      term REWRITE-RTBH-SELECTIVE-COMMUNITY {
            from community PROVIDER_A_W_LOCAL.RTBH;
            then {
               community set PROVIDER_A.RTBH;
               accept;
            }
      }
      term ANNOUNCE-PREFIXES {
            from {
               prefix-list ANNOUNCE-PREFIXES;
            }
            then accept;
      }
      term ANNOUNCE-PREFIXES-V6 {
            from {
               prefix-list ANNOUNCE-PREFIXES-V6;
            }
            then accept;
      }
      then default-action reject;
   }
   policy-statement FIB-FILTER.IN {
      term REJECT-RTBH {
         from community RTBH;
         then reject;
      }
      then default-action accept;
   }
   policy-statement PROVIDER_B.IN {
      then default-action accept;
   }
   policy-statement PROVIDER_B.OUT {
      term REWRITE-RTBH-COMMUNITY {
            from {
               community RTBH;
               community-count 1 equal;
            }
            then {
               community set PROVIDER_B.RTBH;
               accept;
            }
      }
      term REWRITE-RTBH-SELECTIVE-COMMUNITY {
            from community PROVIDER_B_W_LOCAL.RTBH;
            then {
               community set PROVIDER_B.RTBH;
               accept;
            }
      }
      term ANNOUNCE-PREFIXES {
            from {
               prefix-list ANNOUNCE-PREFIXES;
            }
            then accept;
      }
      then default-action reject;
   }
   policy-statement LIVESHIELD.IN {
      term CHECK-COMMUNITY {
         from community RTBH;
         then accept;
      }
      term ACCEPT-FLOWSPEC {
         from rib inetflow.0;
         then accept;
      }
      term ACCEPT-FLOWSPEC-V6 {
         from rib inet6flow.0;
         then accept;
      }
      then default-action reject;
   }
   policy-statement LIVESHIELD.OUT {
      then default-action reject;
   }
   community PROVIDER_A.RTBH members 1000:666;
   community PROVIDER_A_W_LOCAL.RTBH members [ 65535:666 1000:666 ];
   community PROVIDER_B.RTBH members 2000:666;
   community PROVIDER_B_W_LOCAL.RTBH members [ 65535:666 2000:666 ];
   community RTBH members 65535:666;
}
routing-options {
   router-id 192.168.100.222;
   forwarding-table {
      export FIB-FILTER.IN;
   }
}
protocols {
   bgp {
      group LIVESHIELD {
         type internal;
         import LIVESHIELD.IN;
         export LIVESHIELD.OUT;
         peer-as 65501;
         neighbor 192.168.100.10 {
            family inet {
               unicast;
               flow;
            }
         }
      }
      group PROVIDER_A {
         type external;
         description PROVIDER_A;
         advertise-inactive;
         import PROVIDER_A.IN;
         export PROVIDER_A.OUT;
         peer-as 1000;
         neighbor 192.168.200.0 {
            family inet {
               unicast;
            }
         }
         neighbor fc00::200:0 {
            family inet6 {
               unicast;
            }
         }
      }
      group PROVIDER_B {
         type external;
         description PROVIDER_B;
         advertise-inactive;
         import PROVIDER_B.IN;
         export PROVIDER_B.OUT;
         peer-as 2000;
         neighbor 192.168.200.2 {
            family inet {
               unicast;
            }
         }
      }
      local-as 65501;
   }
}
interface GigabitEthernet1
   description TO_LIVESHIELD
   ip address 192.168.100.222 255.255.255.0
   negotiation auto
!
interface GigabitEthernet2
   description PROVIDER_A
   ip address 192.168.200.1 255.255.255.254
   negotiation auto
   ipv6 address FC00::200:1/127
!
interface GigabitEthernet3
   description PROVIDER_B
   ip address 192.168.200.3 255.255.255.254
   negotiation auto
!
router bgp 65501
   bgp router-id 192.168.100.222
   bgp log-neighbor-changes
   neighbor 192.168.100.10 remote-as 65501
   neighbor 192.168.100.10 description LIVESHIELD
   neighbor 192.168.200.0 remote-as 1000
   neighbor 192.168.200.0 description PROVIDER_A
   neighbor 192.168.200.2 remote-as 2000
   neighbor 192.168.200.2 description PROVIDER_B
   neighbor FC00::200:0 remote-as 1000
   neighbor FC00::200:0 description PROVIDER_A
   !
   address-family ipv4
      table-map RIB_FILTER filter
      network 192.168.66.0
      neighbor 192.168.100.10 activate
      neighbor 192.168.100.10 route-map LIVESHIELD_IN_V4 in
      neighbor 192.168.100.10 route-map LIVESHIELD_OUT out
      neighbor 192.168.200.0 activate
      neighbor 192.168.200.0 send-community standard
      neighbor 192.168.200.0 route-map PROVIDER_A_IN_V4 in
      neighbor 192.168.200.0 route-map PROVIDER_A_OUT_V4 out
      neighbor 192.168.200.2 activate
      neighbor 192.168.200.2 send-community standard
      neighbor 192.168.200.2 route-map PROVIDER_B_IN_V4 in
      neighbor 192.168.200.2 route-map PROVIDER_B_OUT_V4 out
      no neighbor FC00::100:10 activate
      no neighbor FC00::200:0 activate
   exit-address-family
   !
   address-family ipv6
      table-map RIB_FILTER filter
      network FC00::66:0/112
      neighbor FC00::200:0 activate
      neighbor FC00::200:0 send-community standard
      neighbor FC00::200:0 route-map PROVIDER_A_IN_V6 in
      neighbor FC00::200:0 route-map PROVIDER_A_OUT_V6 out
   exit-address-family
   !
!
ip bgp-community new-format
ip community-list standard RTBH permit 65535:666
ip community-list standard PROVIDER_A_W_LOCAL.RTBH permit 65535:666 1000:666
ip community-list standard PROVIDER_B_W_LOCAL.RTBH permit 65535:666 2000:666
!
ip prefix-list ANNOUNCE-PREFIXES seq 10 permit 192.168.66.0/24
!
!
ipv6 prefix-list ANNOUNCE-PREFIXES-V6 seq 10 permit FC00::66:0/112
!
route-map LIVESHIELD_IN_V4 permit 10
   match community RTBH
!
route-map LIVESHIELD_IN_V4 deny 1000
!
route-map LIVESHIELD_IN_V6 permit 10
   match community RTBH
!
route-map LIVESHIELD_IN_V6 deny 1000
!
route-map PROVIDER_A_OUT_V4 permit 10
   match community RTBH exact-match
   set community 1000:666
!
route-map PROVIDER_A_OUT_V4 permit 11
   match community PROVIDER_A_W_LOCAL.RTBH
   set community 1000:666
!
route-map PROVIDER_A_OUT_V4 permit 20
   match ip address prefix-list ANNOUNCE-PREFIXES
!
route-map PROVIDER_A_OUT_V4 deny 1000
!
route-map PROVIDER_A_OUT_V6 permit 10
   match community RTBH exact-match
   set community 1000:666
!
route-map PROVIDER_A_OUT_V6 permit 11
   match community PROVIDER_A_W_LOCAL.RTBH
   set community 1000:666
!
route-map PROVIDER_A_OUT_V6 permit 20
   match ip address prefix-list ANNOUNCE-PREFIXES-V6
!
route-map PROVIDER_A_OUT_V6 deny 1000
!
route-map PROVIDER_B_OUT_V4 permit 10
   match community RTBH exact-match
   set community 2000:666
!
route-map PROVIDER_B_OUT_V4 permit 11
   match community PROVIDER_B_W_LOCAL.RTBH
   set community 2000:666
!
route-map PROVIDER_B_OUT_V4 permit 20
   match ip address prefix-list ANNOUNCE-PREFIXES
!
route-map PROVIDER_B_OUT_V4 deny 1000
!
route-map PROVIDER_B_IN_V4 permit 1000
!
route-map RIB_FILTER deny 10
   match community RTBH
!
route-map RIB_FILTER permit 1000
!
route-map LIVESHIELD_OUT deny 1000
!
route-map PROVIDER_A_IN_V4 permit 1000
!
route-map PROVIDER_A_IN_V6 permit 1000
!
interface GigabitEthernet0/0/0/0
   description TO_LIVESHIELD
   ipv4 address 192.168.100.222 255.255.255.0
!
interface GigabitEthernet0/0/0/1
   description PROVIDER_A
   ipv4 address 192.168.200.1 255.255.255.254
   ipv6 address fc00::200:1/127
!
interface GigabitEthernet0/0/0/2
   description PROVIDER_B
   ipv4 address 192.168.200.3 255.255.255.254
!
prefix-set ANNOUNCE-PREFIXES
   192.168.66.0/24
end-set
!
prefix-set ANNOUNCE-PREFIXES-V6
   fc00::66:0/112
end-set
!
community-set RTBH
   65535:666
end-set
!
community-set PROVIDER_A.RTBH
   1000:666
end-set
!
community-set PROVIDER_B.RTBH
   2000:666
end-set
!
route-policy RIB_FILTER
   if community matches-any RTBH then
      drop
   else
      pass
   endif
end-policy
!
route-policy LIVESHIELD_OUT
   drop
end-policy
!
route-policy LIVESHIELD_IN_V4
   if community matches-any RTBH then
      pass
   else
      drop
   endif
end-policy
!
route-policy LIVESHIELD_IN_V6
   if community matches-any RTBH then
      pass
   else
      drop
   endif
end-policy
!
route-policy PROVIDER_A_IN_V4
   pass
end-policy
!
route-policy PROVIDER_A_IN_V6
   pass
end-policy
!
route-policy PROVIDER_B_IN_V4
   pass
end-policy
!
route-policy PROVIDER_A_OUT_V4
   if community matches-within RTBH then
      set community PROVIDER_A.RTBH
   elseif community matches-any RTBH and community matches-any PROVIDER_A.RTBH then
      set community PROVIDER_A.RTBH
   elseif destination in ANNOUNCE-PREFIXES then
      pass
   else
      drop
   endif
end-policy
!
route-policy PROVIDER_A_OUT_V6
   if community matches-within RTBH then
      set community PROVIDER_A.RTBH
   elseif community matches-any RTBH and community matches-any PROVIDER_A.RTBH then
      set community PROVIDER_A.RTBH
   elseif destination in ANNOUNCE-PREFIXES-V6 then
      pass
   else
      drop
   endif
end-policy
!
route-policy PROVIDER_B_OUT_V4
   if community matches-within RTBH then
      set community PROVIDER_B.RTBH
   elseif community matches-any RTBH and community matches-any PROVIDER_B.RTBH then
      set community PROVIDER_B.RTBH
   elseif destination in ANNOUNCE-PREFIXES then
      pass
   else
      drop
   endif
end-policy
!
router bgp 65501
   bgp router-id 192.168.100.222
   address-family ipv4 unicast
      table-policy RIB_FILTER
      network 192.168.66.0/24
   !
   address-family ipv6 unicast
      table-policy RIB_FILTER
      network fc00::66:0/112
   !
   session-group LIVESHIELD
      remote-as 65501
   !
   neighbor-group LIVESHIELD
      use session-group LIVESHIELD
      address-family ipv4 unicast
         route-policy LIVESHIELD_IN_V4 in
         route-policy LIVESHIELD_OUT out
      !
      address-family ipv6 unicast
         route-policy LIVESHIELD_IN_V6 in
         route-policy LIVESHIELD_OUT out
      !
   !
   neighbor fc00::200:0
      remote-as 1000
      description PROVIDER_A
      send-community-ebgp
      address-family ipv6 unicast
         route-policy PROVIDER_A_IN_V6 in
         route-policy PROVIDER_A_OUT_V6 out
      !
   !
   neighbor 192.168.200.0
      remote-as 1000
      description PROVIDER_A
      send-community-ebgp
      address-family ipv4 unicast
         route-policy PROVIDER_A_IN_V4 in
         route-policy PROVIDER_A_OUT_V4 out
      !
   !
   neighbor 192.168.200.2
      remote-as 2000
      description PROVIDER_B
      send-community-ebgp
      address-family ipv4 unicast
         route-policy PROVIDER_B_IN_V4 in
         route-policy PROVIDER_B_OUT_V4 out
      !
   !
   neighbor 192.168.100.10
      use neighbor-group LIVESHIELD
      description LIVESHIELD
   !
!
Verification:
Let’s assume that upstream provider A is exceeding the defined blackholing thresholds, so the RTBH route should be announced with community 1000:666 only to that upstream.
Check if the route is correctly announced:
/usr/share/liveshield/analyser/gobgp/gobgp global rib -a vpnv4
This should give you output similar to the following:
   Network                            Labels     Next Hop             AS_PATH              Age        Attrs
*> 192.168.100.10:0:192.168.66.101/32 [0]        0.0.0.0                                   00:00:05   [{Origin: ?} {Communities: blackhole, 1000:666} {Extcomms: [192.168.100.10:0]}]
As you can see, it only contains global blackhole community and 1000:666, which is correct for upstream provider A. This is configurable in the Upstreams menu.
Note
Extcomms are used for internal LiveShield purposes. This defines to which BGP peers the route should be announced. It’s tied to the GoBGP VRF feature. You can ignore this attribute unless you are familiar with GoBGP and the vpnv4 family.
Check if the route is correctly received:
show route 192.168.66.101/32 detail
This should give you output similar to the following:
192.168.66.101/32 (1 entry, 1 announced)
      *BGP     Preference: 170/-101
               Next hop type: Indirect, Next hop index: 0
               Address: 0x8249b94
               Next-hop reference count: 1
               Kernel Table Id: 0
               Source: 192.168.100.10
               Protocol next hop: 192.168.100.10
               Indirect next hop: 0x2 no-forward INH Session ID: 0
               Indirect next hop: INH non-key opaque: 0x0 INH key opaque: 0x0
               State: <Active Int Ext>
               Peer AS: 65501
               Age: 5:04:53    Metric2: 0
               Validation State: unverified
               Task: BGP_65501_65501.192.168.100.10
               Announcement bits (2): 1-BGP_RT_Background 2-Resolve tree 1
               AS path: ?
               Communities: 1000:666 65535:666
               Accepted
               Localpref: 100
               Router ID: 192.168.100.10
               Thread: junos-main
Look for Communities: 1000:666 65535:666. If it matches the previously defined local blackhole community along with the specific upstream community, then the blackhole route is properly received and ready to be announced to upstream provider A.
Now check if the route is correctly redistributed to upstream provider A:
show route advertising-protocol bgp 192.168.200.0 192.168.66.101/32 detail
This should give you output similar to the following:
* 192.168.66.101/32 (1 entry, 1 announced)
 BGP group PROVIDER_A type External
      Nexthop: Self
      AS path: [65501] ?
      Communities: 1000:666
As you can see, the community has been rewritten to the one required by upstream provider A and the route is properly advertised.
Now, let’s check if the route is NOT redistributed to upstream provider B:
show route advertising-protocol bgp 192.168.200.2 192.168.66.101/32 detail
You should see no output, because the route should not be advertised to that upstream.
Check if the route is correctly received:
show bgp ipv4 unicast 192.168.66.101/32
This should give you output similar to the following:
BGP routing table entry for 192.168.66.101/32, version 10
Paths: (1 available, best #1, table default)
   Advertised to update-groups:
      33
   Refresh Epoch 1
   Local
      192.168.100.10 from 192.168.100.10 (192.168.100.10)
         Origin incomplete, localpref 100, valid, internal, best
         Community: 1000:666 65535:666
         rx pathid: 0, tx pathid: 0x0
         Updated on Jan 21 2026 18:02:56 UTC
Look for Community: 1000:666 65535:666. If it matches the previously defined local blackhole community along with the specific upstream community, then the blackhole route is properly received and ready to be announced to upstream provider A.
Now check if the route is correctly redistributed to upstream provider A:
show bgp ipv4 unicast neighbors 192.168.200.0 advertised-routes 192.168.66.101/32
This should give you output similar to the following:
BGP routing table entry for 192.168.66.101/32, version 10
   Paths: (1 available, best #1, table default)
   Advertised Attributes
      Local Preference: 0
      Metric: 0
      Origin: incomplete
      AS-Path:  65501
      Community: 1000:666
      Nexthop: 192.168.200.1
As you can see, the community has been rewritten to the one required by upstream provider A and the route is properly advertised.
Now, let’s check if the route is NOT redistributed to upstream provider B:
show bgp ipv4 unicast neighbors 192.168.200.2 advertised-routes 192.168.66.101/32
You should see empty output, with no advertisement details:
BGP routing table entry for 192.168.66.101/32, version 10
   Paths: (1 available, best #1, table default)
Check if the route is correctly received:
show bgp ipv4 unicast 192.168.66.101/32
This should give you output similar to the following:
Paths: (1 available, best #1)
   Advertised IPv4 Unicast paths to peers (in unique update groups):
      192.168.200.0
   Path #1: Received by speaker 0
   Advertised IPv4 Unicast paths to peers (in unique update groups):
      192.168.200.0
   Local
      192.168.100.10 from 192.168.100.10 (192.168.100.10)
         Origin incomplete, localpref 100, valid, internal, best, group-best
         Received Path ID 0, Local Path ID 1, version 44
         Community: 1000:666 65535:666
Look for Community: 1000:666 65535:666. If it matches the previously defined local blackhole community along with the specific upstream community, then the blackhole route is properly received and ready to be announced to upstream provider A.
Now check if the route is correctly redistributed to upstream provider A:
show bgp ipv4 unicast advertised neighbor 192.168.200.0 | begin 192.168.66.101/32
This should give you output similar to the following:
192.168.66.101/32 is advertised to 192.168.200.0
   Path info:
      neighbor: 192.168.100.10  neighbor router id: 192.168.100.10
      valid  internal  best
Received Path ID 0, Local Path ID 1, version 44
   Attributes after inbound policy was applied:
      next hop: 192.168.100.10
      ORG AS LOCAL COMM
      origin: incomplete  local pref: 100
      aspath:
      community: 1000:666 65535:666
   Attributes after outbound policy was applied:
      next hop: 192.168.200.1
      ORG AS LOCAL COMM
      origin: incomplete  local pref: 100
      aspath: 65501
      community: 1000:666
As you can see in the Attributes after outbound policy was applied section, the community has been rewritten to the one required by upstream provider A and the route is properly advertised.
Now, let’s check if the route is NOT redistributed to upstream provider B:
show bgp ipv4 unicast advertised neighbor 192.168.200.2 | begin 192.168.66.101/32
You should see no output, because the route should not be advertised to that upstream.
Verify with provider#
After completing configuration and verification on your side, it’s recommended to check if your upstream providers are receiving the blackhole routes as expected.
The easiest way is to look for looking glass services provided by your upstreams.
Here is the list of the most popular ones (maybe you’ll find your provider on that list):
Search for your provider’s looking glass or ask them directly.
Here is an example of a correctly received blackhole route on an upstream provider’s looking glass:
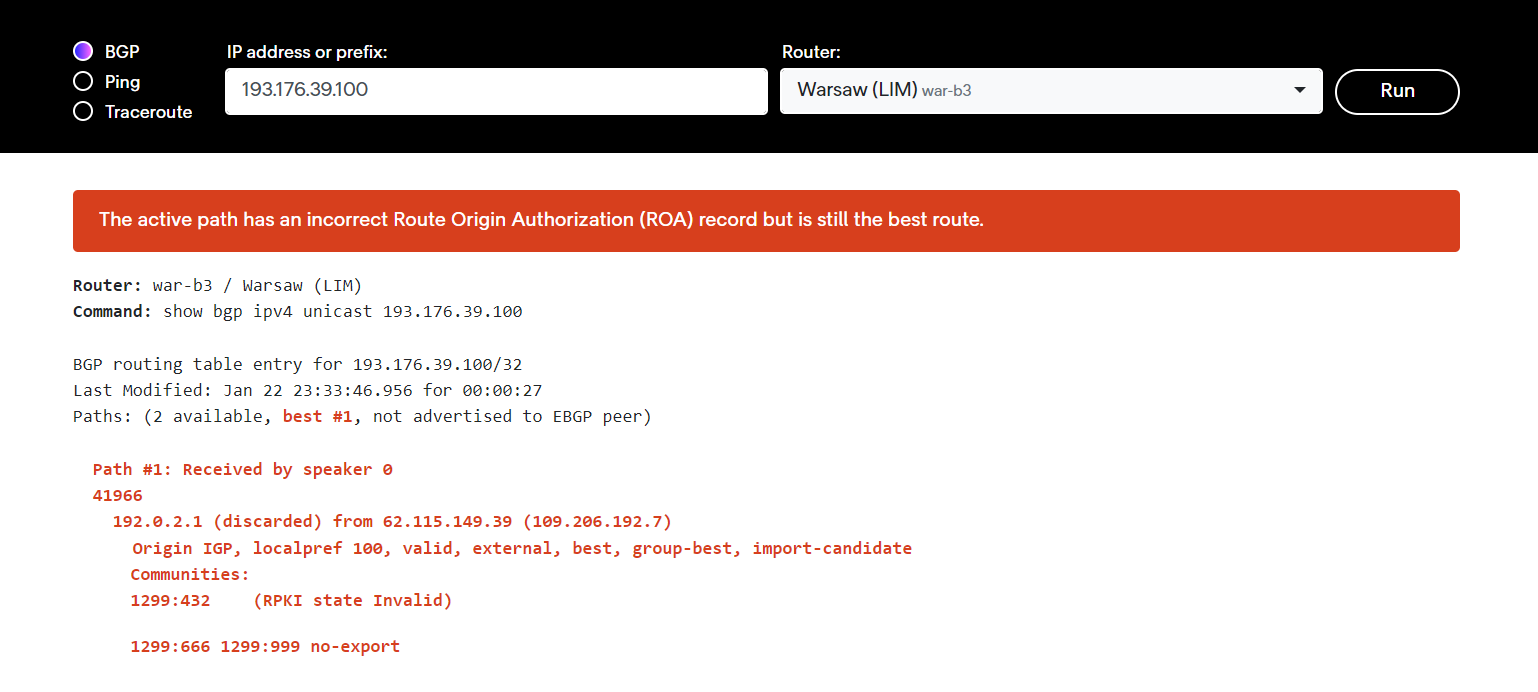
As you can see, the /32 route is accepted and traffic is discarded.