Detection and filtering#
Add prefixes#
The first step of the detection and filtering configuration is to define which IP prefixes you want to protect with LiveShield.
Go to the “Filtering” menu option.
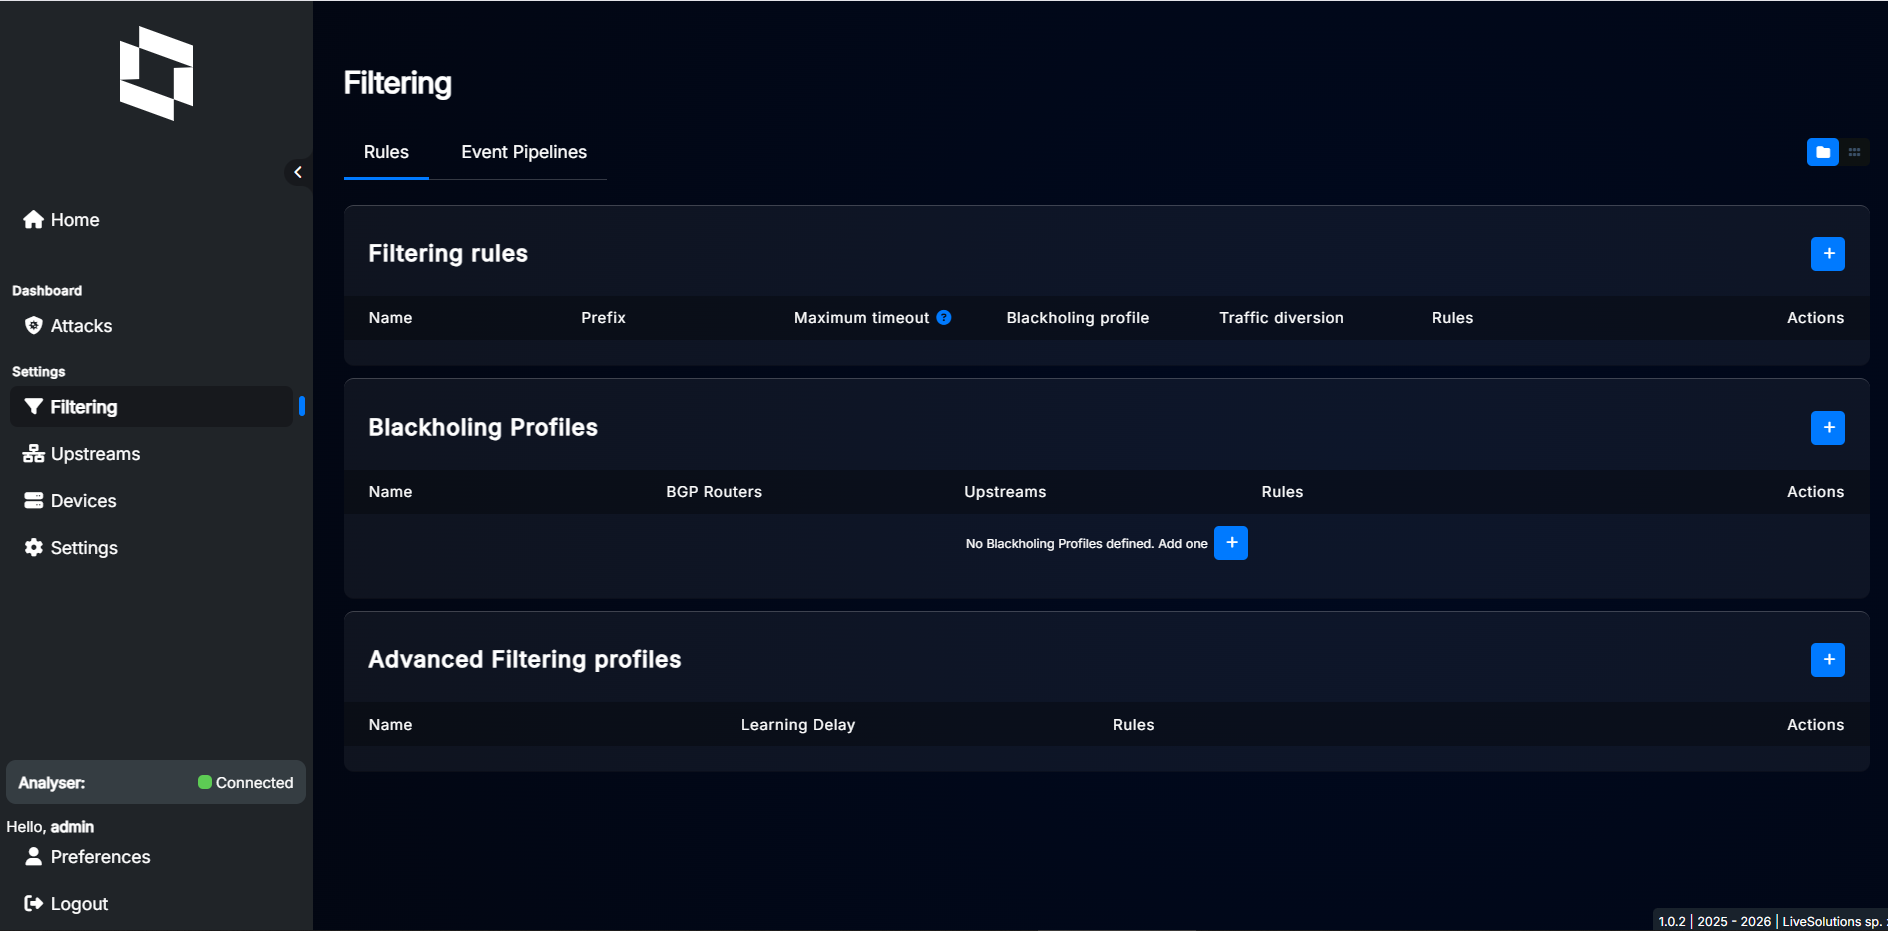
Click “+” button in the “Filtering Rules” section to add new prefix. After that, a dialog will appear.
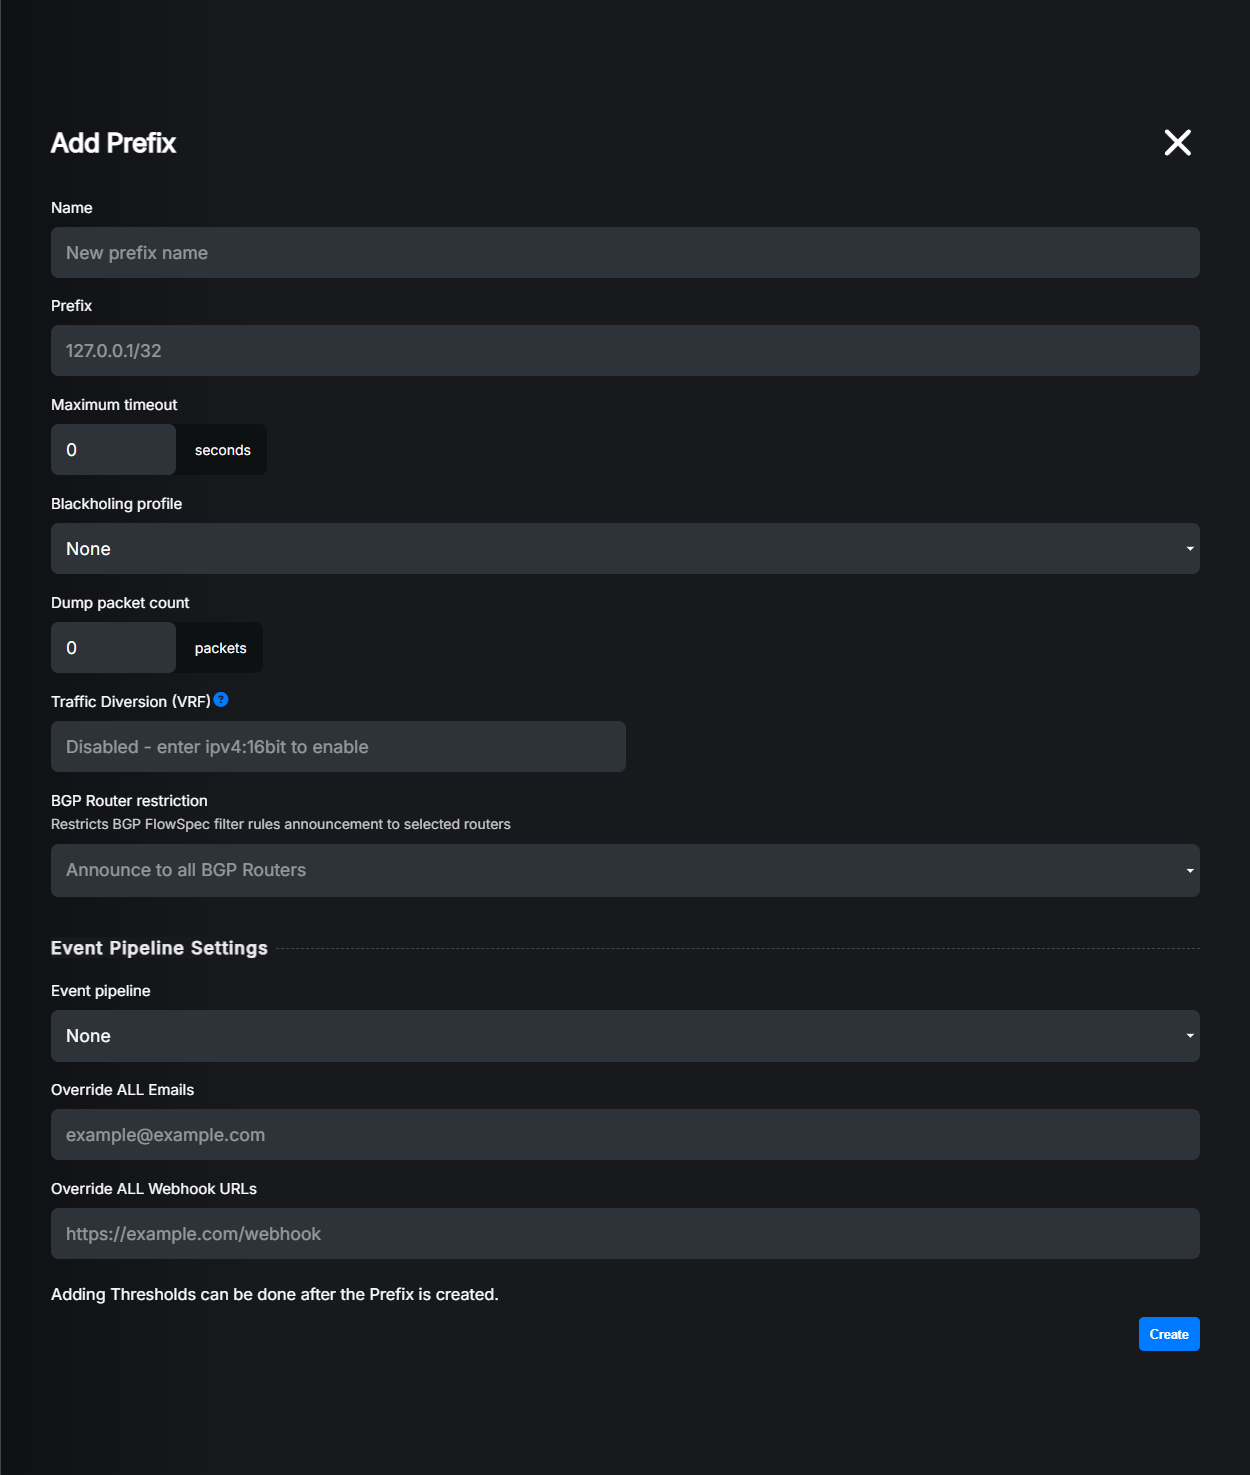
Settings explained:
Template: (Optional) You can select a template to apply predefined settings and thresholds to this prefix. Please refer to Templates section for details.
Name: A friendly name for your prefix. Just for your reference. You can leave it blank, then LiveShield will generate one automatically.
Prefix: The IP prefix you want to protect. You can enter IPv4 or IPv6 prefix in CIDR notation (e.g., 192.0.2.0/24 or 2001:db8::/32).
Maximum timeout: The maximum duration (in seconds) for which an attack will be marked as detected for IP addresses in this prefix. 0 means end all rules immediately when the attack is over. We recommend setting it to around 5 minutes (300 seconds) to improve efficiency.
Blackholing profile: Select the blackholing profile to be used when an attack is detected on this prefix. For more information please refer to Blackholing section.
Dump packet count: Number of packets to capture in single pcap file when an attack is detected on this prefix. These packets can be used for further analysis. Set to 0 to disable packet capturing. We recommend 100 or 200 if you want to use packet capturing.
Traffic diversion (VRF): (Optional) If you want to redirect traffic to some other device or scrubbing center, you can put here VRF route target in format XXX.XXX.XXX.XXX:YY. LiveShield will generate FlowSpec redirect route when any attack is detected on this prefix.
BGP Router restriction: (Optional) If you have multiple BGP routers configured in LiveShield, you can restrict rule generated for this prefix to be sent only to specific BGP routers. Just select one or more routers from the list. If none is selected, rules will be sent to all configured BGP routers matching the prefix IP version and supporting FlowSpec.
Event pipe: (Optional) You can select specific event pipe for this prefix. If none is selected, default event pipe will be used. For more information about event pipes, please refer to Event Pipelines section.
Override ALL Emails: (Optional) If your Event pipe contains email notification actions, you can override all email recipients for this prefix by entering new email address here. Leave it blank to use email addresses defined in the event pipe.
Override ALL Webhook URLs: (Optional) If your Event pipe contains webhook notification actions, you can override all webhook URLs for this prefix by entering new URL here. Leave it blank to use webhook URLs defined in the event pipe.
Aggregate to subnet attack thresholds: (Optional) Check Subnet aggregation for details.
Stop aggregate to subnet timeout: (Optional) Check Subnet aggregation for details.
Maximum subnet count: (Optional) If attack on subnet is detected, LiveShield will try to divide prefix into smaller subnets (as small as possible, according to attacked IPs). This settings defined maximum number of subnets which can be generated for subnet attack in this prefix.
Maximum mask: (Optional) If attack on subnet is detected, LiveShield will try to divide prefix into smaller subnets (as small as possible, according to attacked IPs). This setting defines maximum mask for these smaller subnets.
Thresholds section: Here you can configure thresholds for various protocols. Please refer to Thresholds.
Let’s assume we own prefix 192.168.100.0/24 and we want to protect it with LiveShield. We’ll not use blackholing right now, just FlowSpec rules.
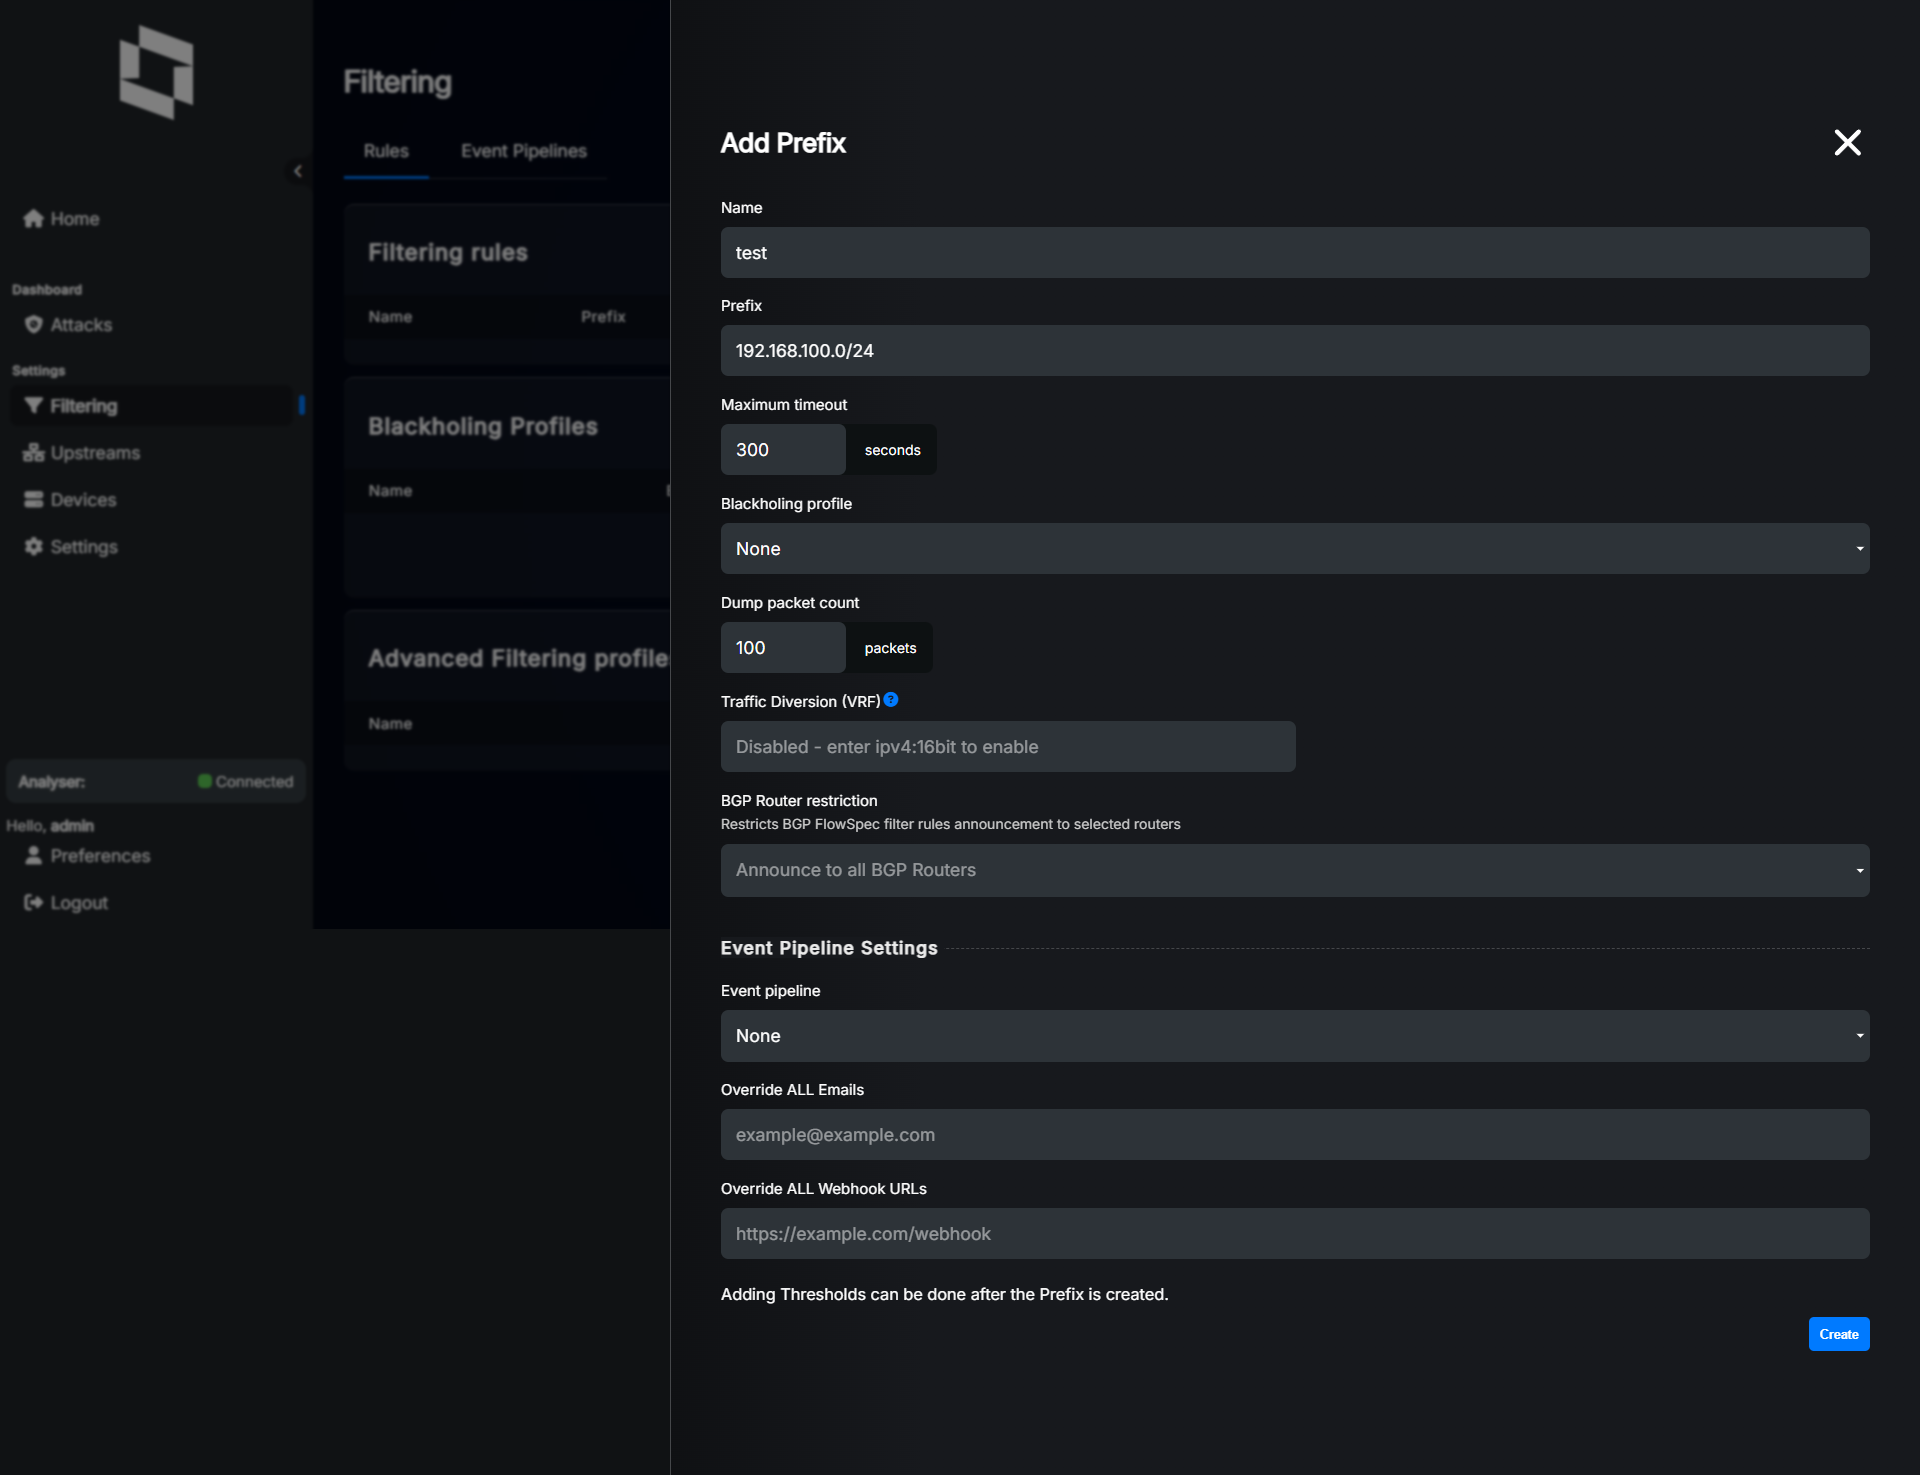
This should give you following result:
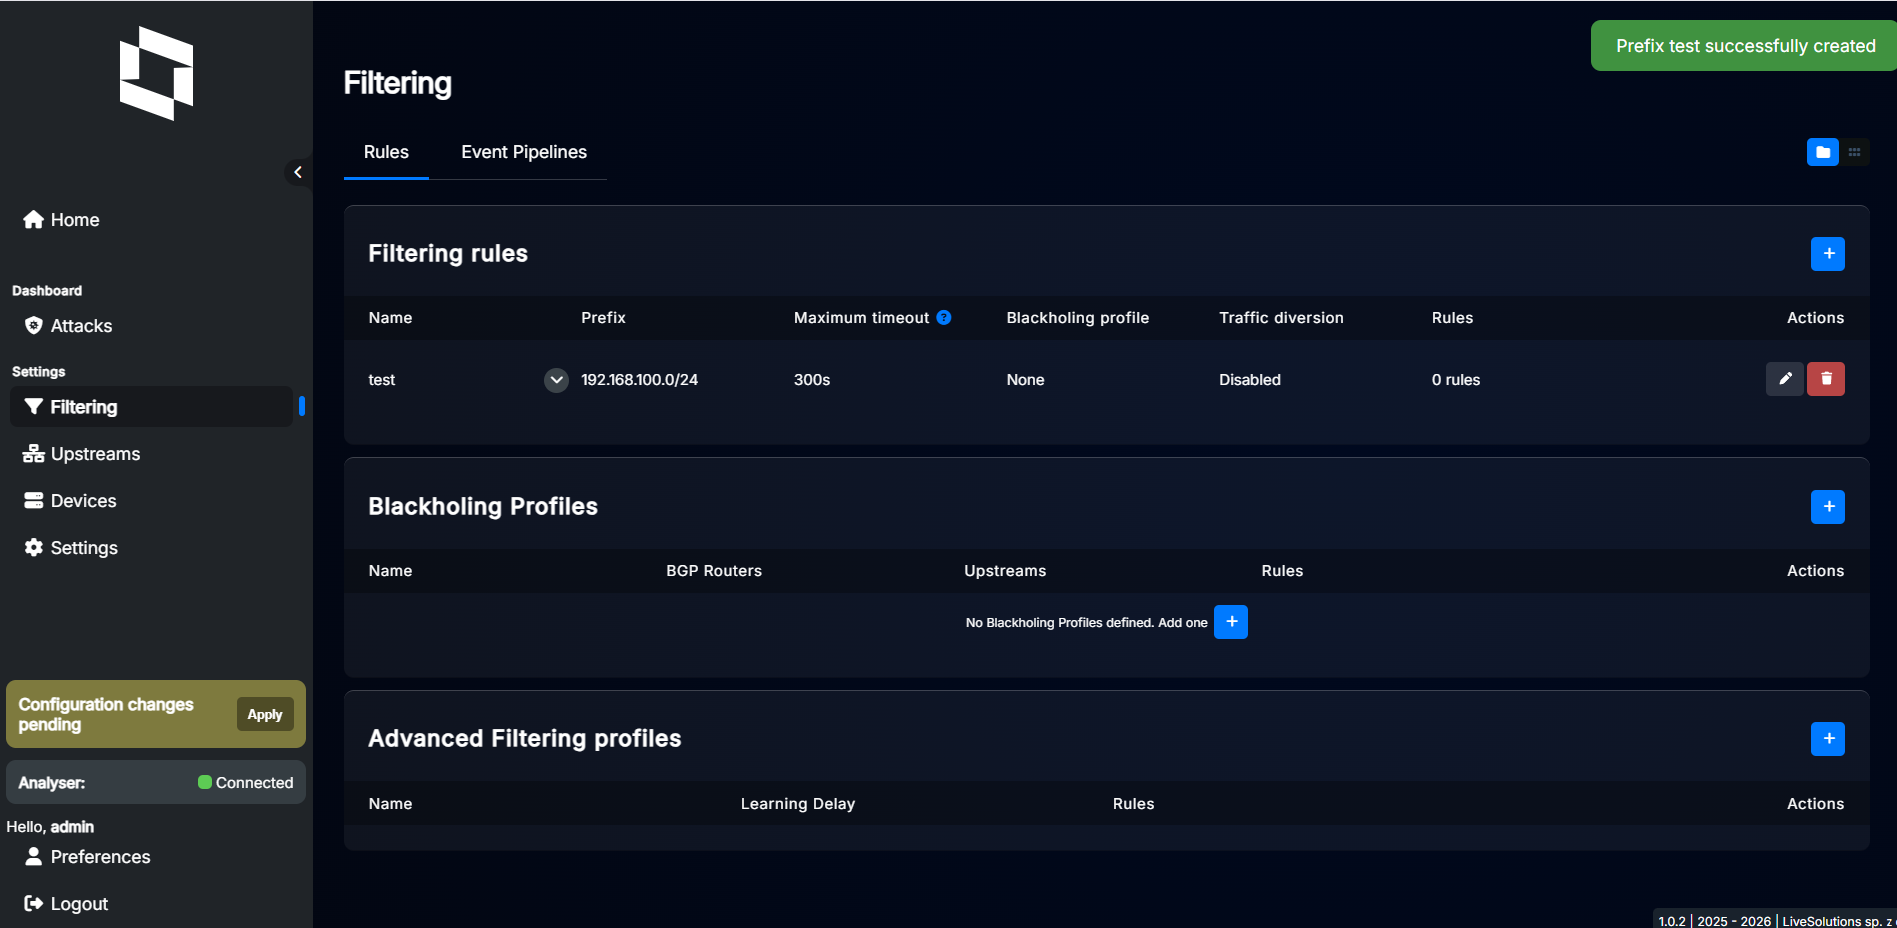
You can now proceed to add more prefixes or start configuring thresholds for specific protocols.
Thresholds#
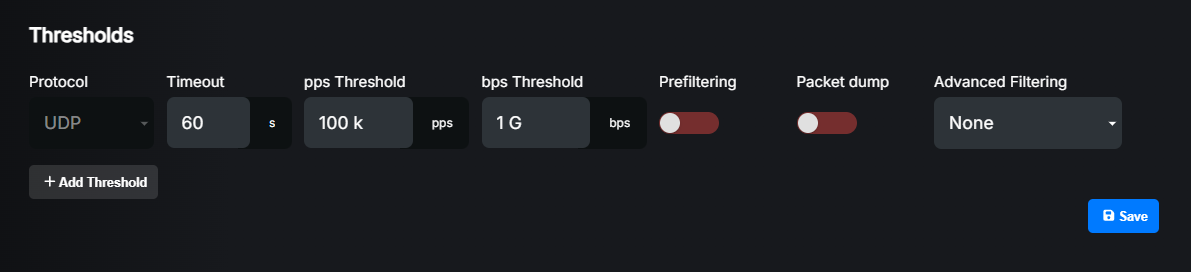
In order to start configuring thresholds, click the edit button on the right side of the prefix entry. Scroll down to the “Thresholds” section.
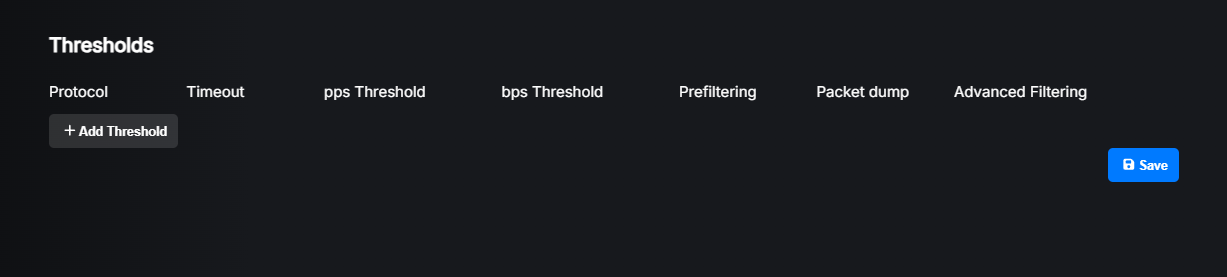
Click the “Add Threshold” button to add a new threshold. A new record will appear. Here you can define the maximum allowed packets per second (pps) and/or bits per second (bps) for a specific protocol. This applies per IP or per subnet (see the tabs) in the prefix.
If you set a threshold in the per IP tab for the IP protocol to 10k (pps), each IP address in that subnet can send up to 10k packets per second before an attack is detected. If any IP address exceeds that limit, an attack will be detected and mitigation rules will be generated for that IP address only.
If you set a threshold in the per subnet tab for the IP protocol to 100k (pps), the total traffic for all IP addresses in that prefix can be up to 100k packets per second before an attack is detected. If the total traffic for that prefix exceeds that limit, an attack will be detected. In this case, LiveShield will try to find the smallest possible subnet inside the prefix to match all attacked IP addresses and therefore reduce collateral damage. If the attack is distributed across the whole prefix, LiveShield will have to cut all traffic for that prefix. In the prefix settings, you can configure Maximum subnet count and Maximum mask to limit how many subnets can be generated for a subnet attack and how small these subnets can be. See prefix configuration for details.
Note
You can set different protocols and thresholds for per IP and per subnet detection. If you won’t configure threshold for per subnet detection, no carpet bomb attacks will be detected!

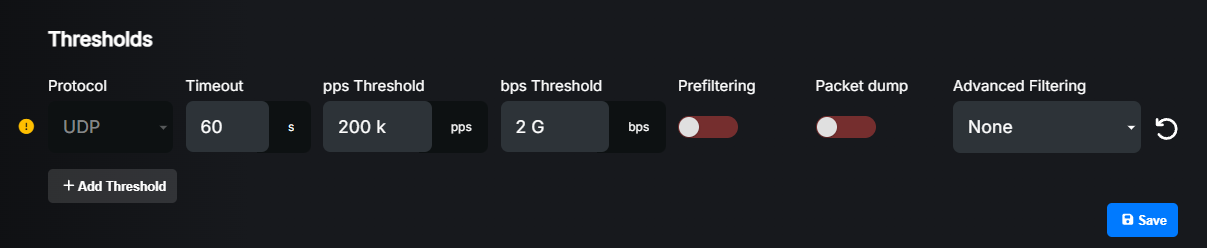
Settings explained:
Protocol: Select protocol for which you want to define threshold.
Timeout: How long (in seconds) any rule generated by this threshold should stay active after the attack is over. If this exceeds the “Maximum timeout” defined for the prefix, the global prefix timeout will be used instead. A value of 0 means rules will be removed immediately after the attack is over. We recommend setting it to at least 30 seconds.
pps Threshold: Packets per second threshold. If the traffic for the selected protocol exceeds this value, an attack will be detected. Set to 0 to disable pps based detection.
bps Threshold: Bits per second threshold. If the traffic for the selected protocol exceeds this value, an attack will be detected. Set to 0 to disable bps based detection.
Prefiltering: After an attack is detected, LiveShield can immediately apply typical rules for the selected protocol to mitigate the attack while it is still gathering more data to create more precise rules. This increases mitigation speed and it’s recommended for typical DDoS protocols like NTP, DNS, CHARGEN, SSDP, SNMP, IPFRAG, etc. However if you enable it for the IP protocol, it will cut IP traffic completely. So be aware before enabling it for useful protocols like IP, UDP, TCP etc. In that case you may want to configure Advanced Filtering instead.
Packet dump: If enabled, LiveShield will capture packets matching this threshold when an attack is detected. The number of packets captured is defined by the “Dump packet count” setting in the prefix configuration. Captured packets can be used for further analysis.
Advanced filtering: Here you can select an advanced filtering profile. It is recommended for useful, more general protocols like TCP and UDP. For more details please refer to Advanced Filtering section.
Hint
You can use “k”, “M” and “G” suffixes when entering pps and bps values. For example, entering “10k” will be interpreted as 10,000.
Supported protocols:
IP: All IP traffic
IPFRAG: Fragmented IP packets
TCP: All TCP traffic
TCP-SYN: TCP SYN packets
UDP: All UDP traffic
DNS: DNS traffic (non fragmented)
NTP: NTP traffic (non fragmented)
SSDP: SSDP traffic (non fragmented)
CHARGEN: CHARGEN traffic (non fragmented)
SNMP: SNMP traffic (non fragmented)
INVALID: Invalid packets. Just for detection purposes, no rules will be generated for this protocol. Invalid packets should be dropped by default at your network edge.
HTTP: HTTP traffic incoming on port 80. Unencrypted traffic only.
RDP: RDP traffic (non fragmented)
ICMP: ICMP traffic, all types. Applies also to ICMPv6.
CLDAP: CLDAP traffic (non fragmented)
UDP_SMALL: Small UDP packets (<= 1 byte of UDP payload). Highly recommended to enable prefiltering for this protocol.
MEMCACHED: Memcached traffic (non fragmented)
WSD: WSD traffic (non fragmented)
IPSEC_UDP: IPsec UDP traffic (non fragmented). Port 500 and 4500 NAT-T.
SIP: SIP traffic (non fragmented)
VXWORKS: VxWorks traffic (non fragmented). Used in reflection attacks.
DVR_DHCPDISCOVER: DVR DHCPDISCOVER traffic (non fragmented). Used in reflection attacks.
Hint
We recommend enabling prefiltering for typical often abused protocols: ICMP, NTP, DNS, CHARGEN, SSDP, SNMP, RDP, CLDAP, UDP_SMALL, MEMCACHED, WSD, VXWORKS and DVR_DHCPDISCOVER to improve mitigation speed.
If you use one of these protocols for legitimate high-volume traffic, please add another more specific prefix entry with different thresholds and/or prefiltering disabled for that protocol. In that case you might still want to use Advanced Filtering to protect against attacks while allowing legitimate traffic.
For protocols like TCP and UDP we recommend using Advanced Filtering instead of prefiltering. This is to avoid cutting all TCP or UDP traffic completely during an attack.
In general, thresholds and protocols should be selected based on services and traffic running on particular IPs in your network. You can create more specific prefix entries with different thresholds. For example, if you run public HTTP server on IP 192.168.100.10, you probably don’t want to enable prefiltering for HTTP protocol and probably you want higher thresholds. You can then create new prefix 192.168.100.10/32 and configure it differently than 192.168.100.0/24.
Hint
Most specific prefix always takes precedence in filtering rules. Just like in normal routing.
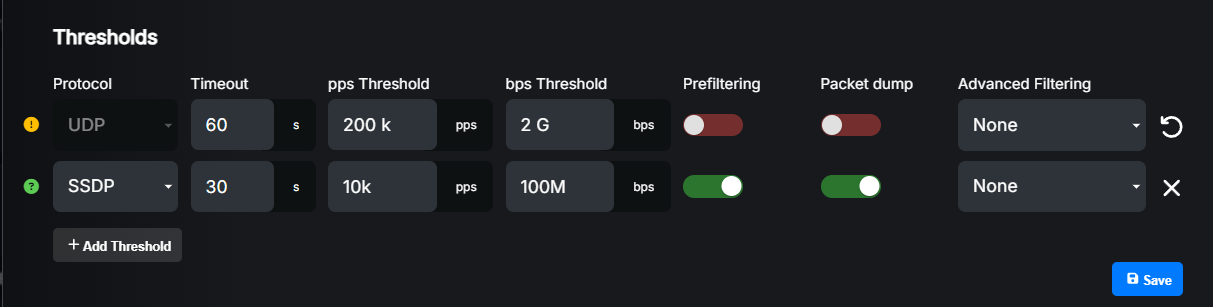
Example of thresholds configuration for prefix:
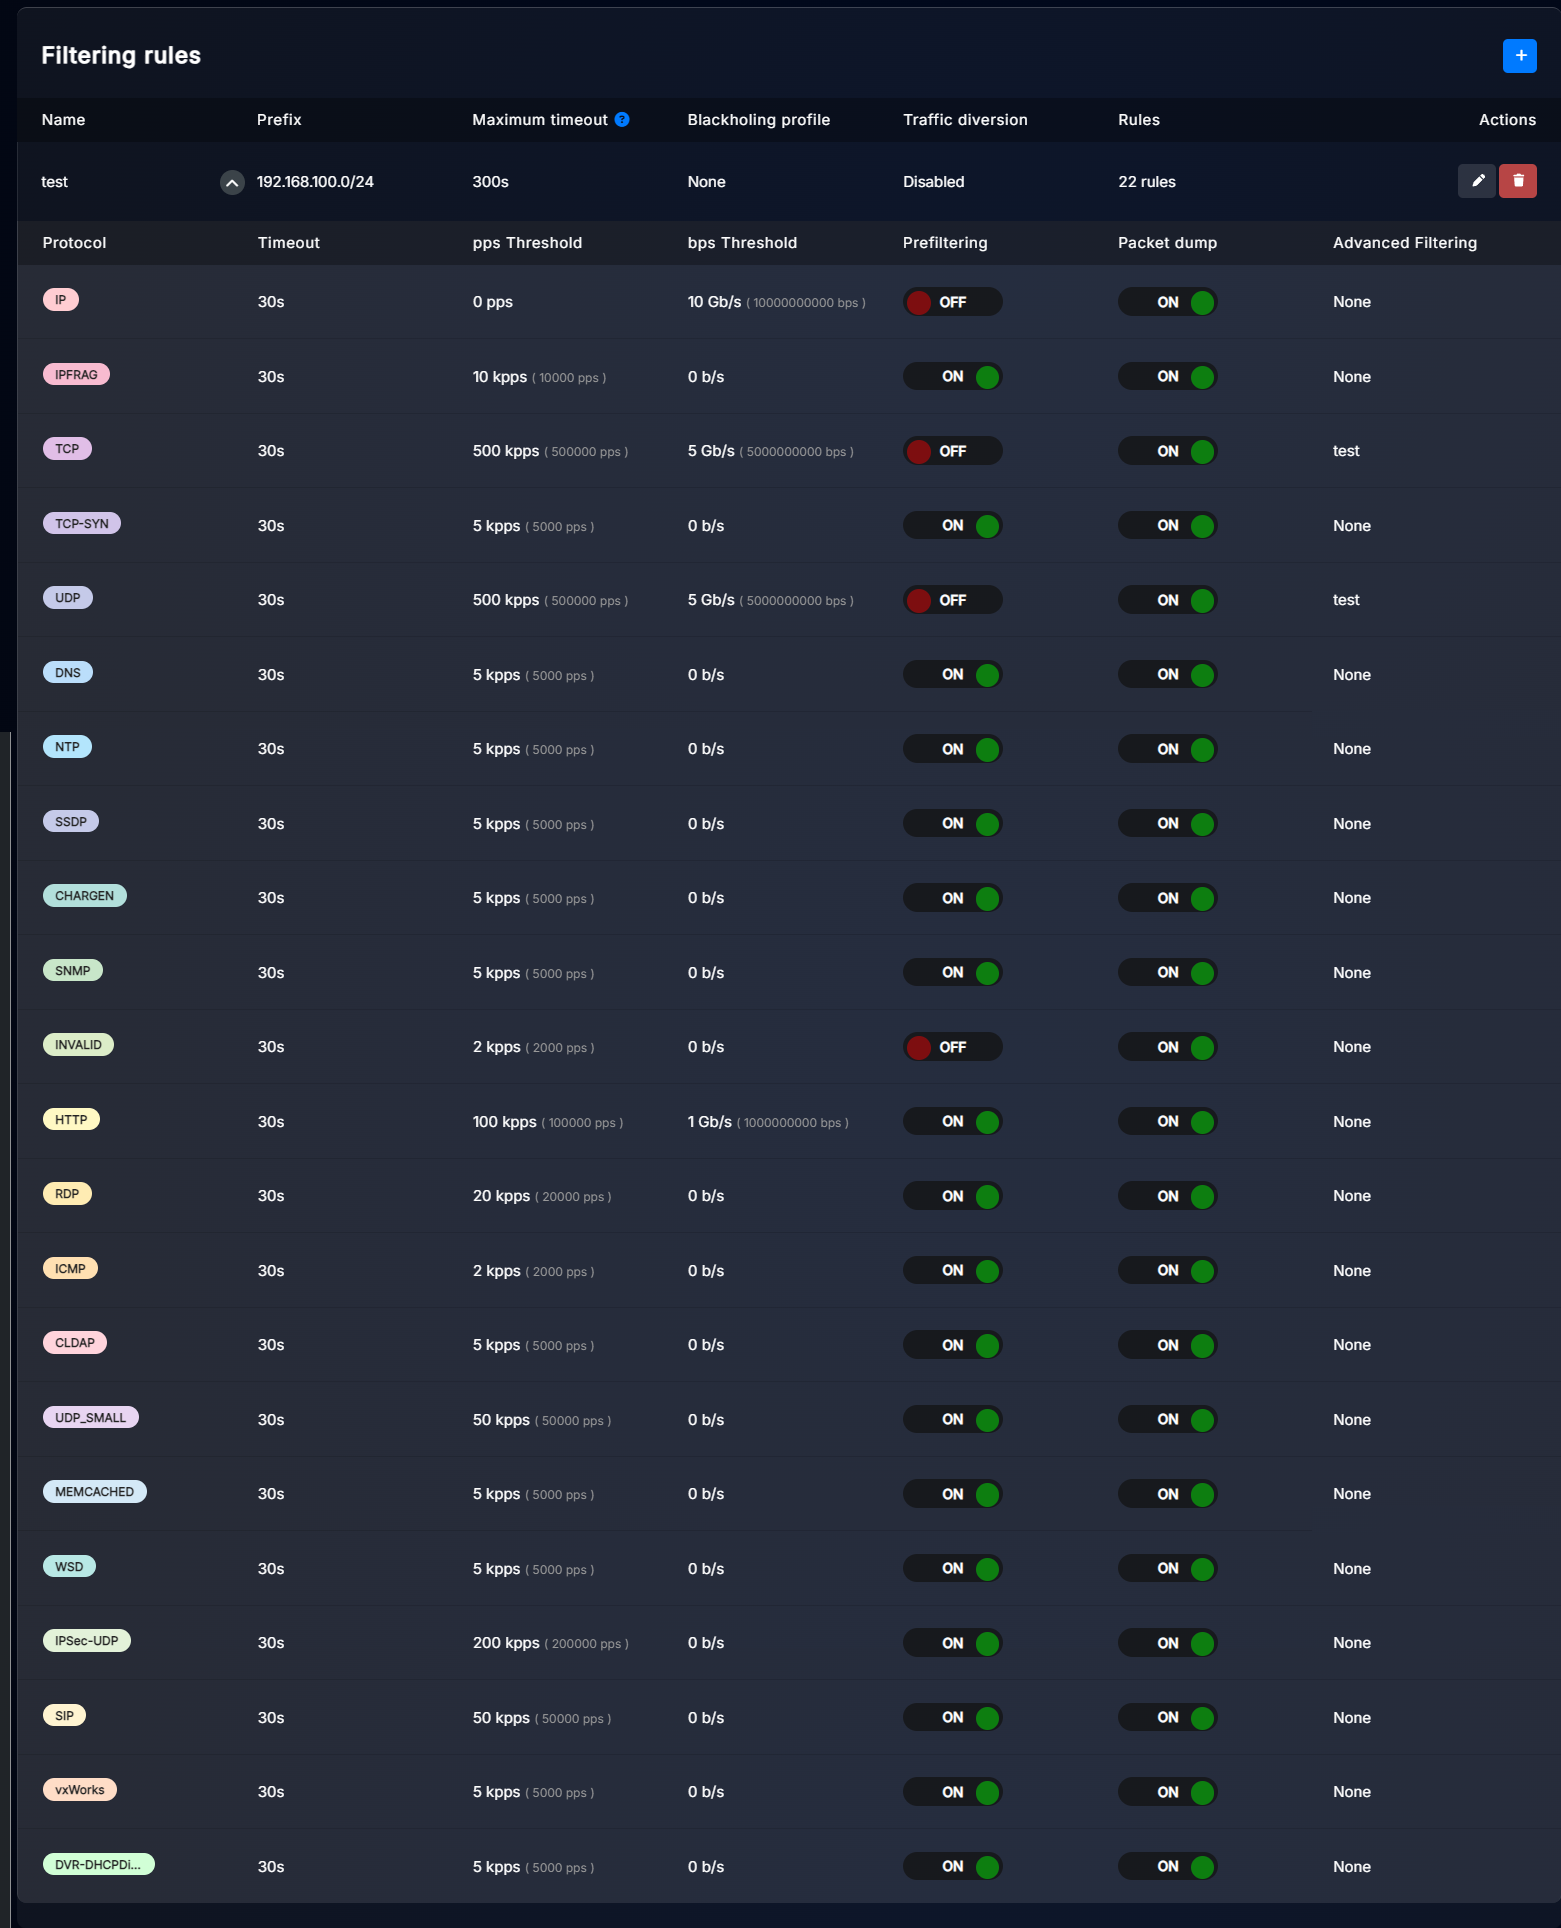
As you see, we have defined multiple thresholds for different protocols.
We configured IP protocol with 10Gbps thresholds and enabled packet dump, just to detect abnormal traffic spikes.
Then we set IPFRAG to 10kpps, because in properly configured network, fragmentation shouldn’t occur.
For TCP we set 5Gbps, 500kpps and enabled advanced filtering rather than prefiltering, because we don’t want to cut all TCP traffic during an attack. We prefer more precise filtering based on pattern learning.
For TCP-SYN we set 5kpps because we don’t host any service there. This IP range is for residential customers. So in this case we can easily set low value and enable prefiltering to cut TCP-SYN completely.
For UDP we set 500kpps and 5Gbps with advanced filtering again, to avoid cutting all UDP traffic.
Because we don’t host any NTP, DNS we set just 5kpps with prefiltering enabled to cut that traffic immediately when an attack is detected. We did same for other well-known abused protocols.
Because ICMP is not that important for us, we set low threshold of 2kpps with prefiltering enabled, so that during an ICMP flood, ICMP traffic will be filtered.
Because we don’t officially host any HTTP servers in this prefix, we set a threshold of 100kpps, 1Gbps with prefiltering enabled. This doesn’t count HTTPS traffic and client originated web traffic.
For RDP we set limit a little bit higher to 20kpps, because some of our customers use RDP heavily.
UDP_SMALL is set to 50kpps with prefiltering enabled, because 0-1 byte UDP packets are rarely used in legitimate traffic and such small packets are often abused in dense DDoS attacks. Quick spike of thousands of small UDP packets may cause network devices to overload due to high packet rate, even if total bandwidth is low.
For SIP protocol we set 50kpps because some customers might use VoIP. We enabled prefiltering to cut SIP traffic once exceeded but you can also use advanced filtering if you want more slower but precise mitigation.
For all protocols we enabled packet dump, so that when an attack is detected, we can later analyze captured packets to improve our defenses.
Important
Please keep in mind that these values are just examples. You should adjust thresholds according to your network traffic profile and services you run.
If you are configuring it for the first time, we recommend disabling all prefiltering and advanced filtering at first, just to monitor your traffic and see if any false-positive attacks are detected. You can then adjust thresholds and gradually enable prefiltering and advanced filtering. Another option is to disable FlowSpec rule import on your BGP routers at the beginning.
Subnet aggregation#
Although you can configure per-subnet thresholds, it is still possible for an attack to be distributed across multiple IPs without exceeding the subnet thresholds. For this reason, LiveShield introduces automatic subnet aggregation. When an attack is detected on multiple IPs within the same subnet, subnet overthresholds will be automatically triggered.
To enable this feature, you need to define subnet settings in the prefix or template configuration.
Settings explained:
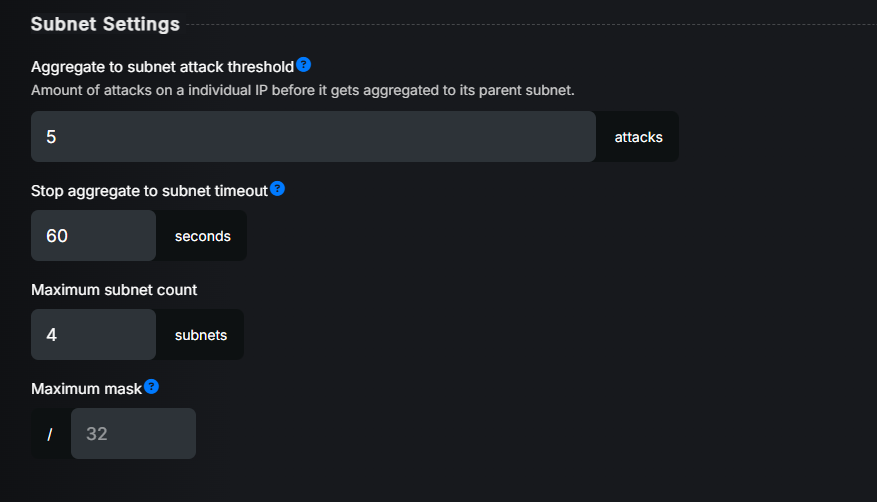
Aggregate to subnet attack thresholds: This is the main setting to enable subnet aggregation. Here you can define the number of attacks on individual IPs that will trigger automatic subnet attack detection. Setting it to 5 means that if 5 per-IP attacks are detected in this prefix, automatic subnet attack detection will be activated.
Stop aggregate to subnet timeout: After a subnet attack is detected, LiveShield will stop detecting per-IP attacks in this prefix until the subnet attack is over. Here you can define how long after the subnet attack ends, per-IP attack detection will be enabled again. Setting it to 300 means that per-IP attack detection will not be enabled until 5 minutes after the subnet attack ends.
Maximum subnet count: If a subnet attack is detected, LiveShield will try to divide the prefix into smaller subnets (as small as possible, according to the attacked IPs). This setting defines the maximum number of subnets that can be generated for a subnet attack in this prefix.
Maximum mask: If a subnet attack is detected, LiveShield will try to divide the prefix into smaller subnets (as small as possible, according to the attacked IPs). This setting defines the maximum mask for these smaller subnets.
Important
It is necessary to have per-subnet thresholds and actions configured for automatic subnet aggregation to work. If you do not configure per-subnet thresholds, once the number of per-IP attacks reaches the defined limit, all per-IP attacks will expire and nothing more will happen!
How it works in practice:
UDP, DNS, and IPFRAG thresholds are configured per-IP and set to 10k pps. For per-subnet thresholds, only DNS and IPFRAG are configured with 200k pps.
A DNS reflection attack is launched on 192.168.100.1-10 IPs with 15k pps IPFRAG and DNS.
The first 5 IPs will trigger per-IP thresholds and start mitigation for these IPs.
Because Aggregate to subnet attack thresholds is set to 5, once 5 per-IP attacks are detected, subnet attack will be automatically triggered, even if it does not exceed any per-subnet thresholds.
Because only IPFRAG and DNS thresholds are configured in the per-subnet tab, only these protocols will be marked as detected. Actions will be taken from their settings in the per-subnet tab.
LiveShield will try to find the smallest possible subnet to match all attacked IPs. In this case, it will be 192.168.100.0/28. Please remember the Maximum subnet count and Maximum mask settings, which can limit how small the subnet can be and how many subnets can be generated for a subnet attack.
All per-IP attacks will expire as the subnet attack is now detected and mitigation should be applied (once any action in the per-subnet tab is configured).
No more per-IP attacks will be detected until the subnet attack is over and the defined timeout in Stop aggregate to subnet timeout has passed.
If the attack IP range changes, LiveShield may dynamically change the mask or add/change the detected subnet.
Hint
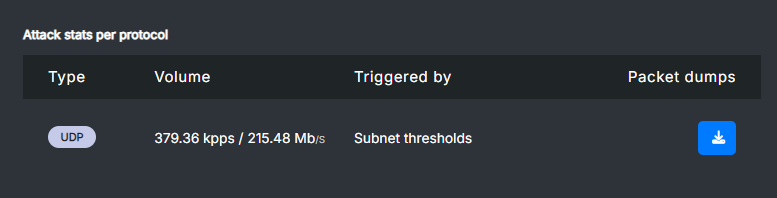
In the attack detail, you can see if a specific protocol is detected by the per-subnet or per-IP threshold.
Templates#
To simplify configuration, you can create templates with predefined thresholds and other prefix settings. You can then apply these templates to multiple prefixes, so you don’t have to configure everything from scratch for each prefix. It is also possible to override some settings for a specific prefix, even if you apply a template to it.
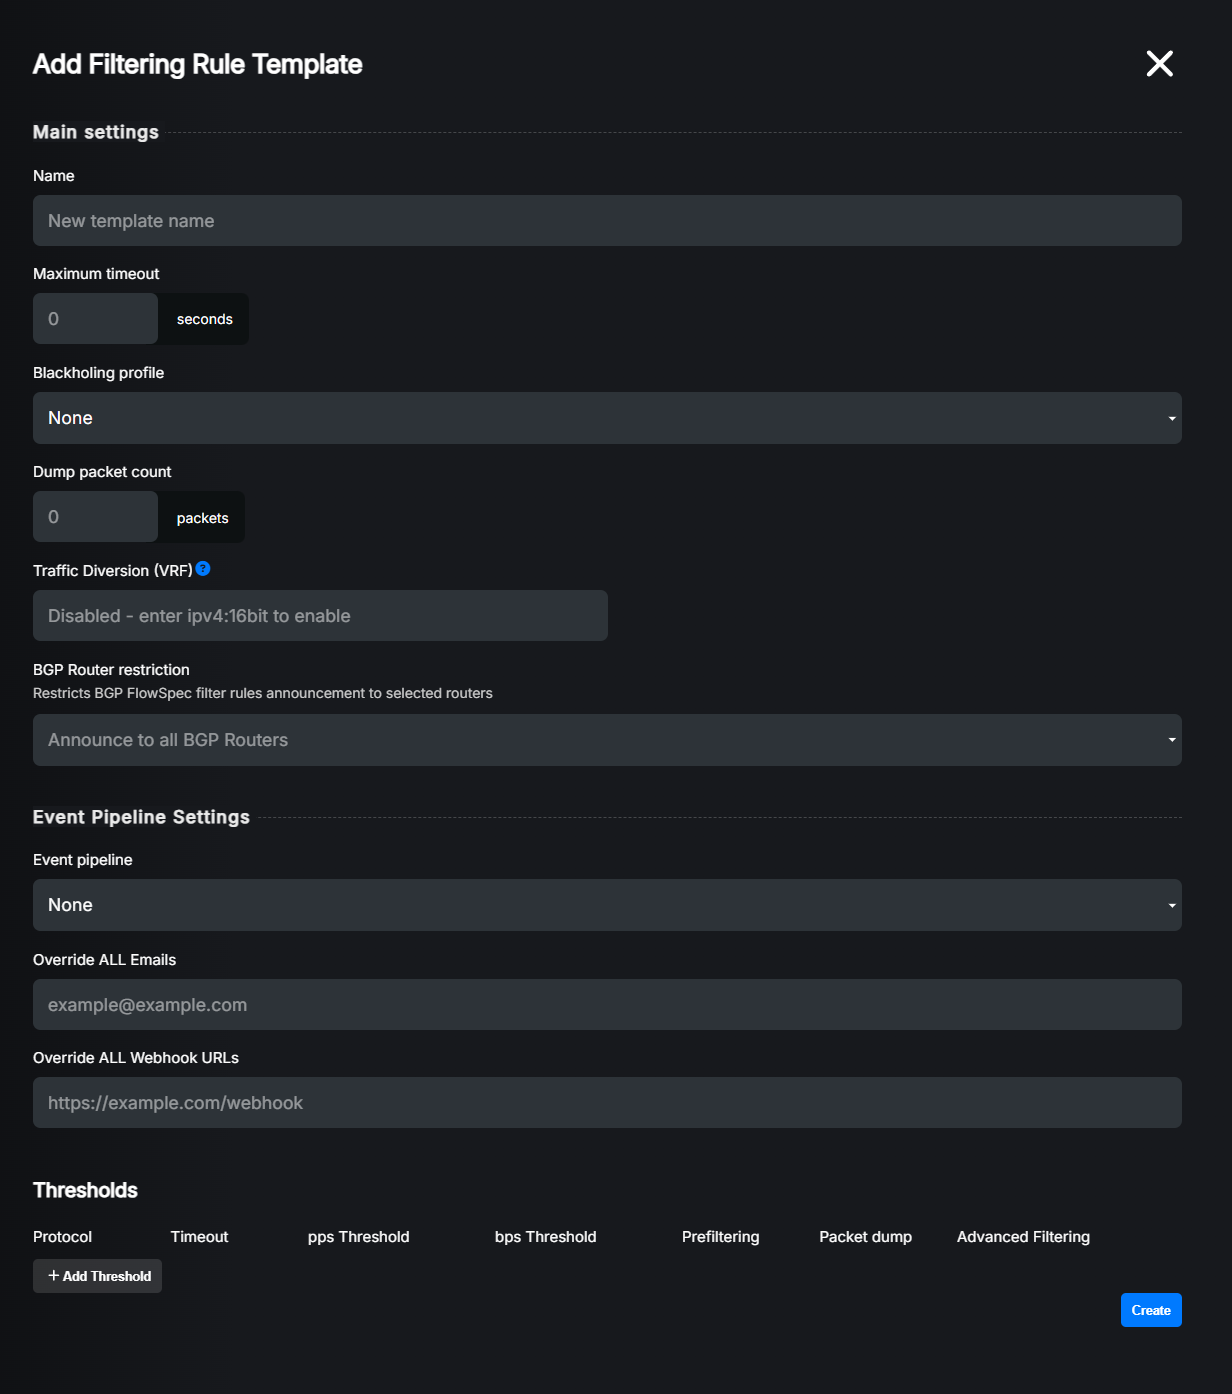
Go to the Filtering menu option, then locate the Filtering Rule Templates section and click the “+” button to add a new template.
The configuration is exactly the same as for prefixes, except that there is no Prefix field. The Name field can be left blank; LiveShield will then generate one automatically.
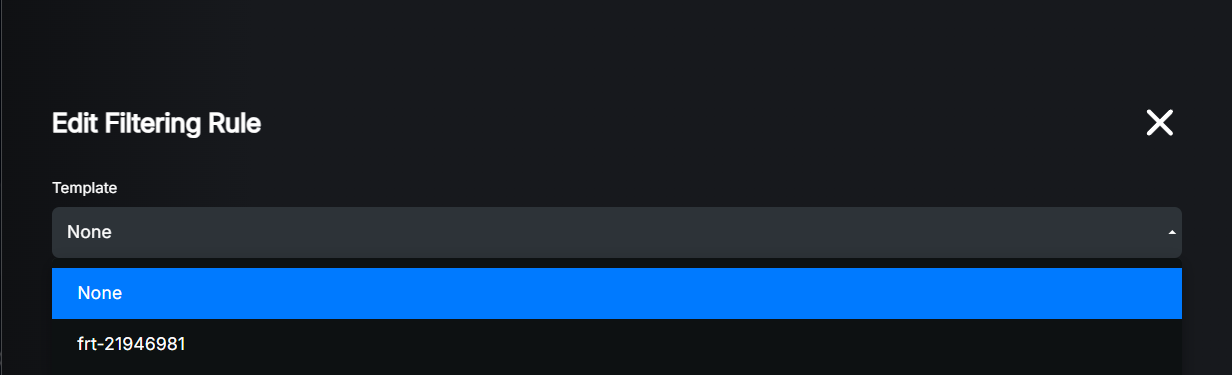
After successfully adding a template, you can apply it to any prefix during edit or creation. Click the edit button for an existing prefix or create a new one, then select the template from the dropdown.
You’ll see that all settings from the template are now applied to the prefix. Threshold protocols imported from the template will be greyed out. You cannot delete them, but you can override their settings.
After overriding some settings, you should see a yellow warning icon next to the field.
Hint
If you want to reset overridden settings back to the template defaults, just click the revert button next to the field (on the right side).
If you add any new thresholds that are not defined in the template, you’ll see a green icon next to the field.